
Create a New Inventory Item
Adding a New Item
Creating a new item in Gojee is easy. You can quickly create tracked or untracked inventory items, and then start using these in your business processes.
This article will show you how to create a new inventory item manually in Gojee.
Note: to import bulk inventory items refer to Importing and Exporting Data.
Inventory Item Creation
To manually create a new item, follow these steps:
- Click on Inventory & Assets from the Dashboard, then select Add a New Inventory Item. The following modal will be shown.

Enter the details of the inventory item:
- Name (*Required field): Enter the name of the item.
- Item Code (*Required field): Enter an item code. This could be the same as the supplier's SKU, or your own business's code. The item code needs to be unique, i.e. you can't have two items with the same item code.
- Description: This is an extended description of the item.
- UoM: Choose the applicable unit of measure from the dropdown list.
Note: If you need a UoM that's not in the dropdown list, contact our support team and we can get it added in for you. The Unit of Measure selection is mostly for internal use and categorisation purposes, but it does affect formatting of numbers and whether or not they can be fractional or must be whole.
-
Stock Type: You can choose from three different stock types by clicking on the dropdown.
- Untracked: Select this if you do not need to track the quantity of the item. This item can be used on jobs as if it was an unlimited resource.
- Tracked per Instance: Select this if you want to track individual items that will have their own unique serial numbers. A mobile phone would be a good candidate for this option. Generally you would select this option when its important to keep track of items at an individual level.
- Tracked as Aggregate Quantity: Select this if you want to track the quantities of the item, but not at an individual level. I.e. a box of bolts would be a good candidate for this option. Each unit of this item will not have its own unique serial number.
-
Cost per Unit: Enter the cost for the item, i.e. what you pay your suppliers.
Note: For tracked items, the initial cost per unit can be set - but once the item has been purchased this field will be locked. The system will calculate the cost per unit based off an average cost of the stock on hand. For untracked items, this field will be editable at all times. You can do stock adjustments to manually change the cost of tracked items with purchase history.
Pricing and Location
- Price per Unit: The sale price of the item, i.e. the price you will charge your customers.
- Markup %: This field is either calculated based off the price and cost, or can be specifically set and used to calculate the price (see details below).
- Set Price by Markup on Cost: If this option is ticked, then the price of the item will be updated whenever the cost is updated by applying the markup % to the cost. If it's not ticked, then the price will be static and not change when the cost of the item is updated.
- Default Location: Choose the default location this item is physically stored.
Note: This field sets only the default location. Items can be stored in more than one location, and all items are tracked against location and moved from one location to another as required. Refer to View and edit inventory items for more information.
Related Financial Accounts
- Expense Account: This is the general ledger account in Xero that will be used to post cost transactions directly into Xero. Only cost accounts from the PnL will be available for selection here.
Note: If you have recently created a new general ledger account in Xero and it doesn’t show in the list, simply sync Gojee with Xero. Refer to the Settings Knowledge Base page for more information. There is an automatic sync that happens daily to update this information.
Note: Gojee will post cost transactions for tracked items through to Xero when an item is consumed onto a job. Refer to this link for more information Recording Consumables. The transaction will expense the value of the inventory item consumed from the asset account, and this will happen at the time the item is consumed.
- Sales Account: This is the general ledger account in Xero that will be used to post sales transactions directly into Xero. Only sales accounts from the PnL will be available for selection here.
Note: Gojee will post sales transactions for tracked items through to Xero when an item is invoiced from Gojee. Refer to the Invoicing section for more information.
- Inventory Asset Account (tracked items only): This is the general ledger account in Xero that will be used to store the value of the inventory that is on hand. Only relevant accounts from the Balance Sheet will be available for selection here.
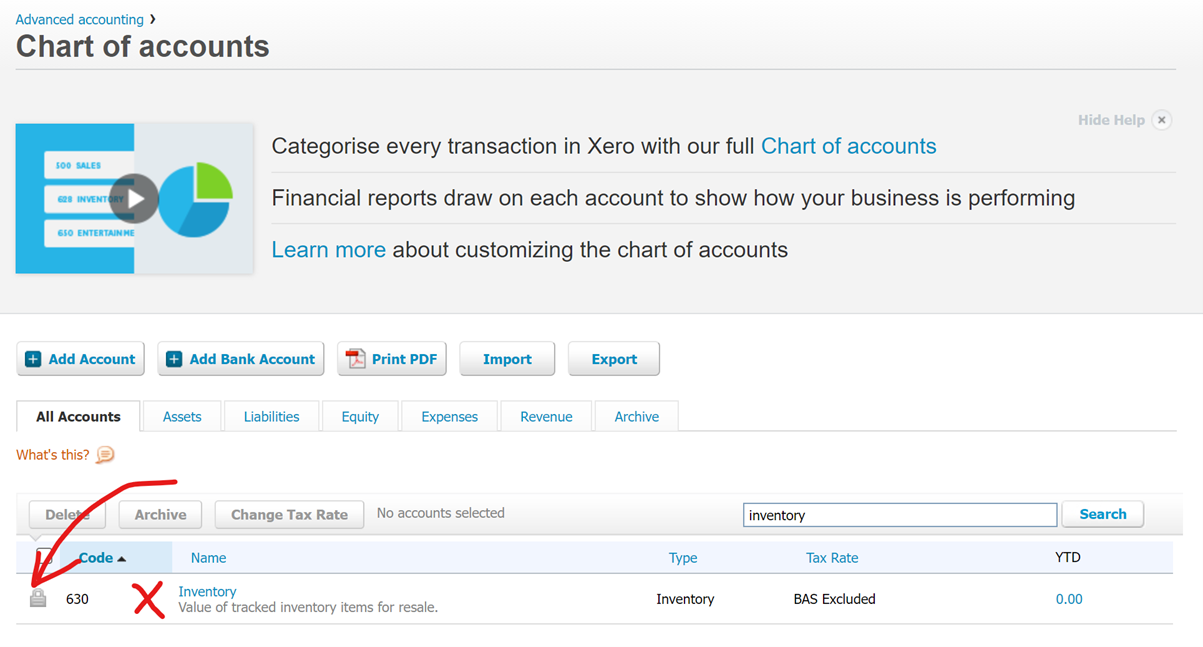
Note: You cannot select a locked inventory account in Xero for this field as Xero will not allow Gojee to post transactions to a locked account (see image below for an example of a locked account in Xero). It is recommended that you create a new general ledger account of type CURRENT ASSET in Xero first, and select this account in this field. For information on creating a new account in Xero, go to Xero Central and once you've finished setting up the account, navigate to My Account in Gojee to Sync the newly created account into Gojee.
Quote/Estimate Blurb
- Invoice/Quote Description: This field is used to set a customer facing description of your items. If this field is set, then the description of the item on Invoices and quotes will use this description by default.
- Hidden on Quotes/Visible on Quote: This toggle allows you to choose whether this item will be shown by default on quotes. The default for this toggle will be driven off the organisation settings, but it can also be changed here at an individual item level.
Note: For each quote you can change what level of detail is showed for each item, this setting will provide a default starting point for each quote. Refer to the Quotes & Estimates section for more information.
Once you're done, hit the Create button and your item will be created. You will be able to view the item in the inventory list page found under Inventory & Assets > View/Edit Inventory Items.