
Job Actions
Introduction
Job actions are available for users to be able to record different actions against any active job. Each Job Action has its own icon to make it easy to tell at a glance what each does.
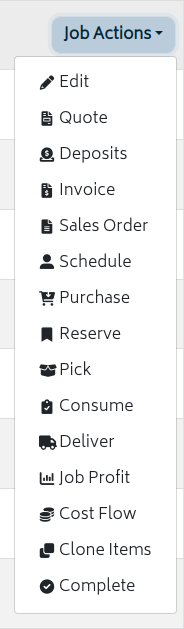
Job Actions can be accessed in two ways:
- From the Job Actions button on the Job List Page:
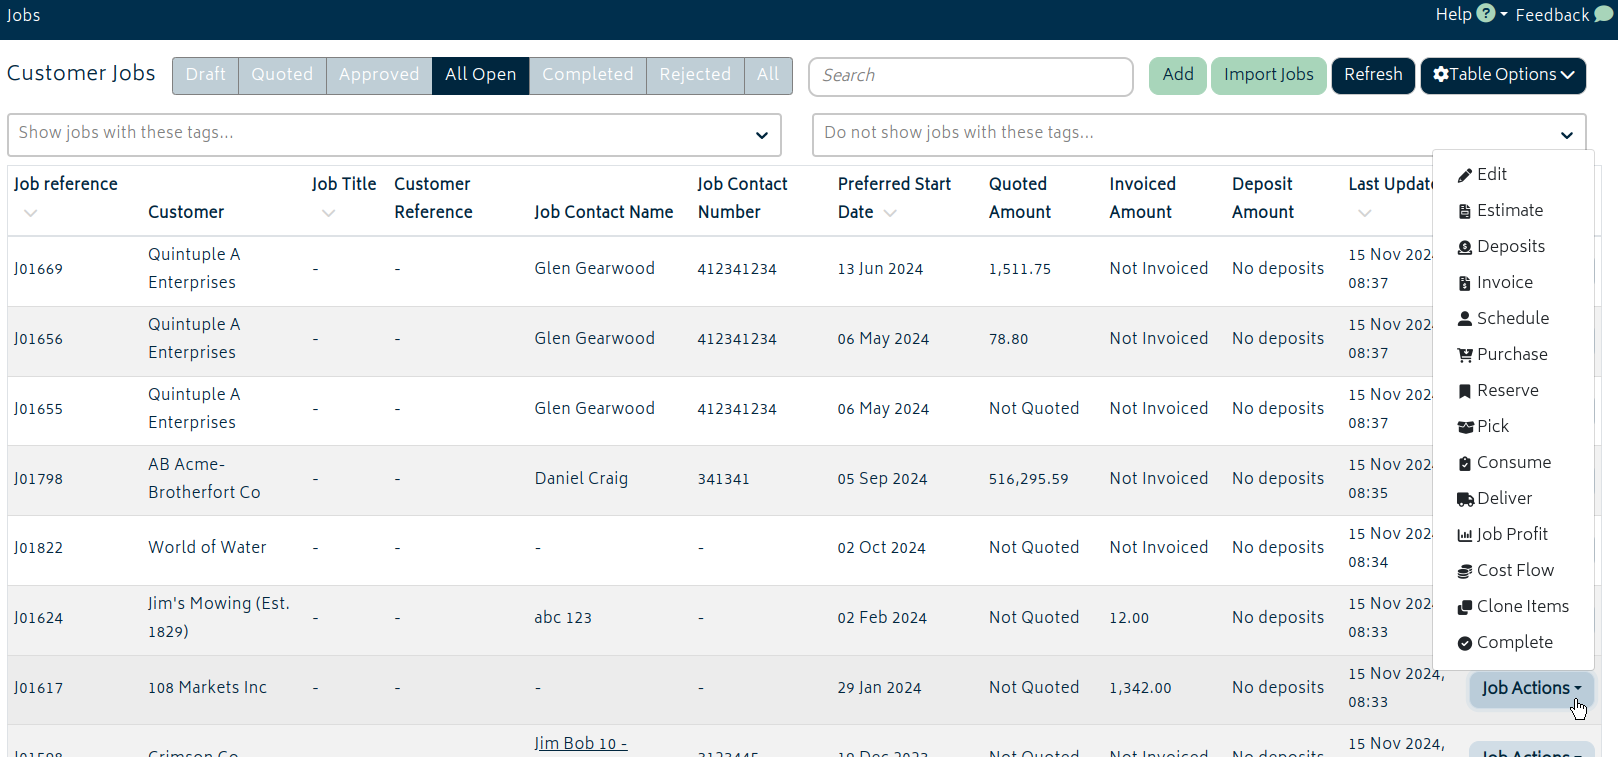
- Or from the navigation "Breadcrumb" section from within a job at the top of the page:

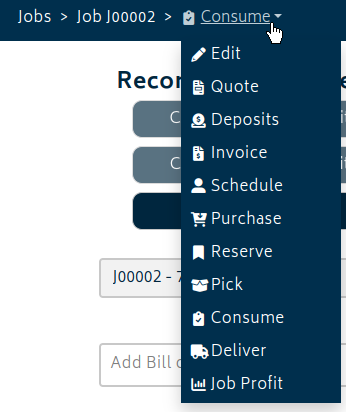
For mobile or narrow screens, the breadcrumb Job Action section will become a dropdown to save space:
> Edit
Note: If a user navigates away from the job page without clicking “Save” no change will be saved. It is important for users to hit “Save” before navigating away from the job page.
Editing jobs allows you to update or change job information after it has been created.
Clicking “Edit Job” navigates customers to the job creation page:
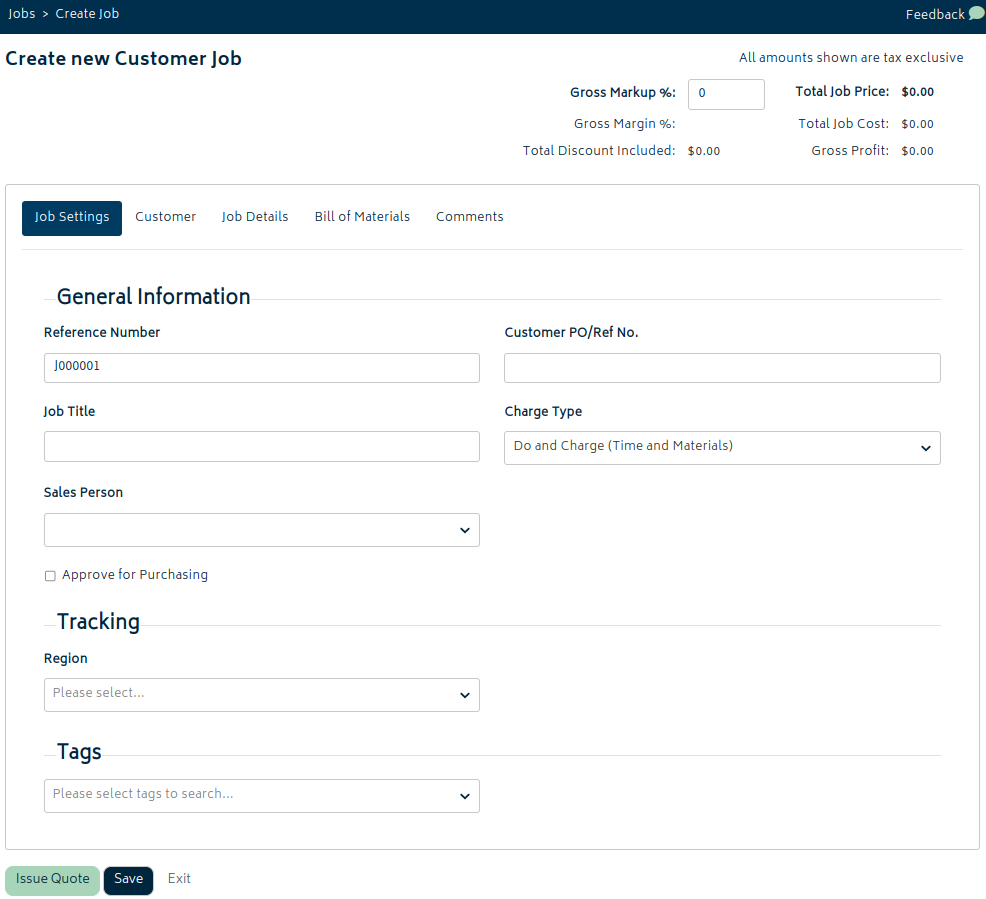
Refer to the Create a Job section for more information on the job fields.
When editing a job, all parts of the job can be updated in most cases, with some exceptions – such as when the job budget is locked or after the job has been invoiced. Refer to the BOM section of the Create a Job page for more information on locking and unlocking a job budget.
> Quote/Estimate
From this page within the job, you can create and send quotes to your customers for this job. You can also view all the quotes / estimates that exist for the job. Refer to Quotes and Estimates for more information.
> Deposits
You can take a prepayment against any job in the system if your business requires. Refer to Deposits and Payments for more information.
> Invoice
This option allows you to create, view and manage all invoices against a particular job. You can also email the invoices out to the customer. Clicking invoices will display all created invoices for a job as below:
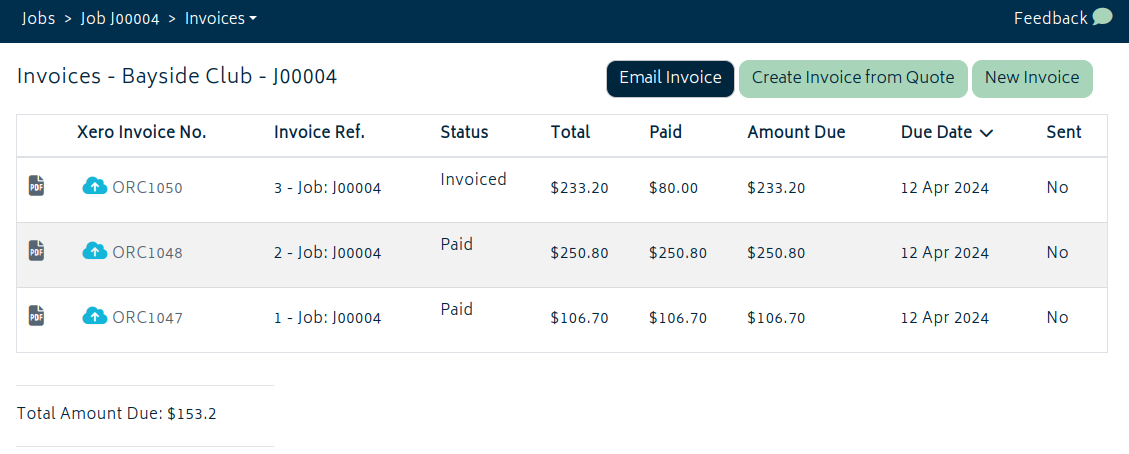
There are two standard methods for creating invoices.
New Invoice: This allows you to create a new invoice for a job. Refer to Invoicing section for more information.
- By default, an invoice created this way will contain the quantities of items that have been consumed via Record Consumables.
- It will refer to previous invoices to ensure that it is only invoicing item quantities that have changed since previous invoices.
- Note that invoices cannot have items with 0 quantity, so you must remove any 0-quantity items from the invoice.
Create Invoice from a Quote: This option allows you to create an invoice by copying all the information on a Quote/Estimate already created for a job. To learn more about Creating Quotes / Estimate refer to the Quotes and Estimates section.
- Using Create Invoice from a Quote replicates the invoice details based off your Quote/Estimate itself.
- If you hid any item’s price or quantity, or removed line items altogether, those will follow the structure of the quote. They won’t be displayed on the invoice.
Other methods of creating invoices can be enabled via Organisation Setup > Organisation Add-Ons. Please read the pages on Add-Ons for more information. These include:
Import Existing Invoice from Xero: If you have alternative workflows for invoices or have a job that was in progress prior to Gojee and you wish to import its paid/approved invoices, this allows you to import an already existing invoice for your job.

Create Retention or Progress Invoices: If your company uses progress claims, you can invoice a percentage of the final result or invoice from the retention amount. These will replace the standard invoice buttons for the job.

> Schedule
Allows you to schedule your staff members onto a particular job and record their timesheets against the job. You will need to have professions set on the job in order to use this. Refer to Scheduling for more information.
Note: In order to schedule a staff member onto a job, you must have the professions set up in Gojee.
> Purchase
This action allows users to raise Purchase Orders for the items required specifically for a job from Gojee.
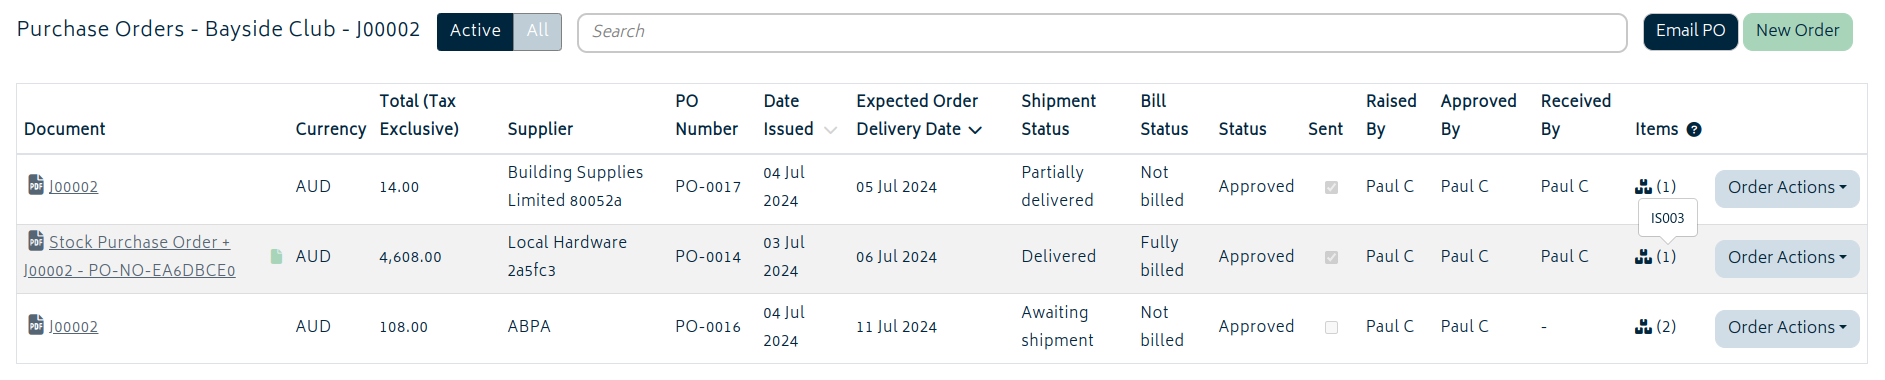
Using the "New Order" button will take you through to the PO creation screen and pull in all items for the job that are not already on order, reserved, or consumed onto the job. If suppliers have already been chosen through the BOM, raising a PO for that job via the Purchasing job action will use the chosen suppliers for that job.
Refer to the Job Stock Orders section for more information on the process of raising purchase orders.
POs can be sent directly to a supplier from Gojee via email. This can be done with either the "Order Actions" dropdown for a specific PO, or the "Email PO" button next to the New Order button.
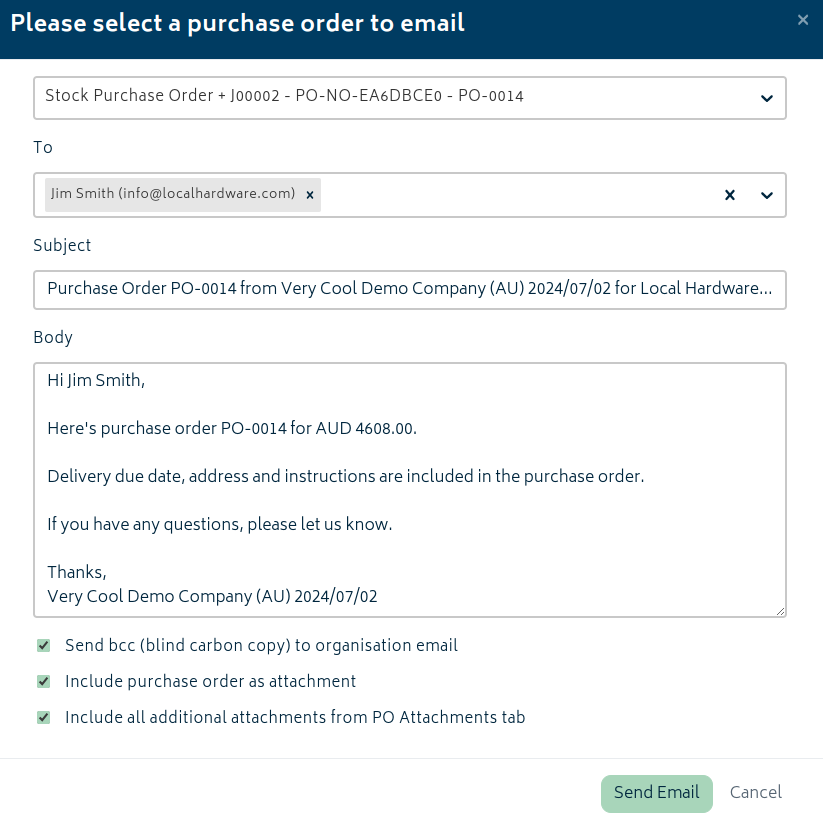
POs listed here can be edited if clicked, and attachments can be added to be sent to a supplier. If a PO has attachments, it will be noted as such with the green attachment icon.
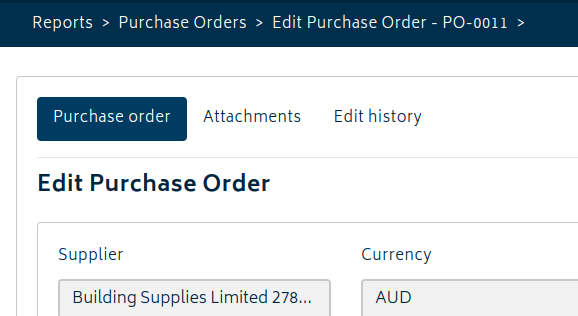
Note: There is a rough limit of 15-20mb of total attachments that can be sent in an email, due to the nature of email as a medium. More can be added to the PO after it is sent (for storage, as memos and records etc) but it is generally a good idea to not add more than 15mb total of attachments if they are to be sent with a PO.
> Reserve
Reservations allow you to reserve stock on hand for jobs. This means that these stock items will stay in stock, and on hand, but they wont be available for other jobs to consume or reserve. This section allows you to view and manage reservations for all items on a job.
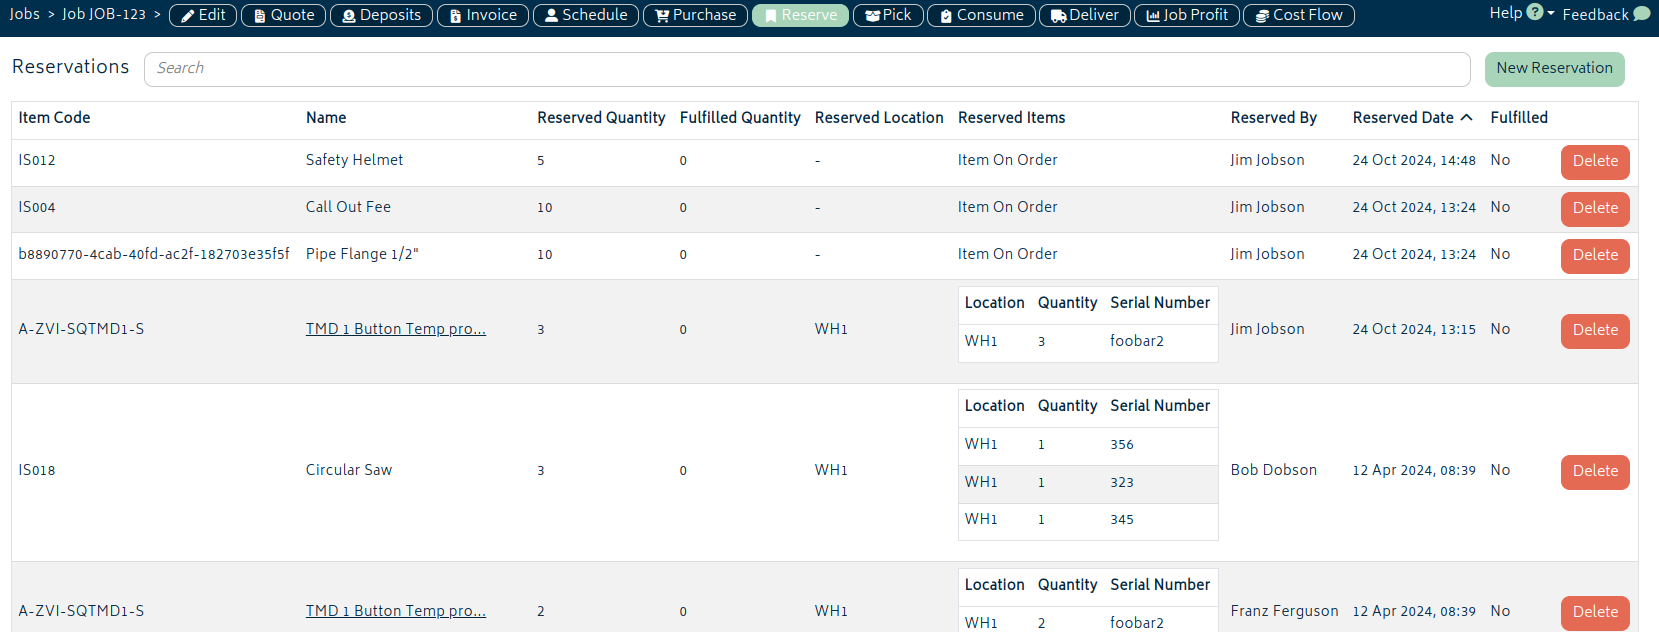
There are 4 main ways to create reservations for items:
-
Reserve all available items from the BOM
- This will reserve all items from stock that are not already earmarked for a job.
-
Create Purchase Orders for the job
- Reservations will automatically be created for these items.
- If they are not automatically consumed, they can wait at the location they are received with open reservations.
-
Create Picking Slips from the Pick job action
- As items are picked, they will be reserved. Picking allows for more manual control over the item-gathering process.
-
Manual reservations via this Reserve page
The reservations list will be blank if no reservations have been made already for the job. In the case where reservations have been made via a purchase order and have not yet been received, the items will show as "on order" as per the image above.
To create a manual reservation, click on the "New Reservation" button at the top right of the page and you will be directed to the following page:
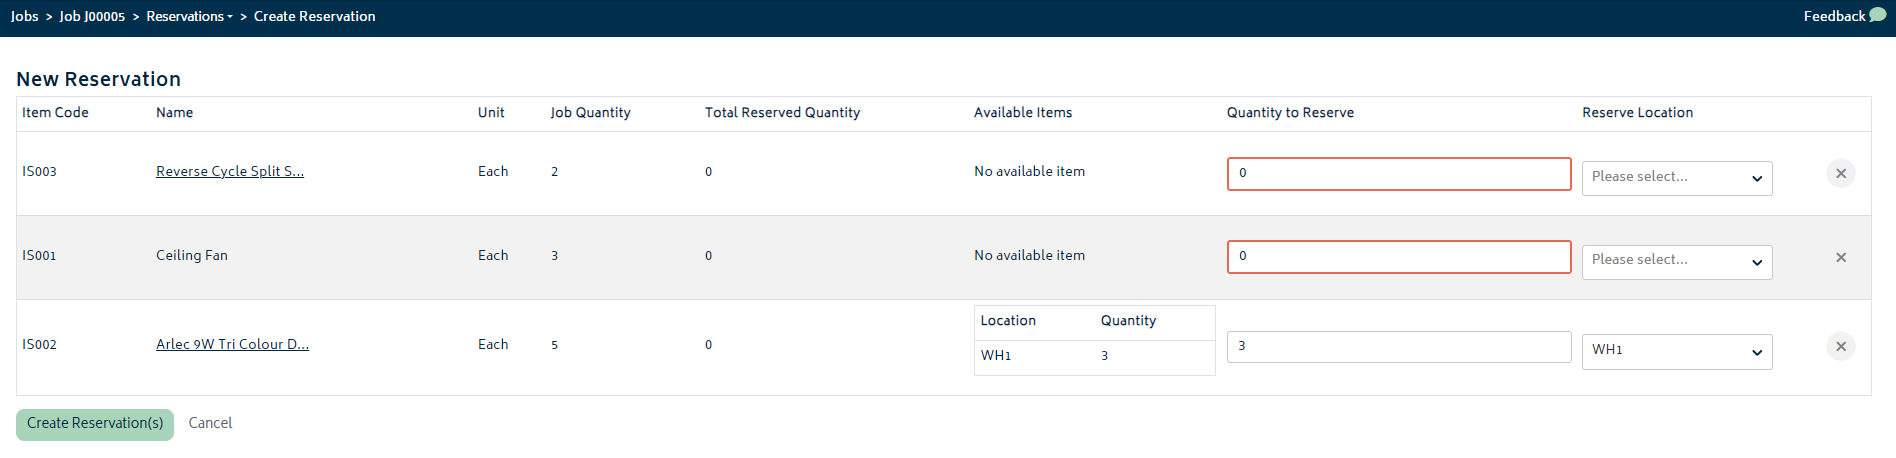
All of the stock items required on the job BOM page will show on this page. Refer to the "Available Items" column for information as to what stock is available to reserve and where. The "Quantity to Reserve" column will default to what's required for the job if the stock item is available. You can remove the lines that aren't available to reserve using the (x) icon at the end of the row. Doing this will result in the following information shown on the page:
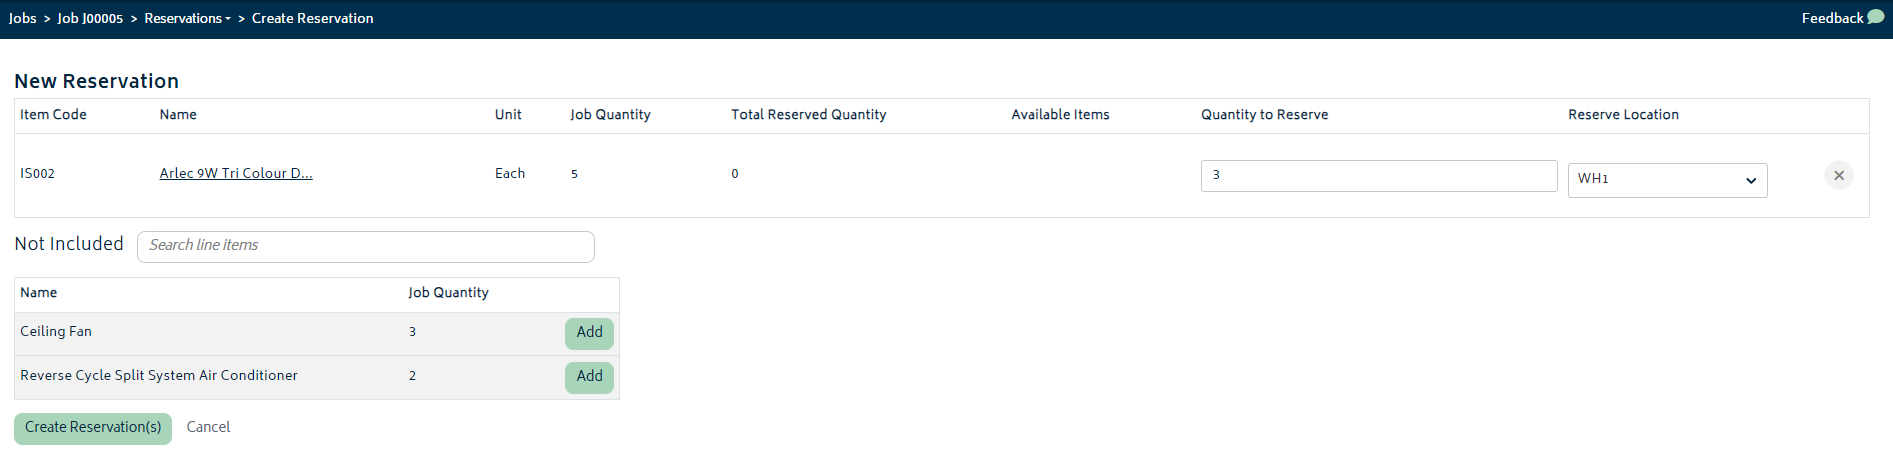
Be sure to select the location that you are reserving the stock from in the last column (as stock can exist in multiple locations) and then hit the create reservation(s) button. You will be directed back to the reservations list page for the job, showing the reservations that have been made:

Note: Once the items are reserved, you will need to consume them onto the job through the Record Consumables process. See below for details. You can either use the "Reserved Instances" option in the location dropdown or the "Consume all reserved items" button:
Once you have consumed the items onto the job from the Record Consumable process, the reservation will be updated as "Fulfilled" as per the image below:

> Pick
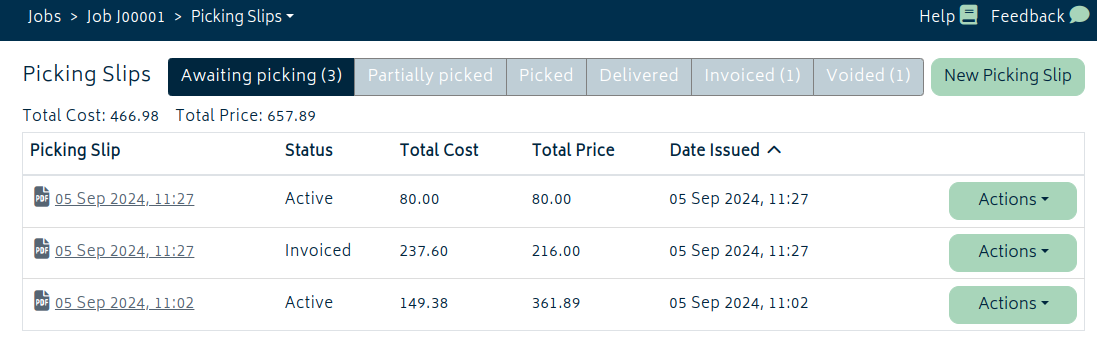
Selecting this option allows you to view and manage your picking slips. It will bring you to the picking slip screen, which will list all picking slips for this job and allow you to see the status of each. You can print picking slips to be used for your staff as a list of items to pick from wherever you have your inventory stored, and record each item on a slip as being picked or not.
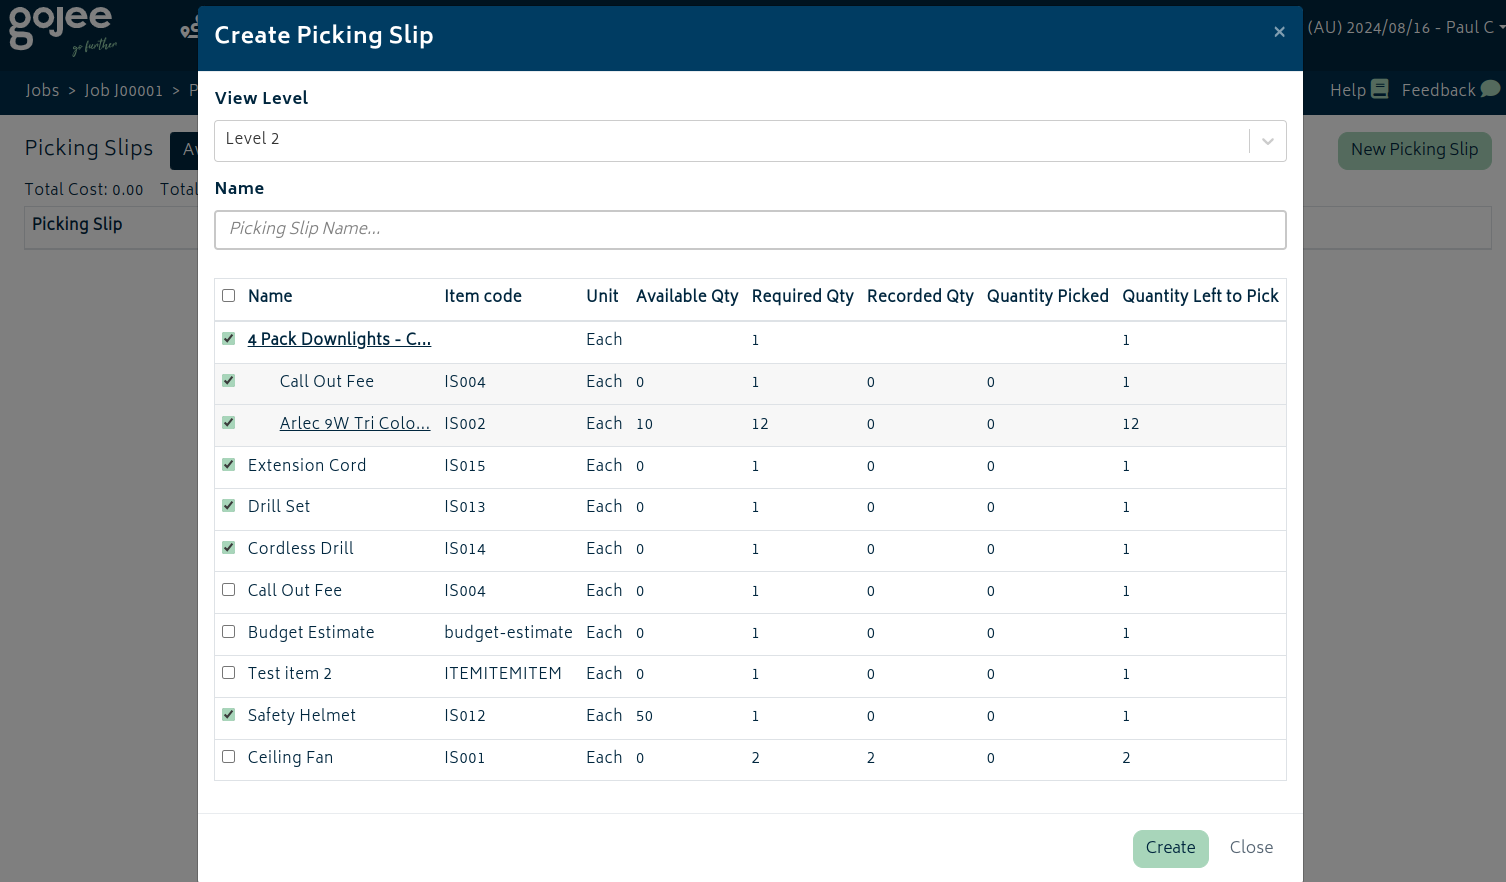
To create a picking slip, click the New Picking Slip button. You will be able to see a list of the items on your job and view them with templates fully expanded, partially expanded to specific depth levels, or flattened.
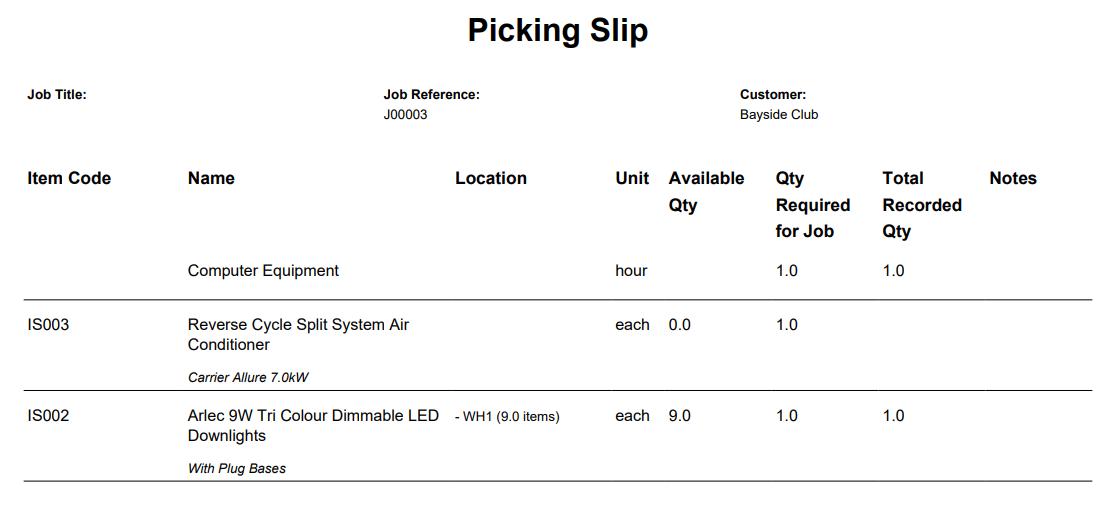
A Picking Slip PDF will be generated for printing, showing all the items for the job along with required and recorded quantity:
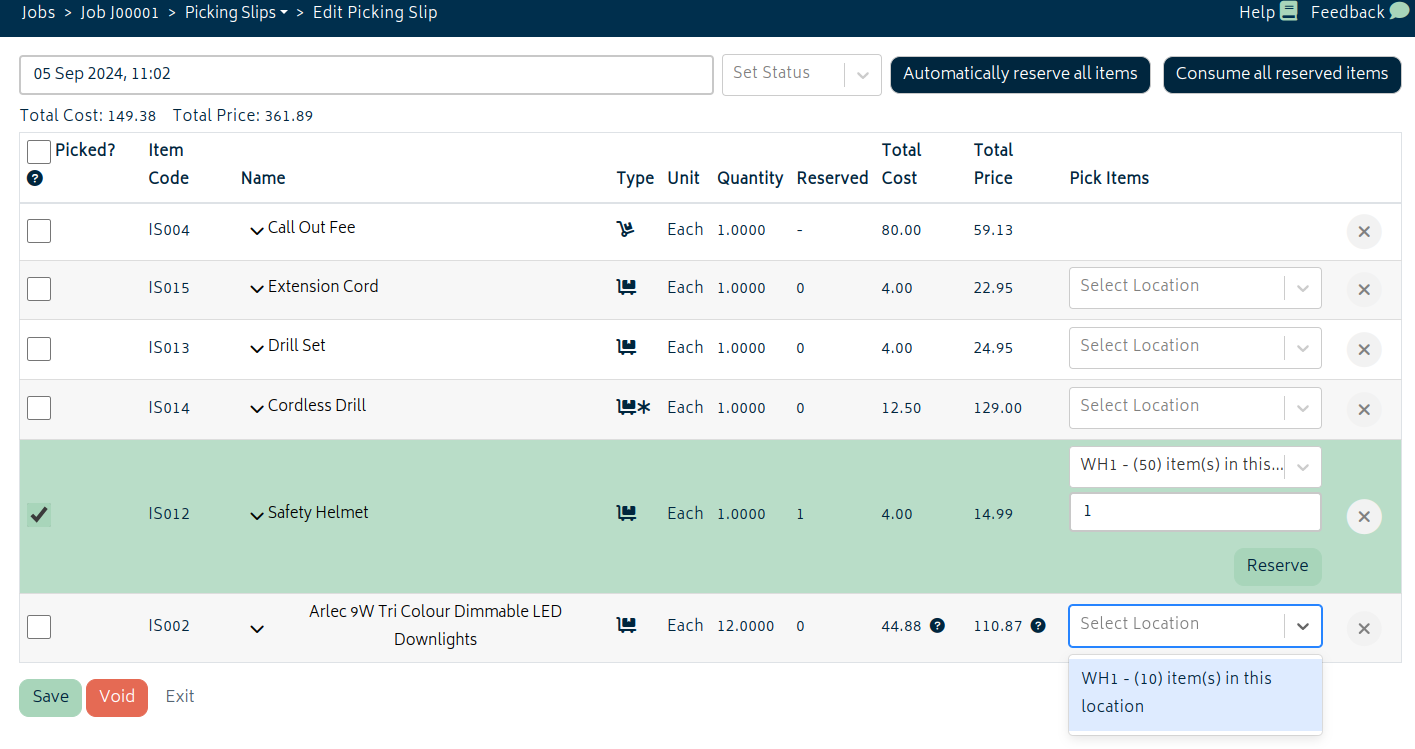
When editing the picking slip, you will be able to change the name and set the status of the picking slip, choose where items have been picked from, and make the reservations for the job. You will also have the option to consume these reserved items directly onto the job.
> Consume
This option allows you to record your stock items against a job and return excess back to stock, or record the usage time of fixed assets. You can record individual quantities, consume all items at once, or consume items reserved through the BOM. Alternatively, when receiving a purchase order made for a job, Gojee will automatically record the required quantity for a job if the "Automated Consumption" checkbox is ticked on the Goods Receipt page. Refer to Purchasing for more information.
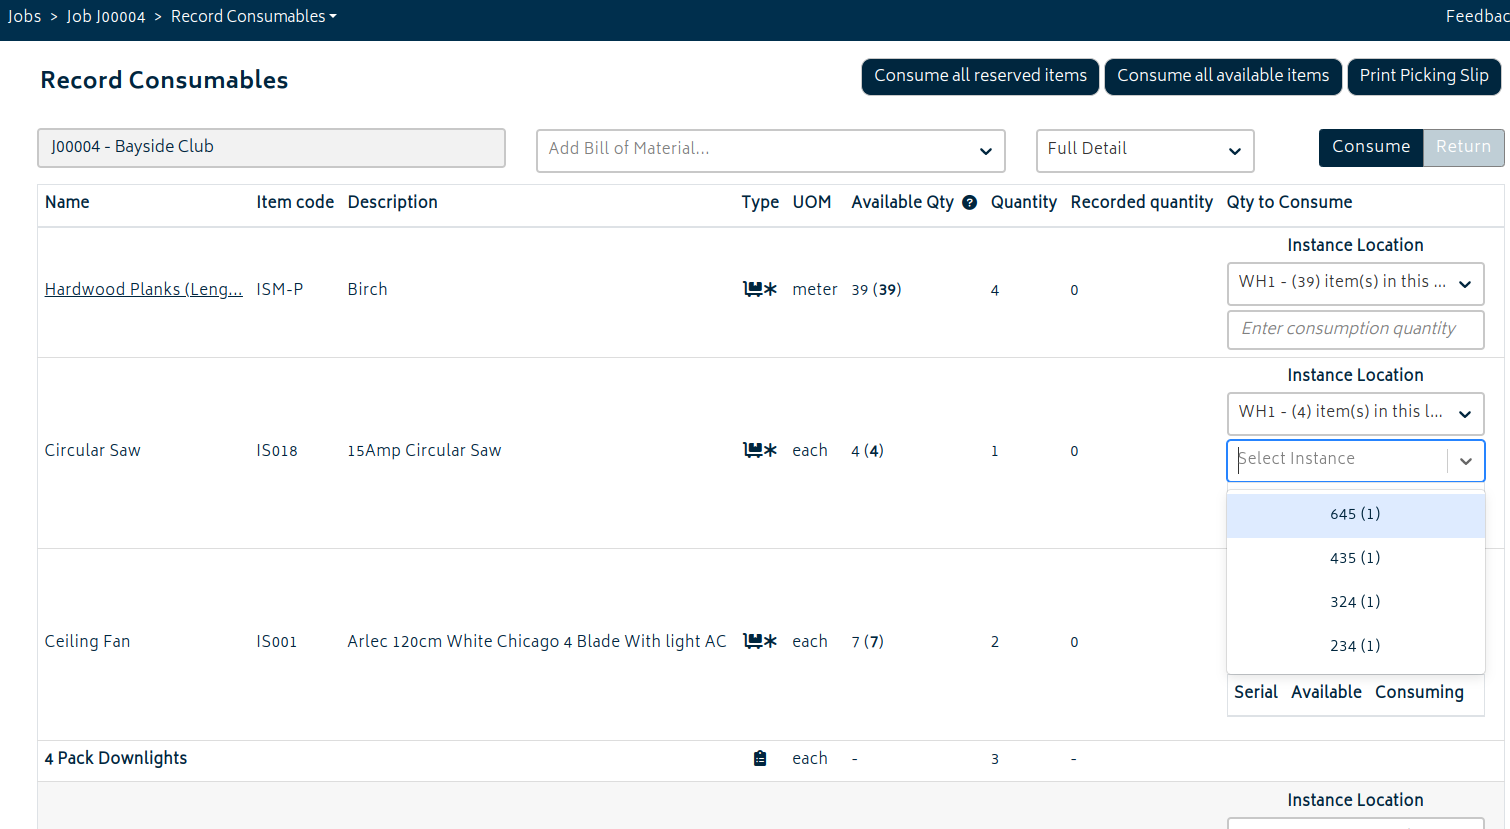
To consume an item on a job:
For each item, its name, item code, type, unit of measure, and quantities will be shown and you will be able to choose how many to consume (and from where).
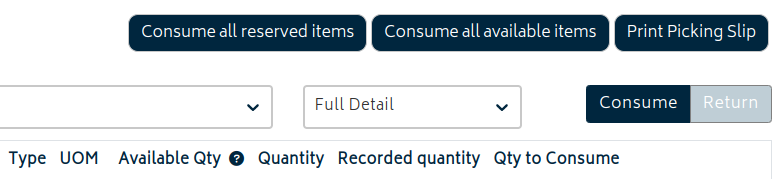
The items in the image above are explained below:
- Consume all reserved items: Consumes all instances of items reserved from the BOM.
- Consume all available items: Automatically consume everything possible from item stock.
- Consume/Return tiles: Indicates whether you are consuming or returning an item.
- Full Detail/Flat dropdown: Choose whether to nest templates or list all items on one level.
The categories are as follows:
- Unit of Measure: Indicates whether an item must be recorded in wholes or can be recorded in partials.
- Available Qty: Shows how many of the item are available for use.
- Quantity: The quantity required for this job.
- Recorded Qty: Indicates the quantity recorded against this stock item or asset.
- Qty to Consume: Shows the consumption total you will have when changes are saved
The fields on the right allow you to pick the correct stock location to consume the items from (and in the case of individually tracked items, which item to consume) or allows you to consume reserved instances onto the job. Location is not required for untracked items.
- To learn more about setting up multiple stock locations, refer to the Settings section.
- To learn more about stock reservations, refer the section below.
To record an item against a job, select the stock location and enter the quantity that is consumed.
Note: You do not need to consume an item manually if you have raised a purchase order through the Job Stock Orders function, unless you have chosen to not automatically consume the item at the goods receipt stage.
In the case that the consumption is not automatically done, the items ordered for the job will be allocated to stock, and reserved for the job, so the system will not allow them to be consumed onto other jobs. To consume the reserved items onto the job from the record consumables page, simply select "Reserved Instances" from the dropdown in the Qty to Consume column (i.e. instead of selecting a location).
To return an item to stock (i.e. reverse the process of consuming it):
You can return an item if the item was consumed by mistake or in the case where a customer cancelled an order after you processed it. To return an item:
-
- Go to Job Actions > Record Consumables
- You will be navigated to the record consumable page
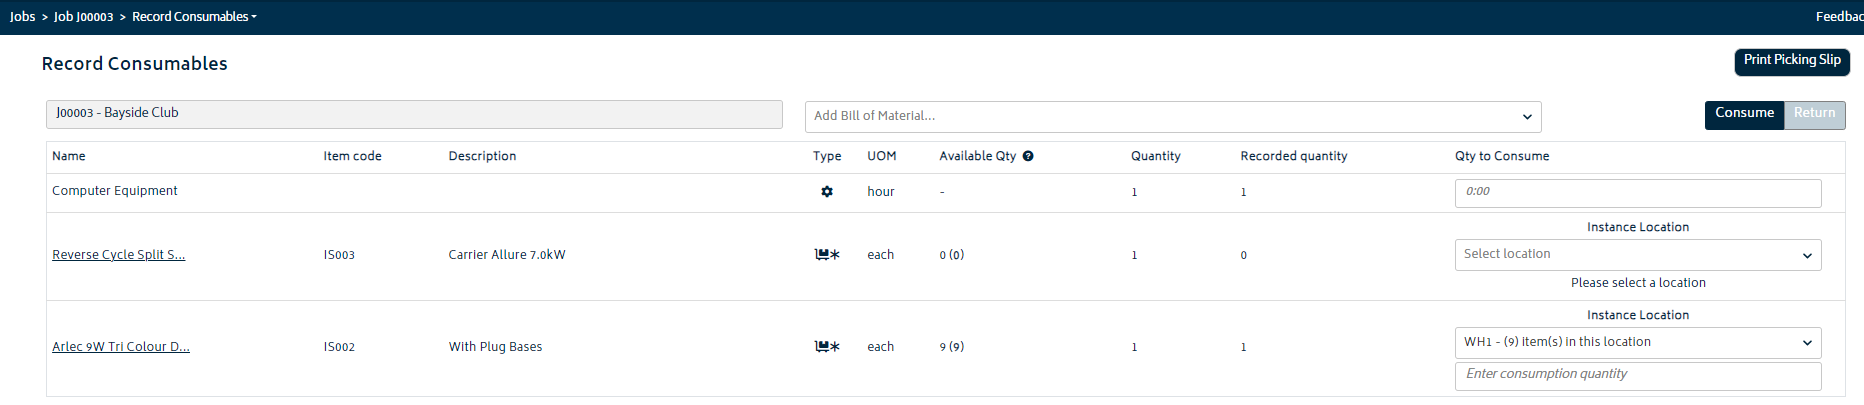
3. Click Return from the top right menu:
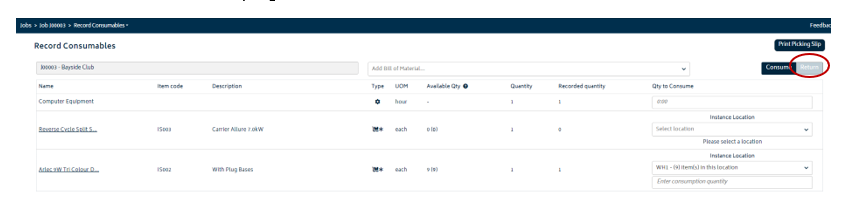
4. Enter the quantity against the item that you wish to return (please ensure that you select the correct warehouse if you are using multiple stock locations)
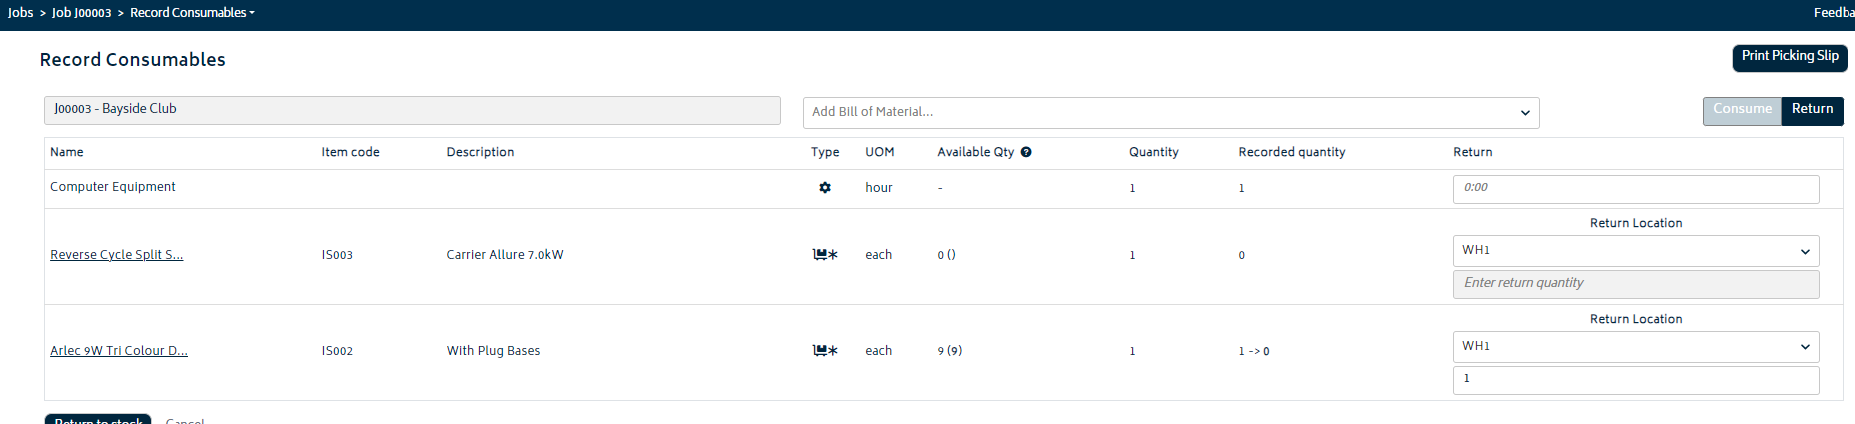
5. Click “return to stock” and stock will be returned to your warehouse.
> Deliver
You can create one or more delivery dockets for a job as it progresses. As you create multiple delivery dockets, the system will track what's already been shipped, and what's on back order.
To create a delivery docket:
- Go to Job Actions > Delivery Dockets

- Click on “New Delivery Dockets” from the top right menu and you will be directed to the Delivery Dockets creation page:
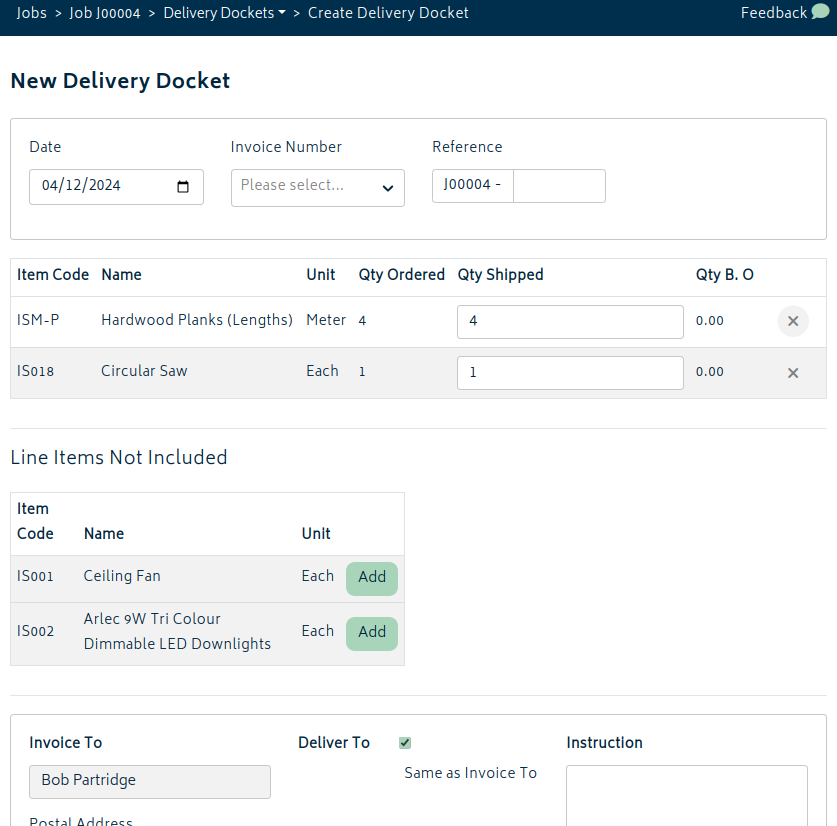
The line items will be shown based on your bill of materials for the job. You can remove any items you don't wish to display on the docket, such as if you prefer to hide items with a quantity of 0.
- The Qty Ordered amount is what is required for the job from the BOM page.
- The Qty Shipped amount will default to what items have been consumed onto the job, that are not yet delivered. This field will set the qty shipped amount for this delivery docket.
- Qty B.O. is the quantity on back order. Its the difference between what's required for the job, and what's being shipped in this delivery docket, or has already been shipped.
- If the items are tracked per instance, you can choose to show serial numbers for the items
- The Invoice To field will default to the customer details for the job.
- The Deliver To field will default to the site address as set on the job settings tab, however you can edit it as required. This field will be hidden if "Same as Invoice To" is checked (on by default).
- The Job Contact Name and Job Contact Number will be included from the job settings, but you can edit them (or remove them) before creating the docket.
After making the required changes, Click “Create Delivery Docket” at the bottom left of the screen:

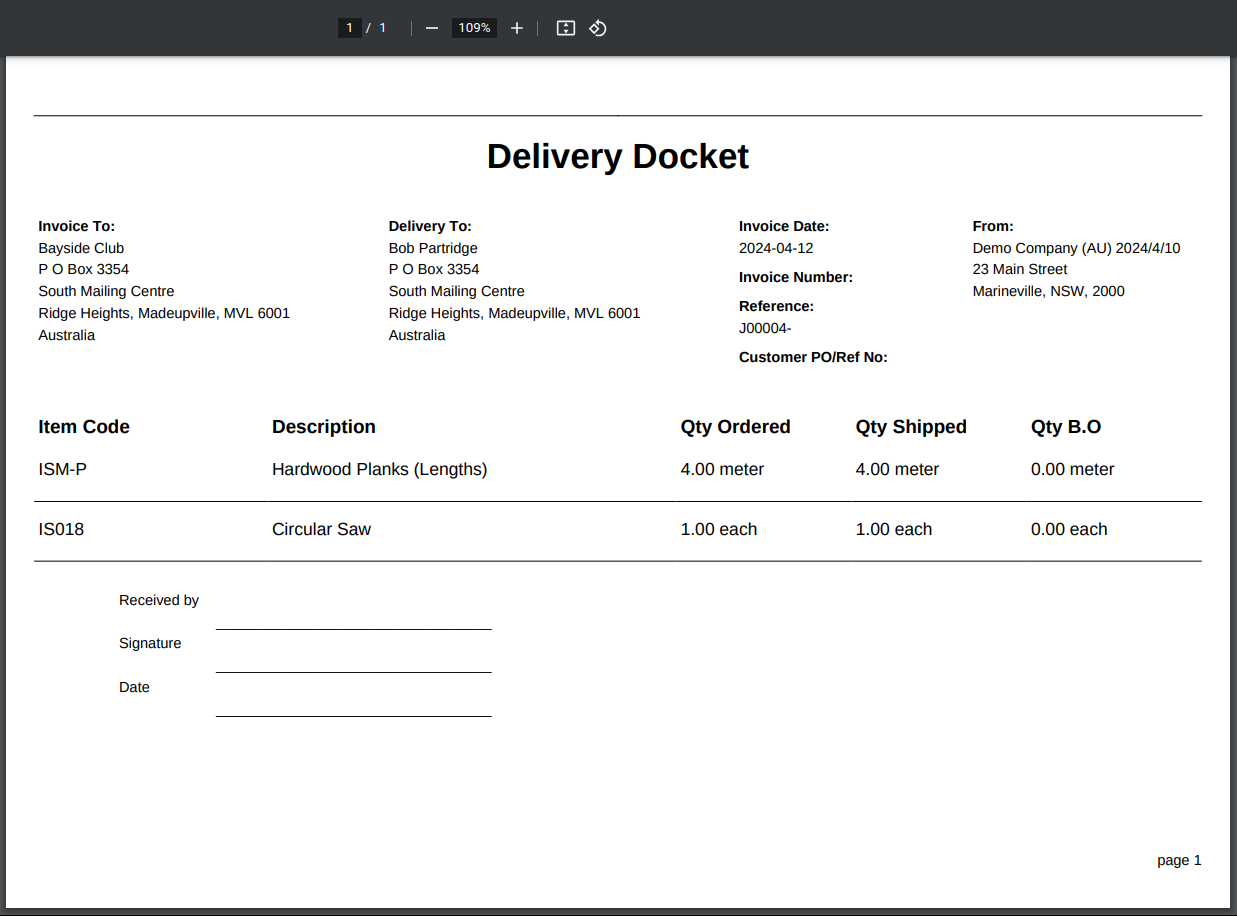
A PDF document will be generated that you can print and post onto your deliveries.
> Forms
Forms allow users to fill in information and create a short checklist or other type of form related to a job.
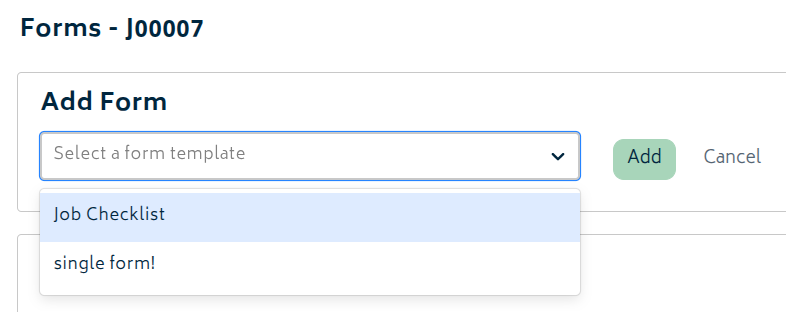
Click Add Form to select a form to add into a job that staff scheduled onto the job can freely fill out. New forms can be added to the dropdown list via setting them up in Organisation Settings.
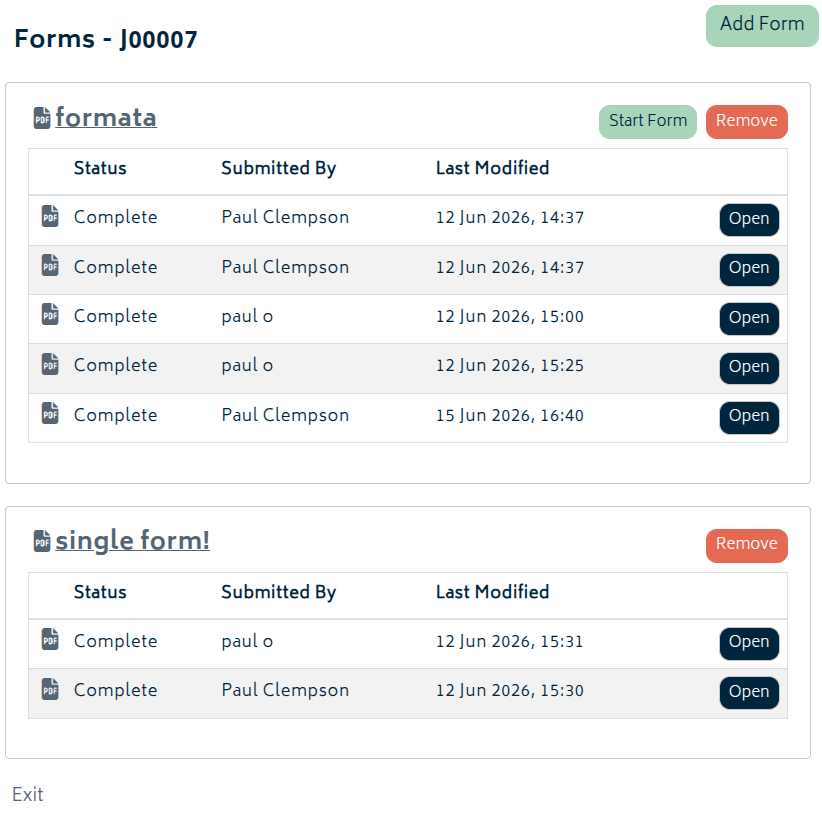
From the Forms page for a job, users can open the list of attached forms, create a response, save progress as a draft, and complete the response when finished. 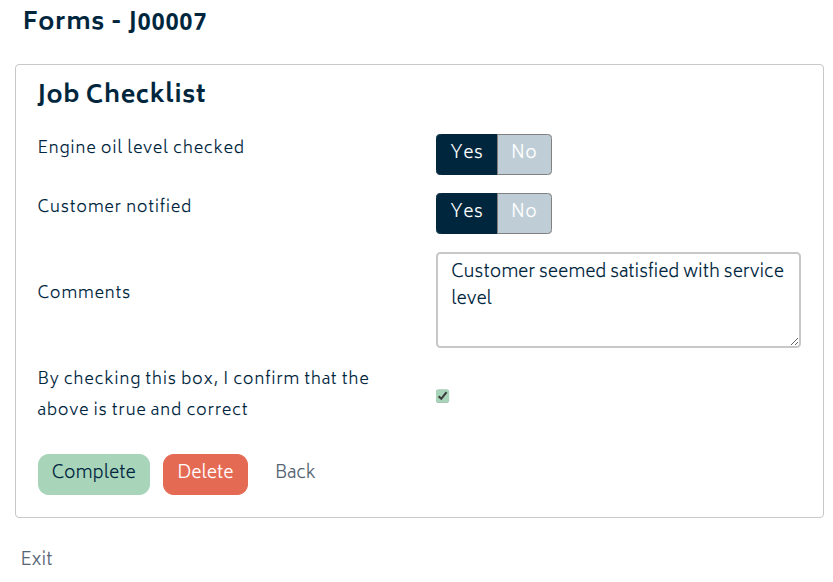
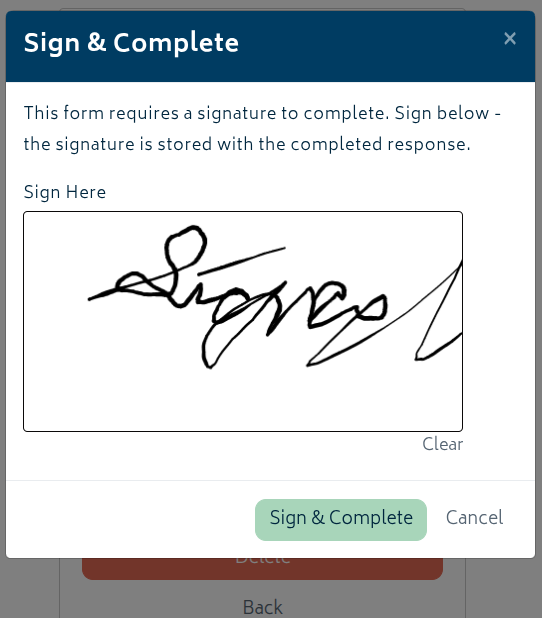
If the form has been configured to require a signature on completion, the signer will be prompted to provide it before the response can be completed.
Depending on how the form has been configured, a form may allow either a single response or multiple responses. Completed responses remain attached to the job for later review, and completed forms and responses can be downloaded as PDF when a printable or signed copy is needed.
> Job Profit
The Job Review page lets you look at your job’s progress in real time, and compare the budgeted costs and revenue to actuals.
The cost budget and quantities come from an approved quote - if there is no quote, it comes from the BOM.
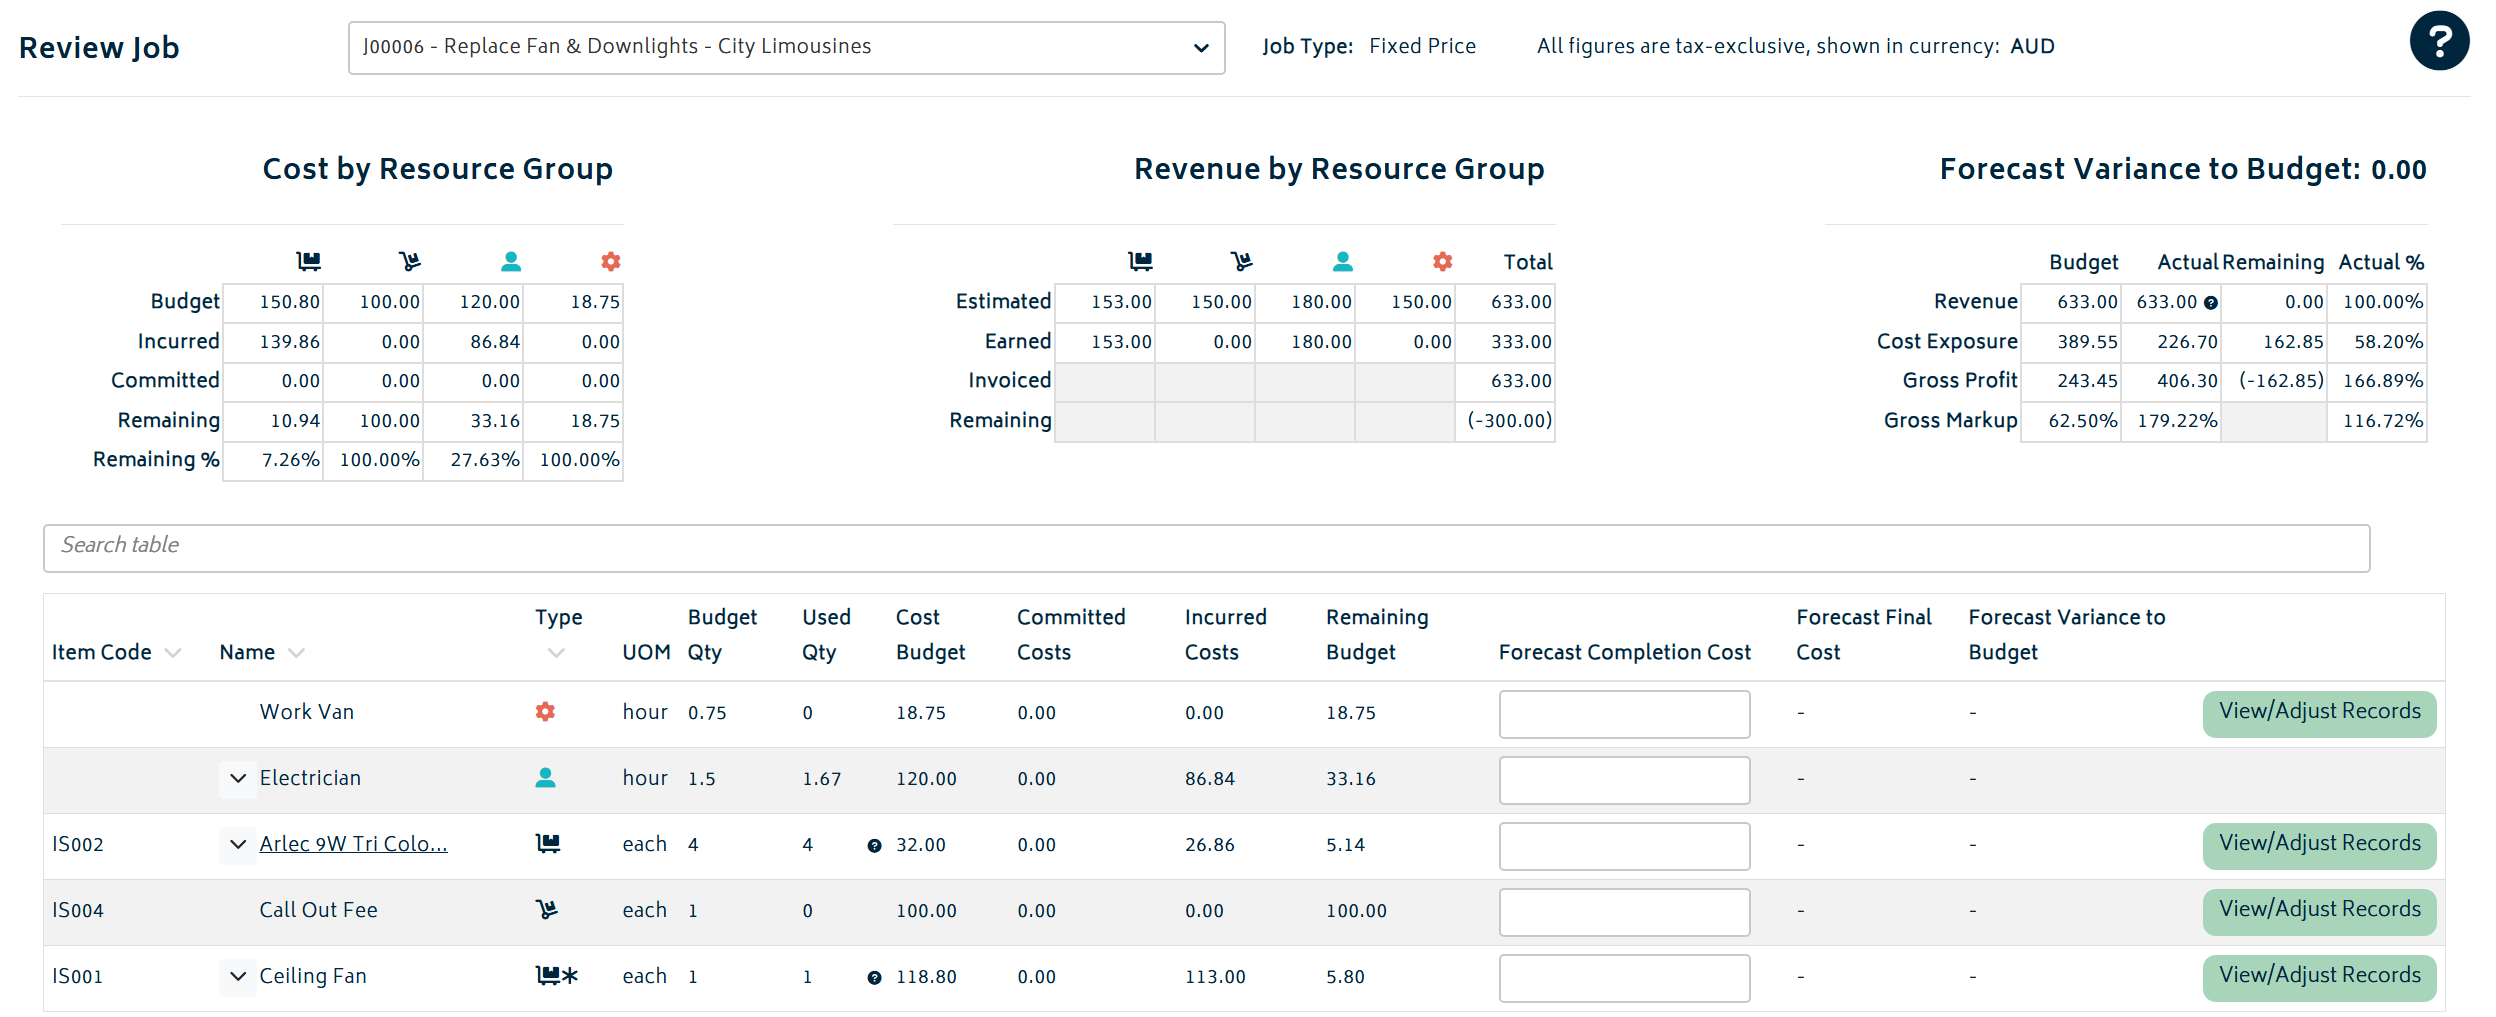
Above the item table is a summary of the budget for each category of items and the job as a whole. If only one type of item is included on the job, the cost and revenue by resource group summaries will not be shown. Untracked and tracked inventory items are split and summarised separately.
The table's headings are explained below:
- Item Code: Unique identifier for each item.
- Name: The name of the item used.
- Type: Indicates whether the item is inventory, an asset, a template, or a profession.
- UoM: The unit of measure.
- Budget Qty: The quantity of the item indicated while creating the quote/estimate for this job and estimated to be required.
- Used Qty: Indicates what item qty has been recorded against this particular job.
Note: If the Automated Consumption tickbox is selected when receiving the goods ordered, any inventory purchases made for a job will automatically be consumed for a job and have the costs allocated on the job review page once the item has been received. Refer to the Purchasing section for more information.
For existing stocked inventory and assets, you will need to manually consume these costs against the job. Refer to the Record Consumables section below for more information.
For professions, your employees or a manager must record time against the profession for a particular job for the costs to show on the job review page. Refer to this section for more information Time Tracking.
- Cost Budget: The estimated total cost for a particular line item, driven off information entered onto the BOM page (refer to the Create Job page for more information).
- Committed Cost: Costs for this item from Purchase Orders raised for a job, but not yet incurred onto the job.
- Incurred Cost: indicates the amount of items that have already been consumed for a job.
- Remaining Budget: indicates the remaining budget after subtracting Committed + Incurred Cost.
- Forecast Completion Cost: is a manual entry for users to insert a forecasted completion cost on a job or project to track Forecast final cost as well as Forecast Variance to Budget.
- Forecast Final Cost: A sum of the committed cost, actual cost and forecast completion cost.
- Forecast Variance to Budget: Calculated by subtracting the forecast final cost from the cost budget.
The View/Adjust Records button allows for stock and asset items to be consumed onto a job. It takes you to the Record Consumables page for that job.
Addendum
Other things that are not always in the Job Actions list:
- Sales Order: This appears if a Sales Order is present for the job. It is a quick shortcut to the sales order for this job.
- Cost Flow: This appears if the Cost Adjustment add-on is enabled. It allows for longer-term jobs to expense consumed inventory items when needed to keep the account books balanced.
- Clone Items: This only appears from the Job List. This clones the BOM to a new job so that the job may be duplicated for another customer, or the job may be performed again.
- Complete/Reactivate: This only appears from the Job List. This will mark the job as completed or not.
When completing a job, the system will run a check against the job to note items that require confirmation. Completing a job will automatically stop all running tasks and additionally complete any open tasks that are scheduled for the job.
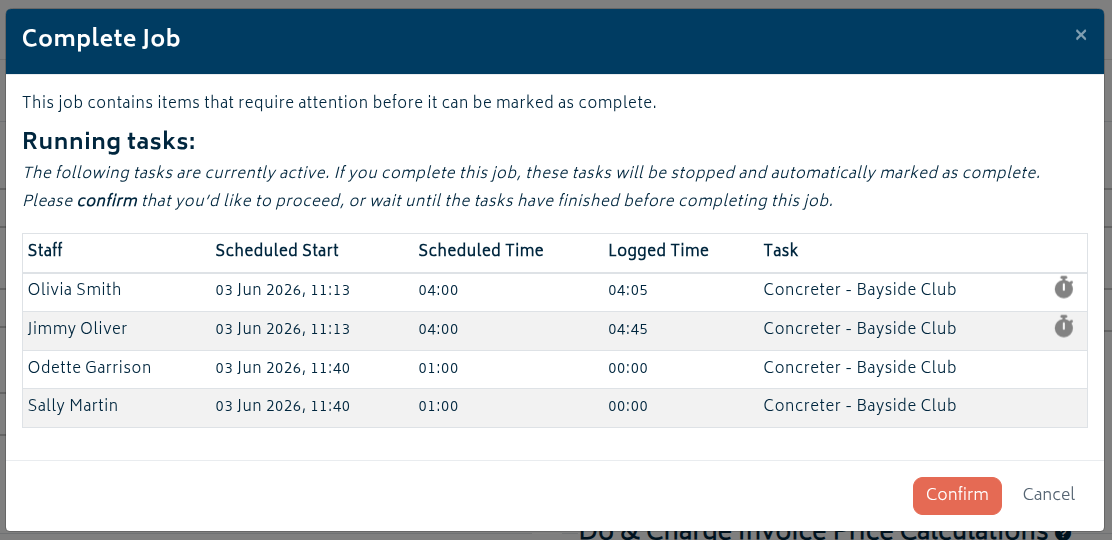
Any job that is marked as complete will no longer show up on the default view of the job list or be available to track time to/record consumable usage against. If you need to work with a job after it is marked complete, it can be reactivated at any time - though this will not undo any steps that were performed upon confirming completion of the job.
Next: Tags.