
Organisation Settings
Introduction
Organisation Settings allows you to choose options for your organisation and configure the connection between Xero and Gojee. You can access this menu by selecting Settings from the Navigation Dashboard:
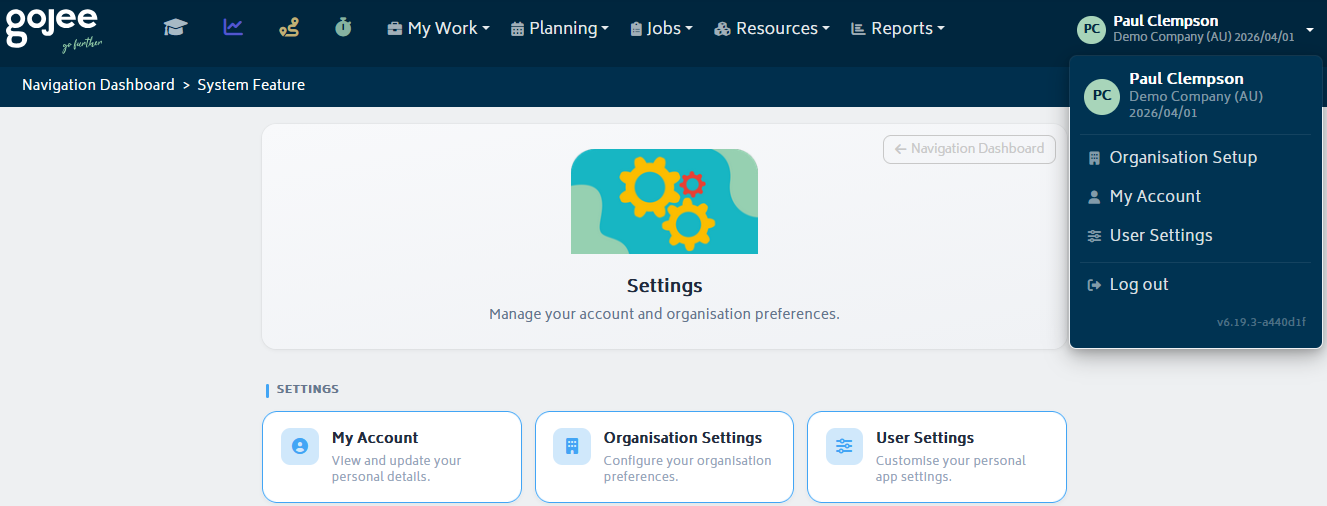
Click “Organisation Settings” and you will be directed to the Organisation Settings page. Alternatively, you can access it from My Account or by clicking "Organisation Setup" under your organisation's name at the top-right.
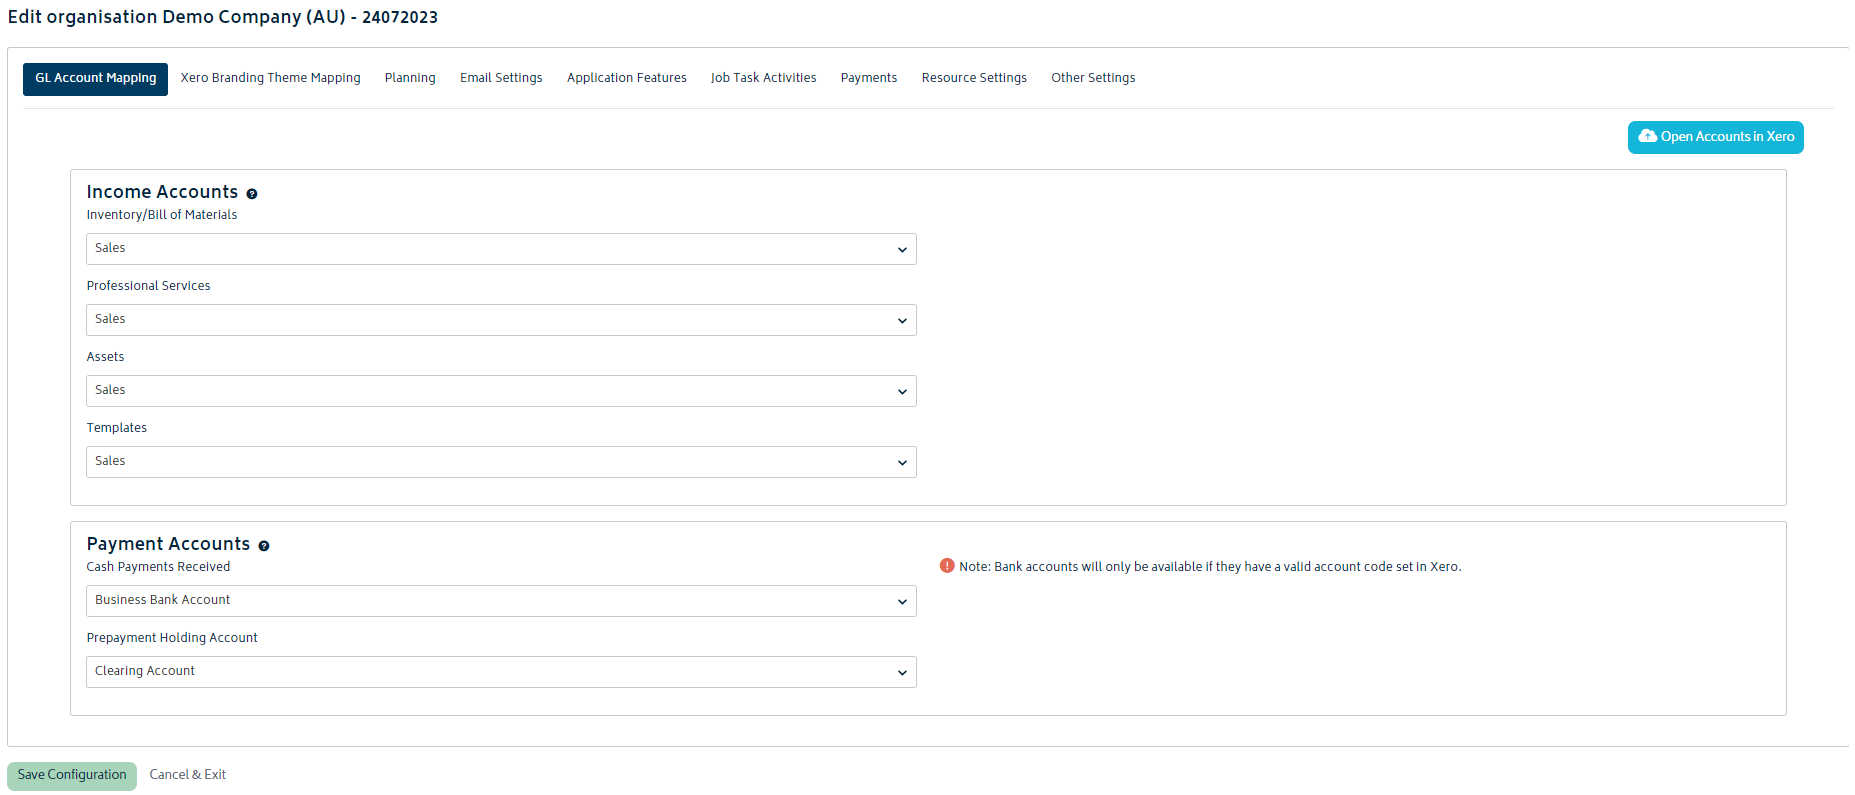
The ability to view the settings page and configure any of the options is relegated to either users with the administrator role or the organisation's owner. Detail on each tab is provided below.
Note: You must hit save at the bottom of the page for your changes to take effect. If you navigate away from the tab your changes will be lost.
When configuring your account for the first time, you'll have the option to save and complete later if you're not finished selecting all the required options.
General Ledger Account Mapping
This page allows you to set your general ledger accounts to be used when Gojee sends transactions through to Xero:
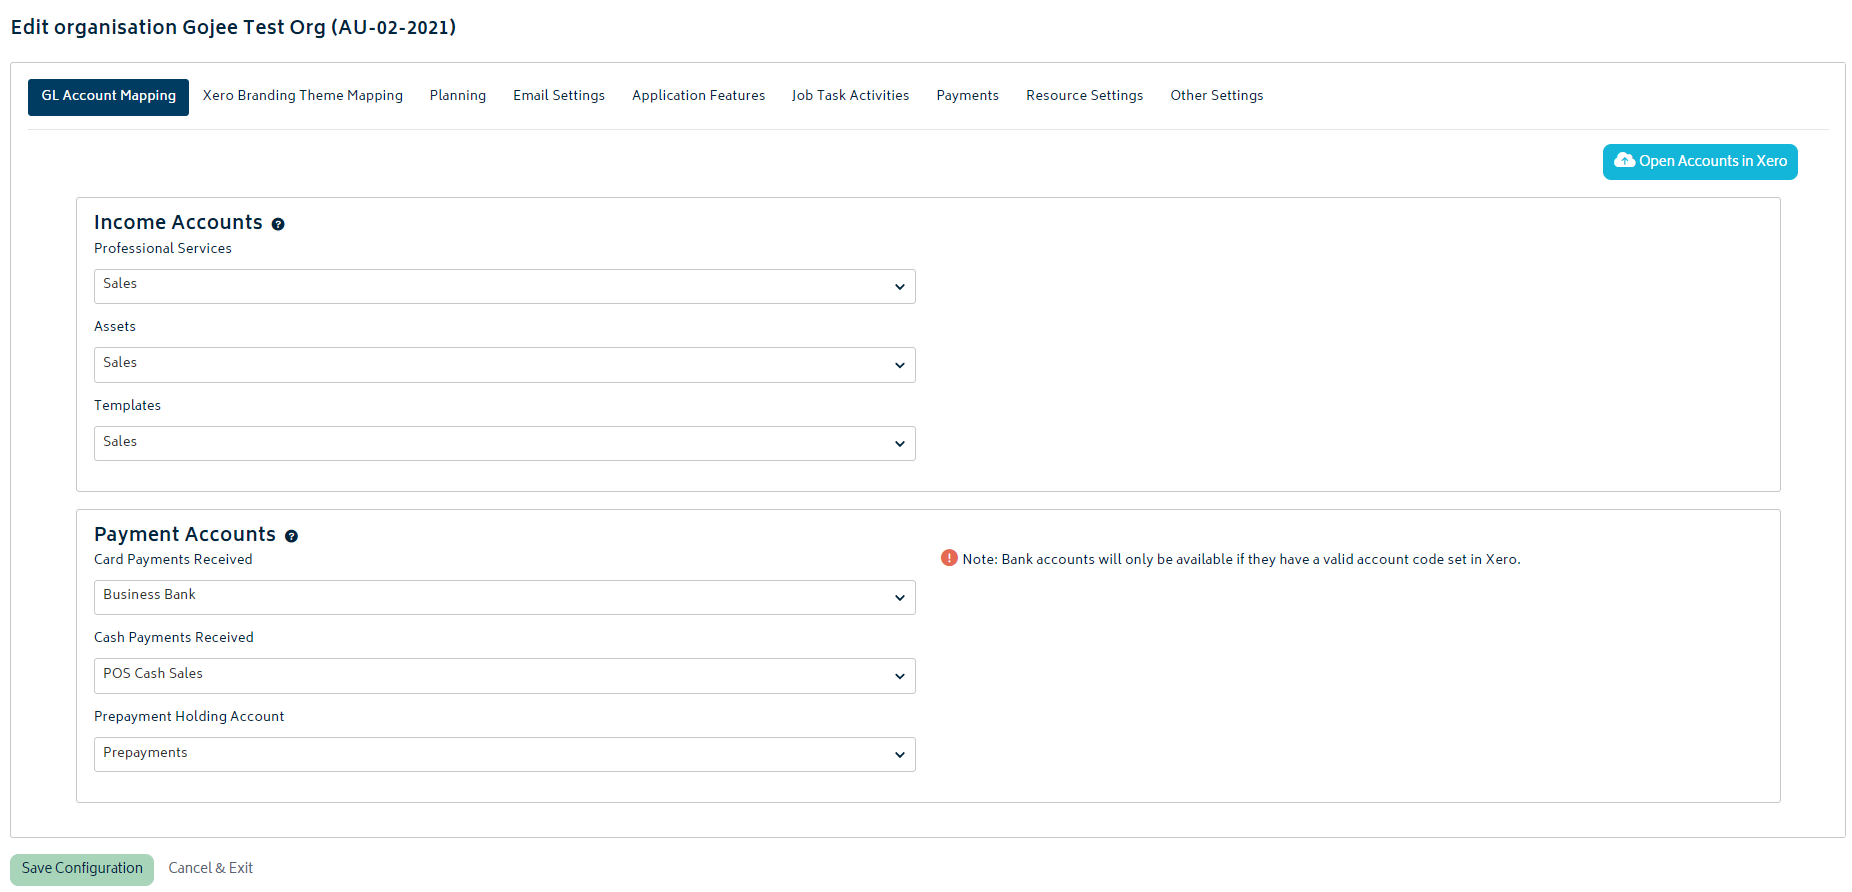
Income Accounts:
- This is where your job revenue will be posted to when you invoice your customers. Revenue will be split between the categories listed, based off the products/resources used in your jobs.
- You will only be able to choose Xero accounts of type Revenue/Sales for these options.
As an example, the following images illustrate how the settings in Gojee for Income accounts, flow through to the invoice created in Xero:
Select these accounts in Gojee:
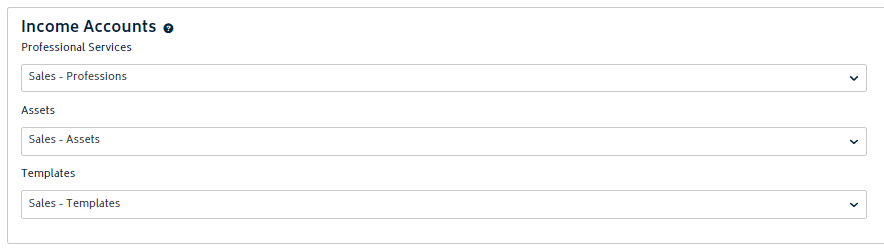
Raise an invoice for a job that has charges for Professions, Assets and Templates, and it will be configured as follows in Xero:
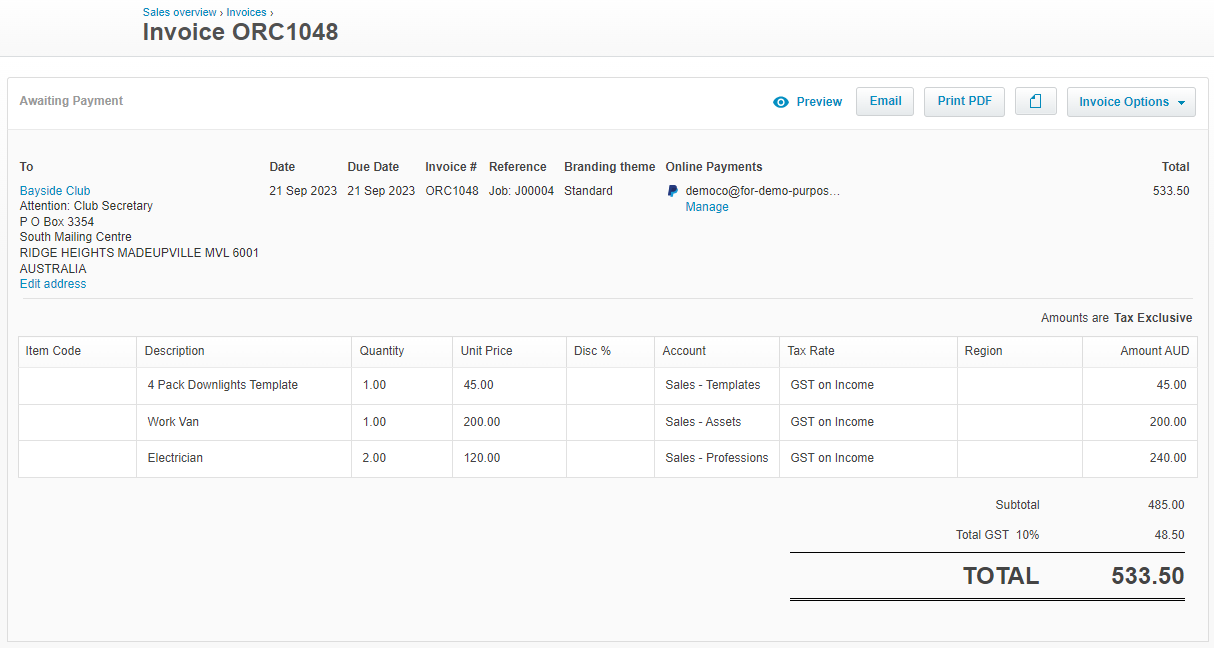
Note: for inventory, the sales account is set individually for each inventory item, and can be updated in bulk for items using the CSV import function.
Payment Accounts:
- These are the asset accounts where your payments will be posted in Xero, i.e. generally your bank account.
- When a payment is taken from Gojee (refer to the Invoices and Payments section), a payment transaction will be created in Xero linked to the document being paid (i.e. invoice or prepayment).
- The payment account selected in this setting field will be the account that the payment is linked to as an unreconciled transaction.
- Each Payment account is explained below.
- Please speak with your bookkeeper or accountant for advice on which account to select if you're unsure of which account to choose from the dropdown.
Card Payments Received: Typically, this would be the bank account that Square card payments are deposited into (i.e. the bank account you nominate with Square when setting up your account with them), however you may also want to reconcile these payments into a clearing account, or some other account depending on your processes.
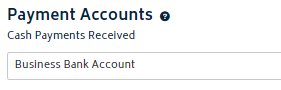
Cash Payments Received: Typically, this would be the bank account that you deposit your cash takings into, however you may also want to reconcile these payments into a clearing account, or some other account depending on your processes.
Prepayment Cash Payments/Prepayment Card Payments: These accounts are where any prepayments applied to invoices will be deposited into. This must be configured before invoicing a customer with a prepayment balance. It works similar to the cash and card payments received, but the amount will go into this account only when an invoice is created and prepayments are allocated.
Prepayment Holding Account: Typically, this would be a liability account that you recognise the value of prepayments (deposits) on your balance sheet prior to invoicing your customer (i.e. an "unearned revenue" account or similar), however you may also want to reconcile these payments into an asset account, or some other account depending on your processes. The account thats selected here will show on the prepayment document created in Xero as follows:

To illustrate how the chosen accounts flow through to the transactions in Xero, an example cash payment transaction is provided below:
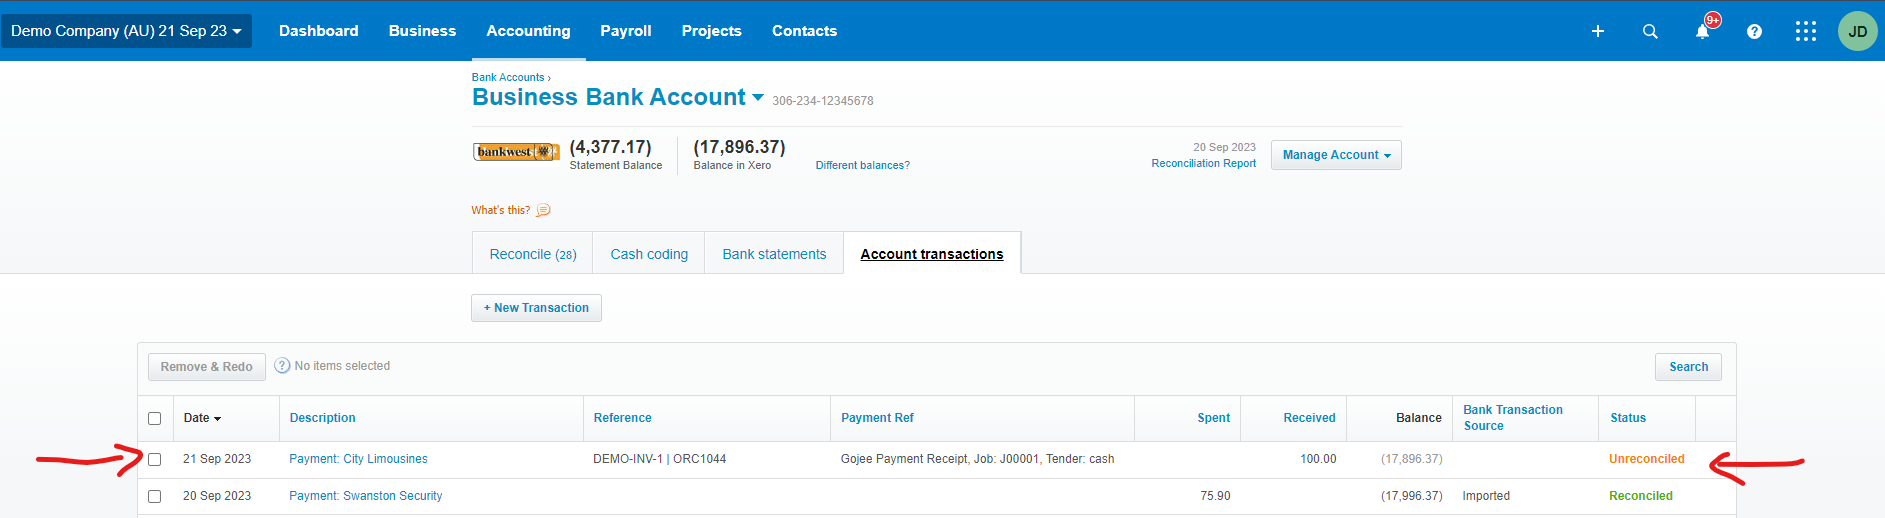
Example: Set the cash payment account in Xero to "Business Bank Account" (this is a bank account set up in Xero)
Create a payment in Gojee for an Invoice, and it will be automatically sent to Xero as per the image below:
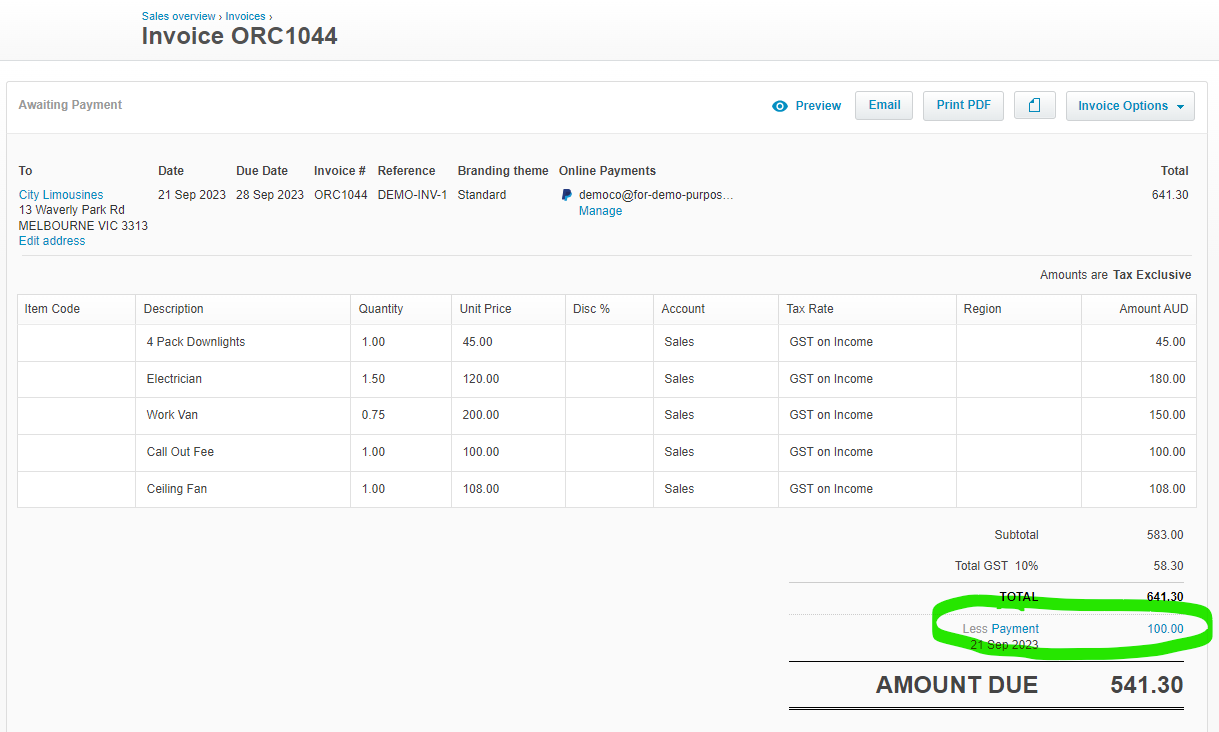
This payment will be allocated to the "Business Bank Account" as an unreconciled payment. When the funds are deposited into the bank account this transaction can be reconciled against the deposit:
Trouble shooting:
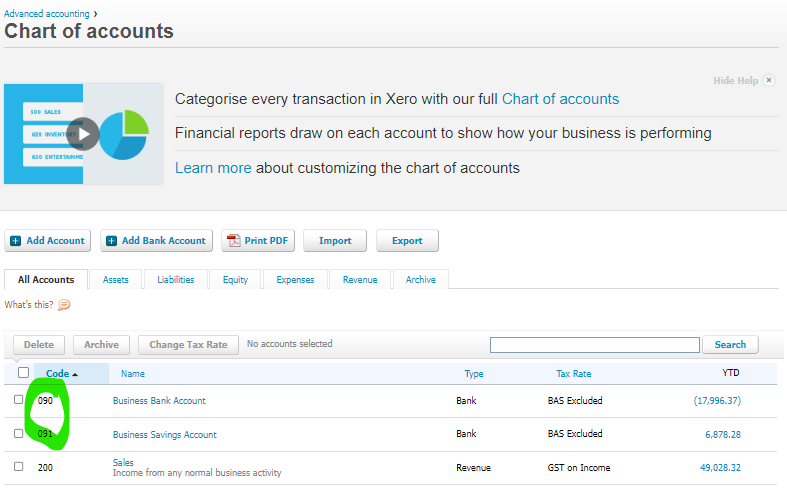
- Bank accounts will only be available to choose in this field they have a valid account code set in Xero (i.e. when setting up a bank account in Xero its not compulsory to assign an account code, and without this code Gojee cannot send the transaction to Xero).
- If you're bank account isn't showing in the list for Payment Accounts, navigate to the chart of accounts in Xero, and check that the Bank account has an account code set up as per the image below:
- If a bank account was recently added into Xero, you may need to do a Sync between Gojee and Xero to pull in the latest information. Refer to My Account section for instructions to complete this, and choose to sync the "Organisation Setup" details.
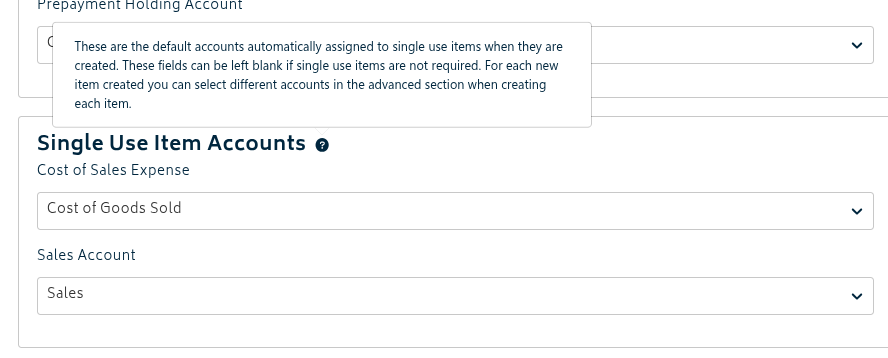
Single use item accounts: These are the accounts that will automatically be selected when creating/setting up a new Single-Use Item on the BOM for a job. These are required to be set in order to add single-use items, but are not required if single-use items are not needed.
Goods Received Clearing Accounts: If your organisation recognises purchases when goods are received rather than when the supplier bill is raised, you can enable this option and select separate clearing accounts for tracked stock and untracked items. When enabled, receiving goods against a purchase order posts the purchase value to Xero using these clearing accounts. Supplier bills are then coded to the clearing accounts so the bill clears the amount recognised at Goods Receipt.
Note: Both tracked and untracked goods received clearing accounts must be selected before this setting can be saved. Please confirm the appropriate accounts with your accountant or bookkeeper before enabling this workflow.
Xero Branding Theme Mapping
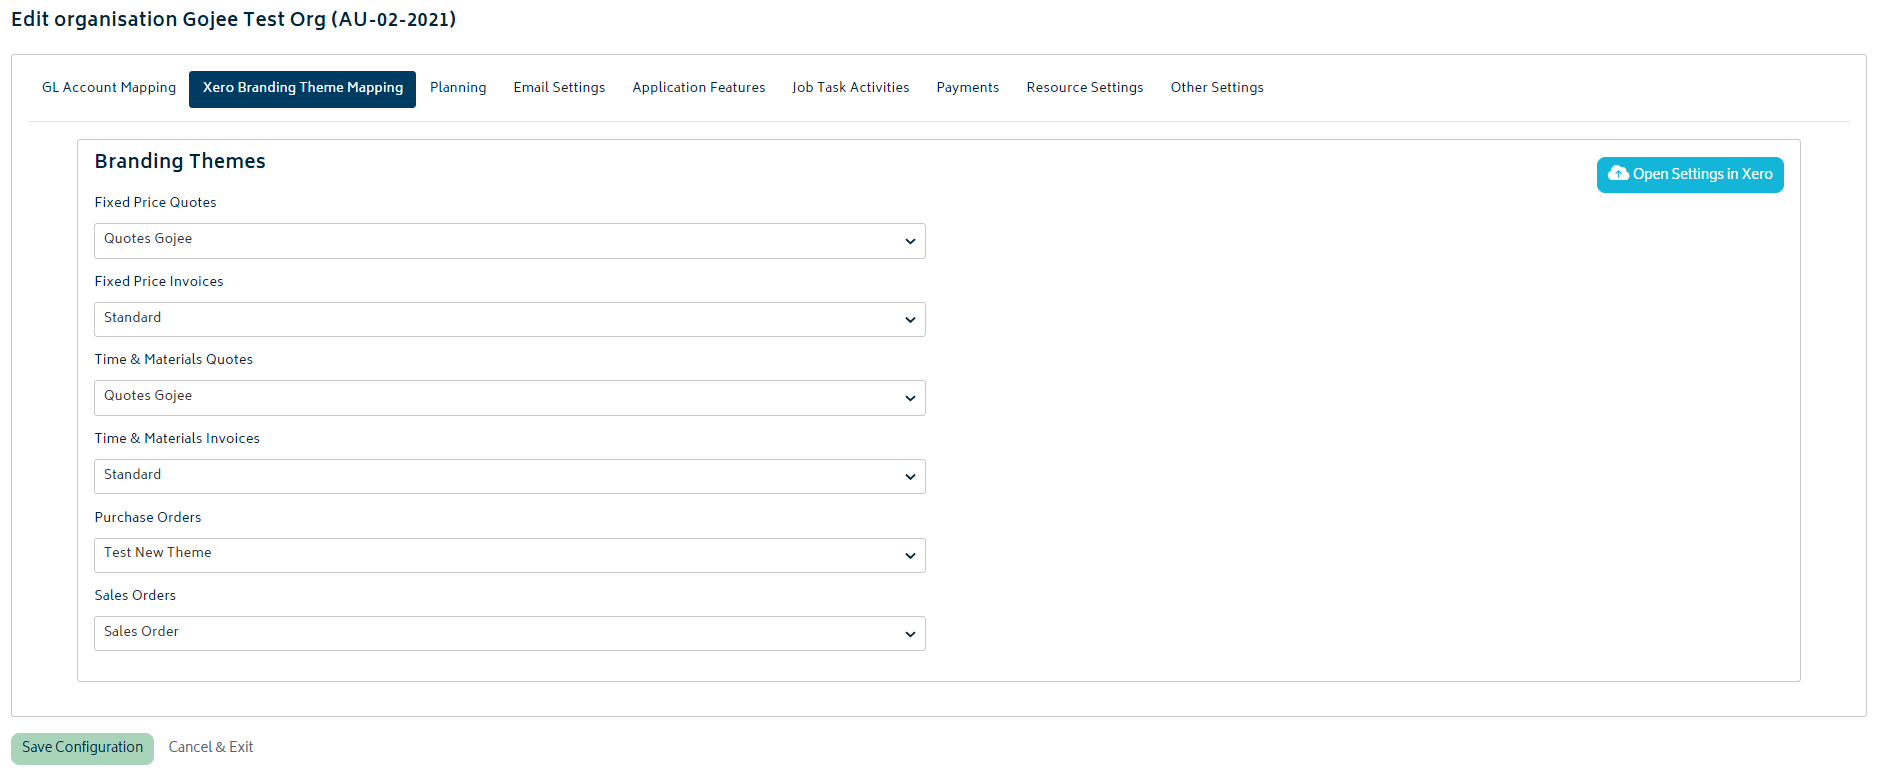
This section allows you to set the default branding theme that will be applied when creating a new document of the types shown on this page. Currently, the branding themes will apply to quotes and invoices for Do and Charge jobs, quotes and invoices for Fixed Price jobs, invoices for Point of Sale jobs, purchase orders, and sales orders. Gojee uses the Xero branding themes to generate custom PDFs with your business's logo, formatting and styles. There are also special Gojee branding themes for quotes that have extra fields (expiry date, title, summary, and footer notes) and allow you to add two logos at once.
To learn more about using Xero branding themes, refer to the following resources:
- Xero Central Documentation - branding themes explained
- Step by Step Video Tutorial - customising branding themes
Alternatively, via an add-on Gojee also supports Docmosis branding themes for quotes. You can read more here:
- Custom Docmosis Documents - details specific to Gojee
Once you have your branding themes set up, you can simply choose the relevant branding theme for each document listed on this page:
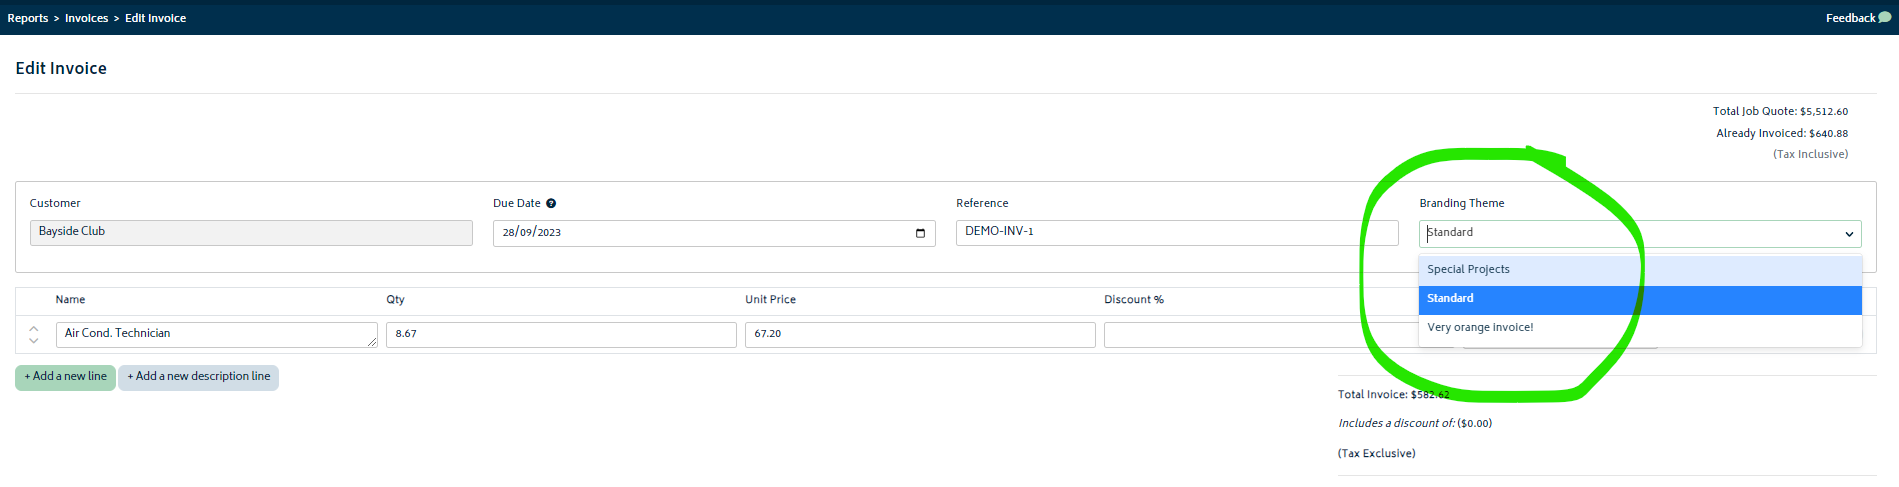
Note: When creating or editing Invoice, Quotes, Purchase orders etc, you will have the option to change the branding theme applied on an individual basis, as per the example below:
Planning
The planning sections allows you to choose your default business operating hours. This information will be used to set the width of the planning schedule for the daily view.
Simply enter a default start and stop time in the input fields as shown below:
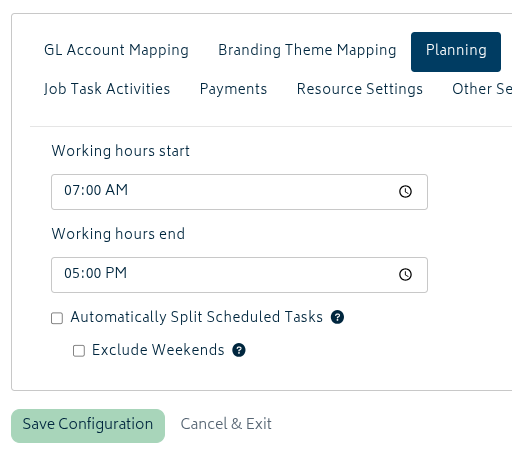
For example, the settings above would result in a view on your staff scheduling page as follows:
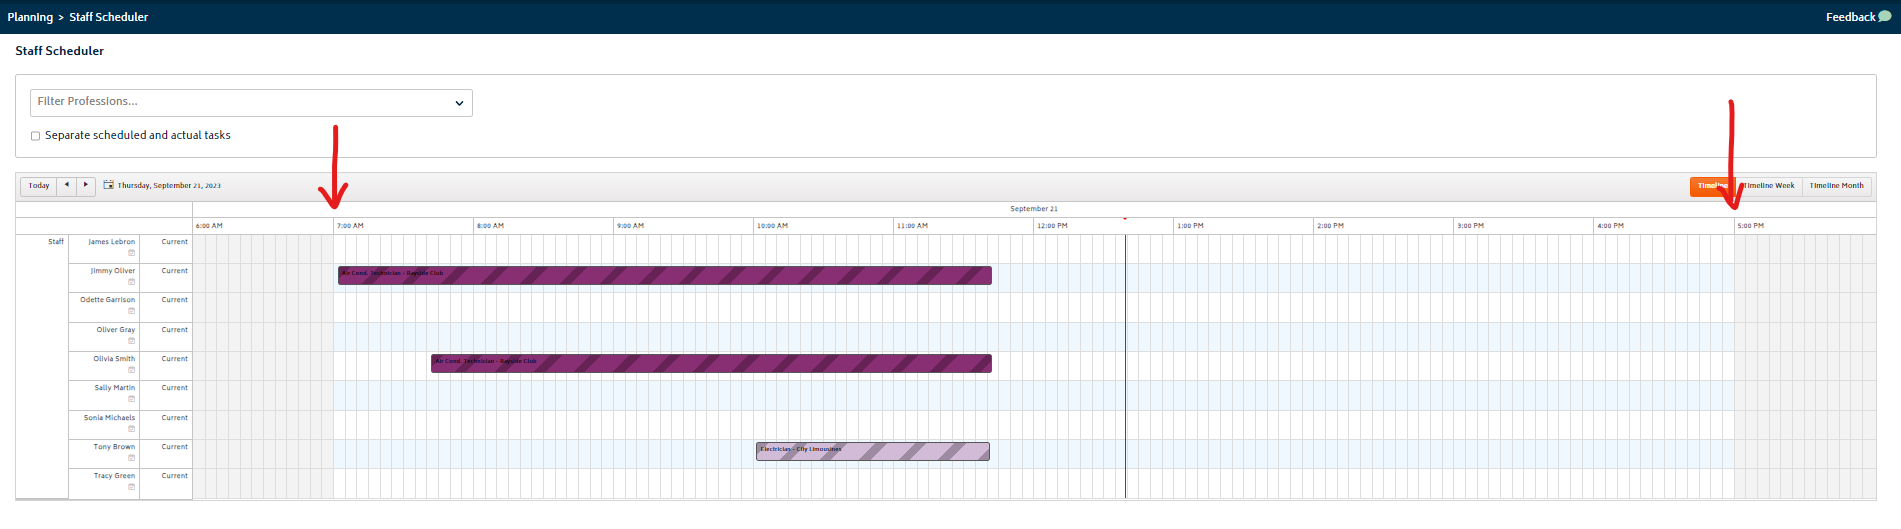
Note: a buffer of one hour either side of the default start and finish is displayed on the calendar as shown in the image above.
Below the setting for the hours is the option to automatically split scheduled tasks and allow scheduling multiple days' worth of tasks at a time. If enabled, when creating a schedule for a task that spans multiple days, each day will have the task split based on the organisation's set hours.
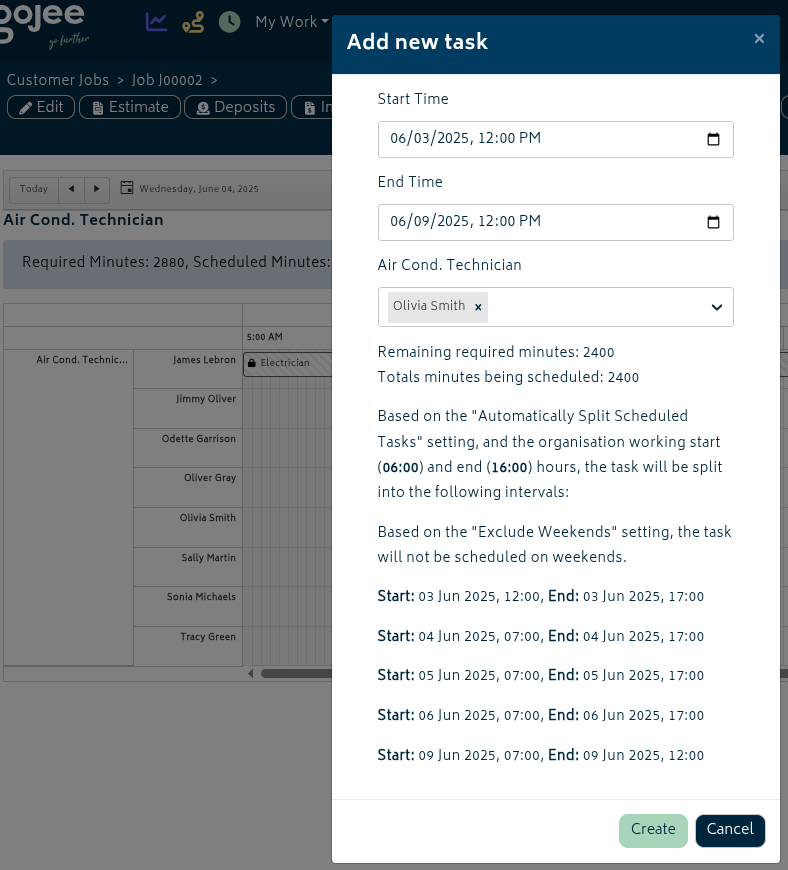
Note that this only applies to the initial scheduling of the task - inputting hours via bulk time entry or time logging will not be split and will be recorded exactly as entered.
Email Settings
Email Settings controls how Gojee sends emails and displays contact details on outgoing documents. This section includes your organisation reply email, contact email, shared connected mailboxes, default send-from accounts, and Xero sync report preferences.
Gojee supports Microsoft 365 / Outlook and Google Gmail connections. You can store up to two organisation-wide mailboxes here so users can send quotes, invoices, and purchase orders from shared business email addresses instead of relying only on the Gojee system email. If organisation mailboxes are connected, administrators can set separate default send-from accounts for Quotes & Invoices and Purchase Orders. Users can still change the selected sender when they open the email modal.
The core email settings are shown below:
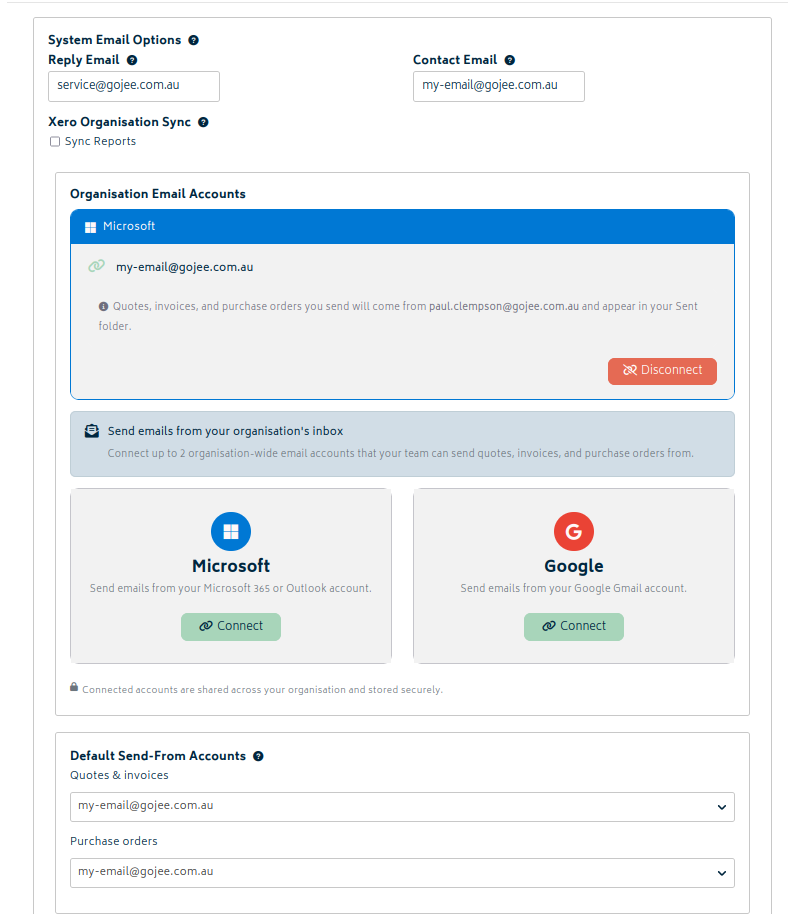
- Reply email: Emails sent from Gojee use this address as the reply-to address. When a customer clicks “Reply”, their response will be addressed to this email. You need to set this if you are sending emails using the default Gojee noreply email - it is optional if linked emails are chosen.

- Contact email: This is the email address displayed on delivery dockets and in the organisation details section of generated PDFs generated with Gojee, such as variations, quotes using the Gojee branding theme, and custom job documents.

- Organisation Email Accounts: Connect up to two Microsoft or Google mailboxes for shared use across the organisation. Emails sent from a connected mailbox appear in that mailbox’s Sent folder.
- Default Send-From Accounts: Choose one default sender for quotes and invoices, and another default sender for purchase orders. If no default is selected, users can choose from the available connected accounts or fall back to the Gojee system email.
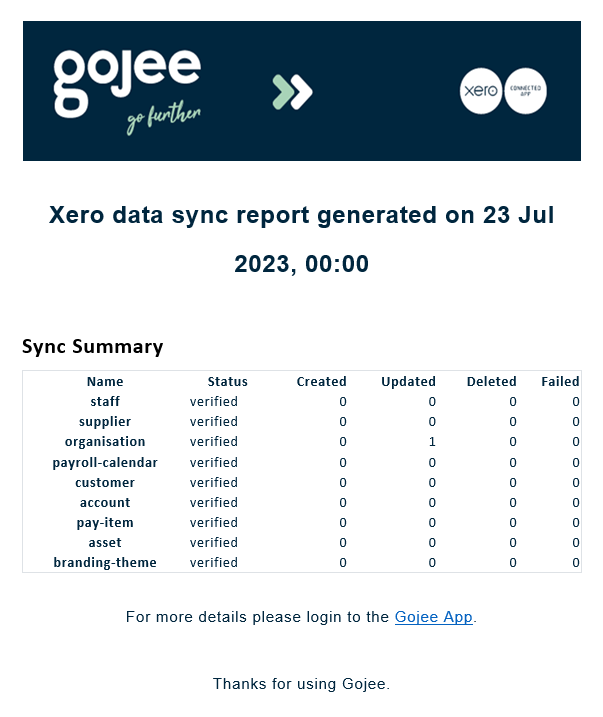
- Sync Reports: Select whether Xero sync reports are sent to owner and administrator users. If enabled, Gojee sends a daily report summarising the Xero sync activity. This option can be turned off if you do not want to receive those reports. An example sync report is provided below:
Email Settings: Email Templates
Email templates allow you to set different pre-defined messages for your outbound communications, providing flexibility all within Gojee. They are organised into five categories, specific to the category they are created in, and do not carry over from one to another:
- Quote
- Invoice
- Purchase Order
- Bulk Purchase Order
- Quote Approval
Creating new templates is simple. Select the type that is required, click “Add” to create a new form, specify the form name and fill out as required. Ensure the template is saved before navigating elsewhere as all information will be lost otherwise. You can also select the “Default?” option which sets the selected template as the primary shown when drafting the outbound email.
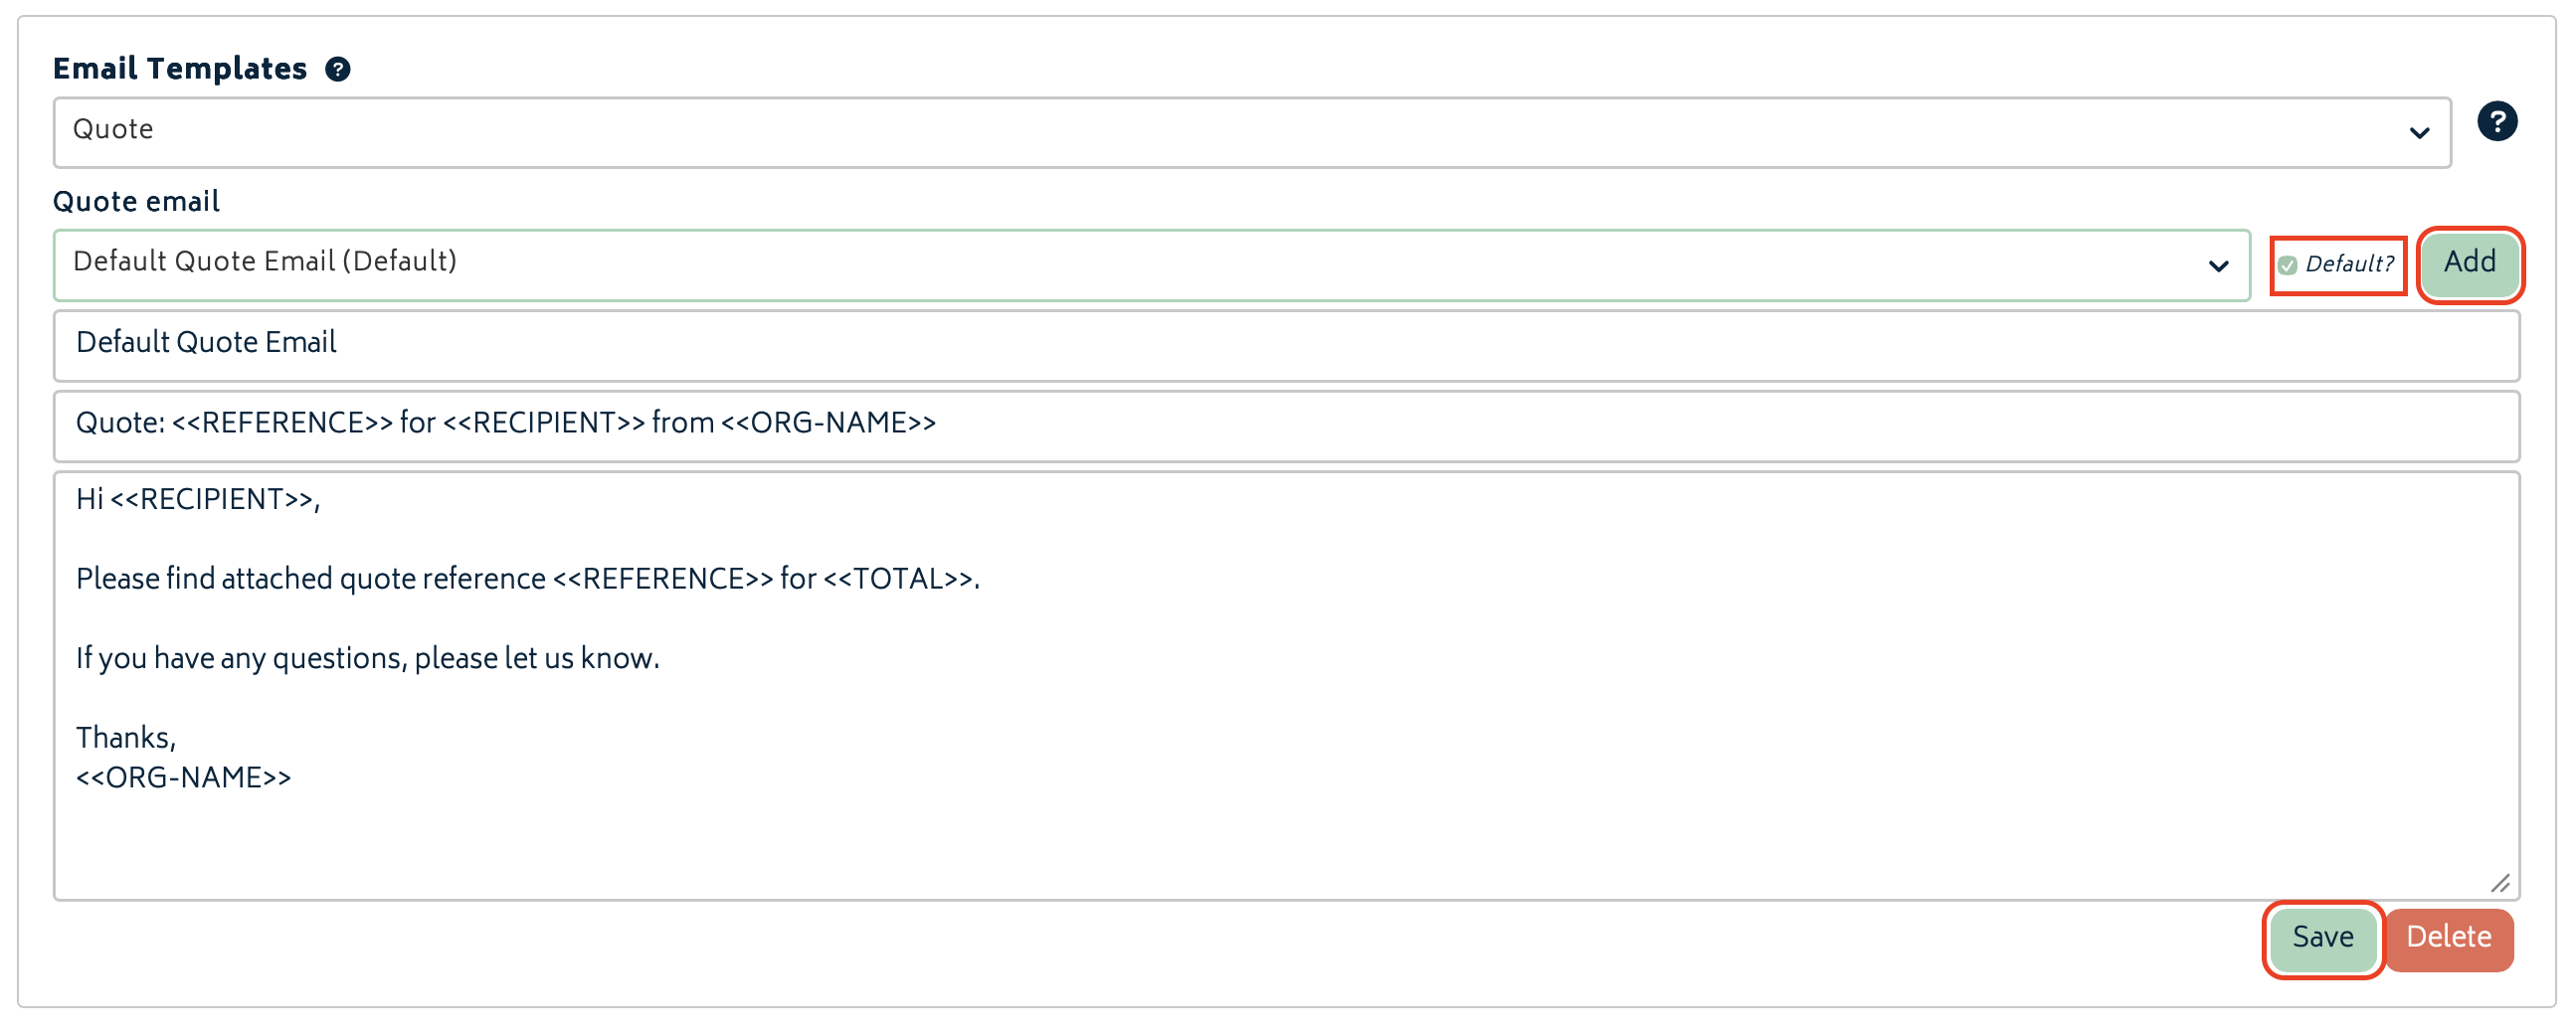
Templates can also be edited and deleted at any time. It follows similar formatting to Custom Docmosis Documents, where text located between keys styled like <<ORG-NAME>> will be replaced with the relevant text when the template is applied to an email. The text will be replaced when the template is selected for the email. Available fields for the specified email template type can be discovered by hovering over the (?) icon to the right of the type dropdown.
Note: There are no restrictions when deleting templates, meaning the default Gojee template can be deleted. In these instances, if there are no available templates, the outbound page will be blank and require manual input.
Organisation Add-ons
This tab provides options to turn on advanced features and modules to help you do more with Gojee. Please refer to the Organisation Add-ons page for more information.
Job Task Activities
In Gojee, there are three types of activities that can be selected when users are tracking time or entering time records. These activities define whether the time will be billable on a job, and/or billable on the worker's time sheet. Each of these activities has a default name, as detailed below:
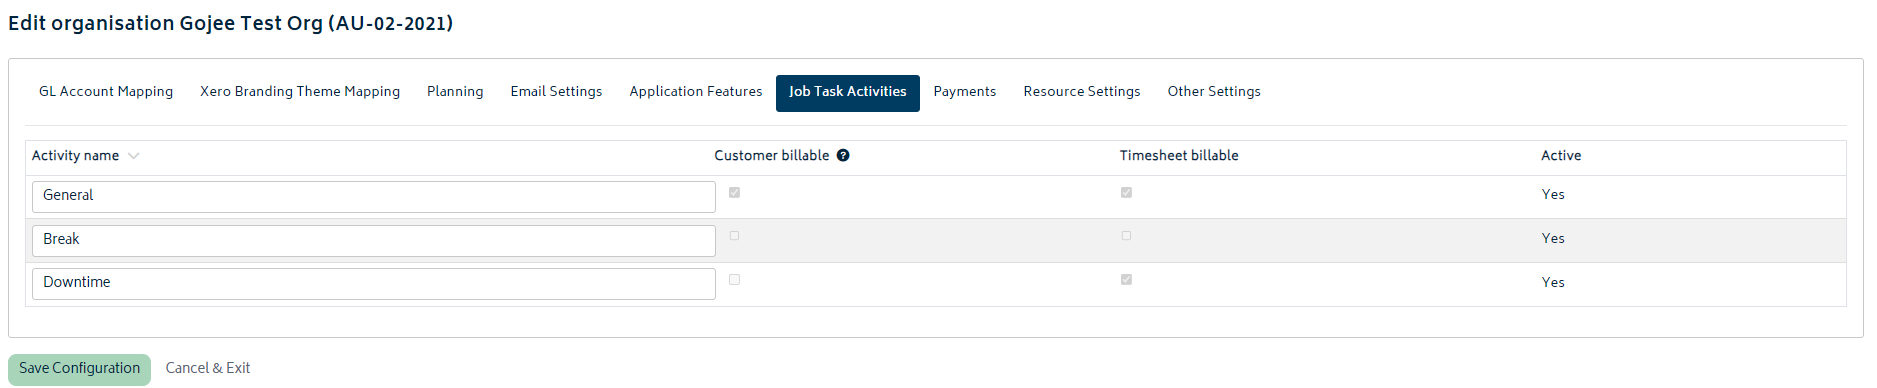
This page allows you to quickly change the name of these activities to another name that's more applicable to your business, or makes more sense for your employees. To change one of the activity names, simply click on the text and update it. If you're comfortable with the default names, then no changes are required on this page. If you want to customise these further, then custom activities can be enabled via the Custom Activities add-on.
Note: Refer to Time Tracking for more information on how these activities are used in Gojee when tracking time.
Payments
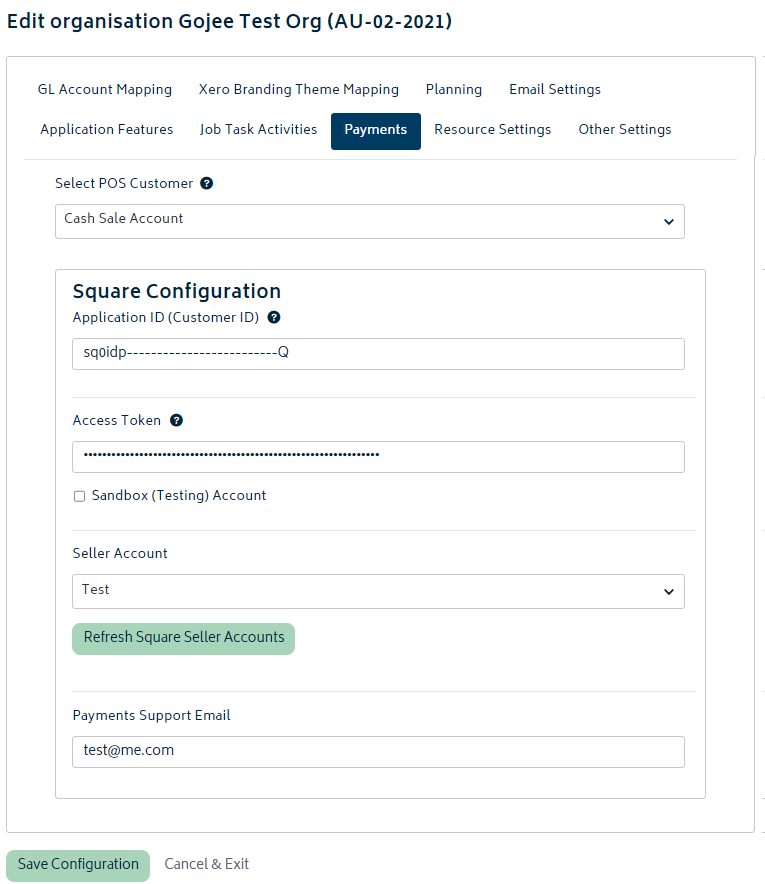
This tab allows you to configure a default customer for your point of sale (POS) transactions and also define your Square integration settings if the add-on has been turned on in the Add-ons tab. None of these options are required, so you can continue setting up the rest of your organisation and come back to this at any time if you'd like to use it.
When the Square add-on is enabled, the page will look as follows:
POS Customer:
Select any of your existing customers from the dropdown list. If you need to create a new customer, refer to the Contacts section for details on how to do this. You can save and navigate away from this page, create the new customer, and then come back to select it.
Square Configuration:
Please see the Square Payments article for more information on how to configure this section.
Resource Settings
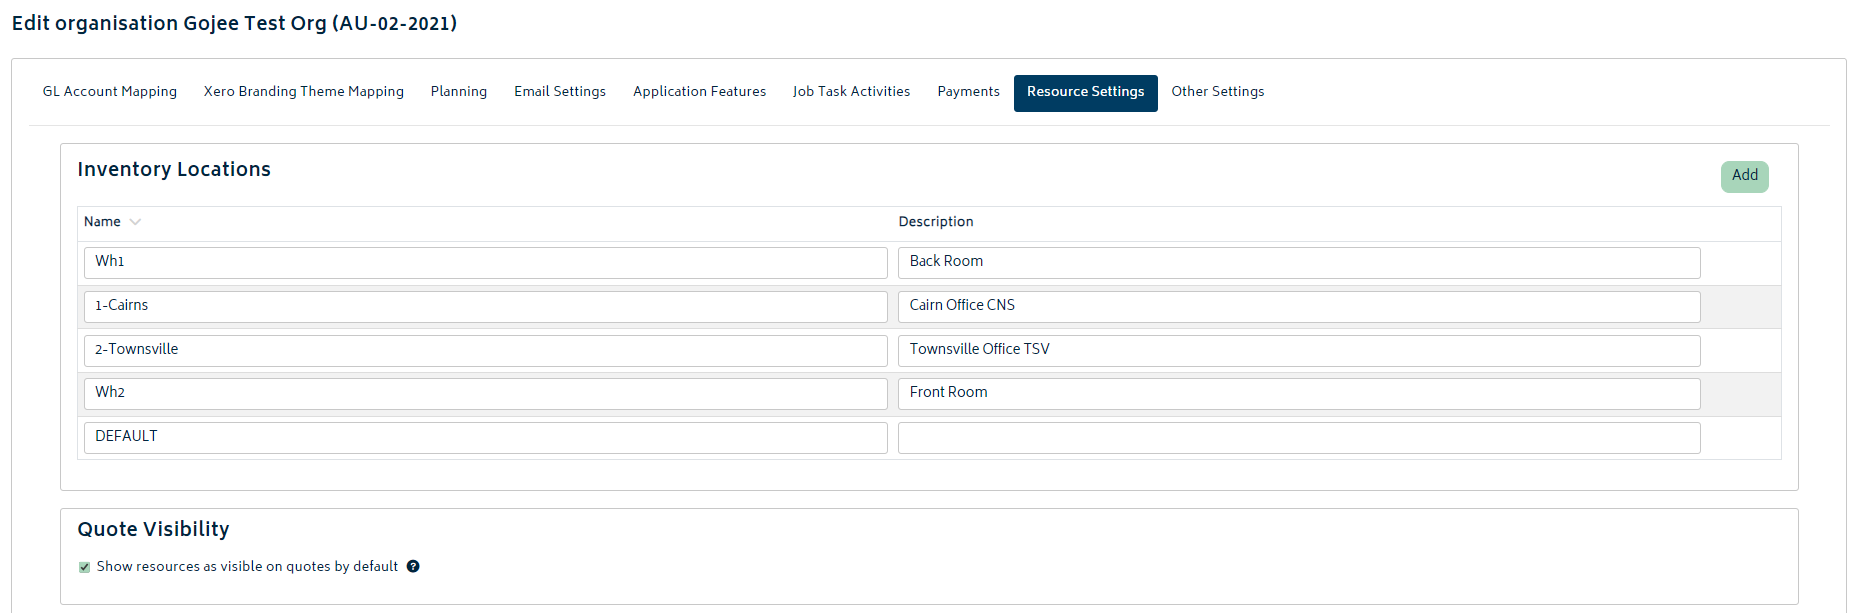
This section enables you to configure different aspects of your resources. These settings are optional and some standard defaults will be applied if no changes are made. Please review the details of each section below:
Inventory Locations:
- If you have tracked inventory items, you can assign your items to locations and track their movements when in stock up until the point they are consumed on a job.
- You can create an unlimited amount of locations in Gojee to manage your stock.
- To add a new location, simply click the Add button at the top right of this section. Enter a name (required) and description is neccesary (not required).
- You can remove a location if no items exist in the location by clicking the (x) at the end of the row.
- If no (x) is available, it means there are items in stock in this location.
- Make sure you hit save at the bottom of the page prior to navigating away.
Delivery Addresses:
-
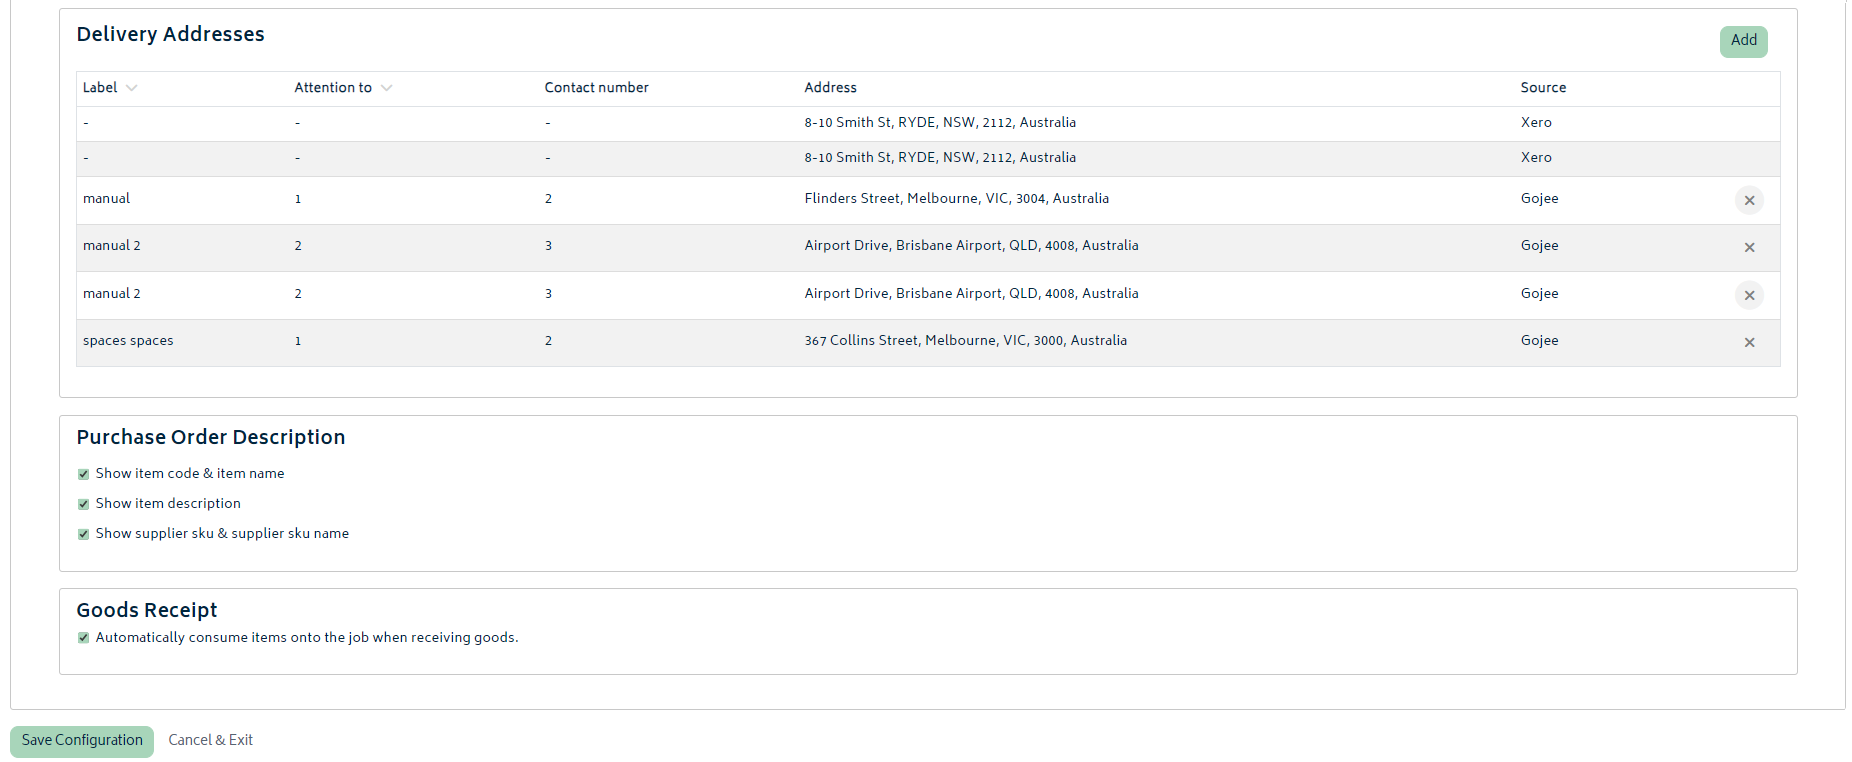
Delivery addresses you have already set up in Xero will be synced into Gojee by default. These will be identified with the source column showing "Xero".
-
In Xero, the delivery addresses can be modified here:
- Go to Xero Organisation Settings
- Select "Organisation Details"
- Scroll down to the contact information section and there will be two address options:

These addresses will show in Gojee as follows:

- Note that addresses synced from Xero are not editable in Gojee - these must be modified from Xero.
- You can however add new Delivery addressed in Gojee using the green Add button on the right-hand side. Once added the entry will show with Gojee as the source:

These delivery addresses can then be selected as defaults when creating purchase orders. Refer to the Purchasing section for details on creating purchase orders.
Address Autocomplete:
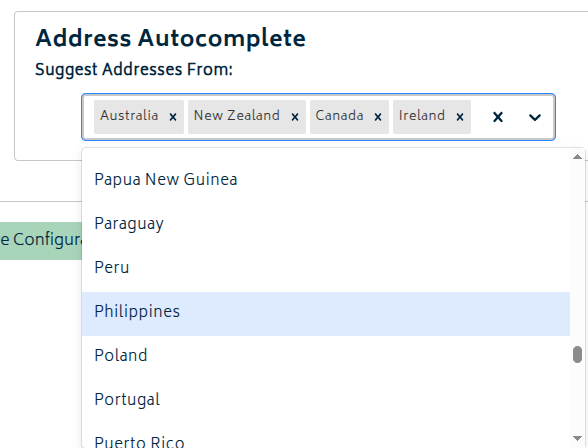
Select which places should appear in address autocomplete suggestions. These use Google's address autocomplete function to work. If no places are selected, your organisation's country will appear. If you need more, select all countries you want to fetch addresses for from the list.
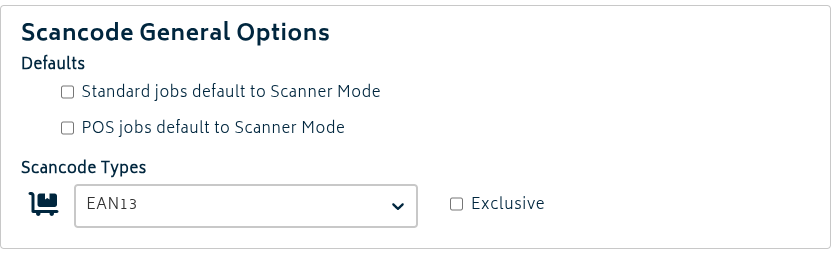
Scancode General Options:
-
Standard jobs/POS jobs default to scanner mode allows you to open the BOM in scanner mode instead of in selection mode.
- This is handy if you deal with items you typically have on hand through the BOM preparation process.
-
Scancode Types will automatically pre-select the type of scancode (i.e. QR code, EAN13, UPC etc.) for items that do not already have one.
- This allows you to quickly scan the item in and visually compare.
- Selecting "Exclusive" will lock the scancode type selector to prevent selection of other types. It will not modify items that already have a different scancode type saved.
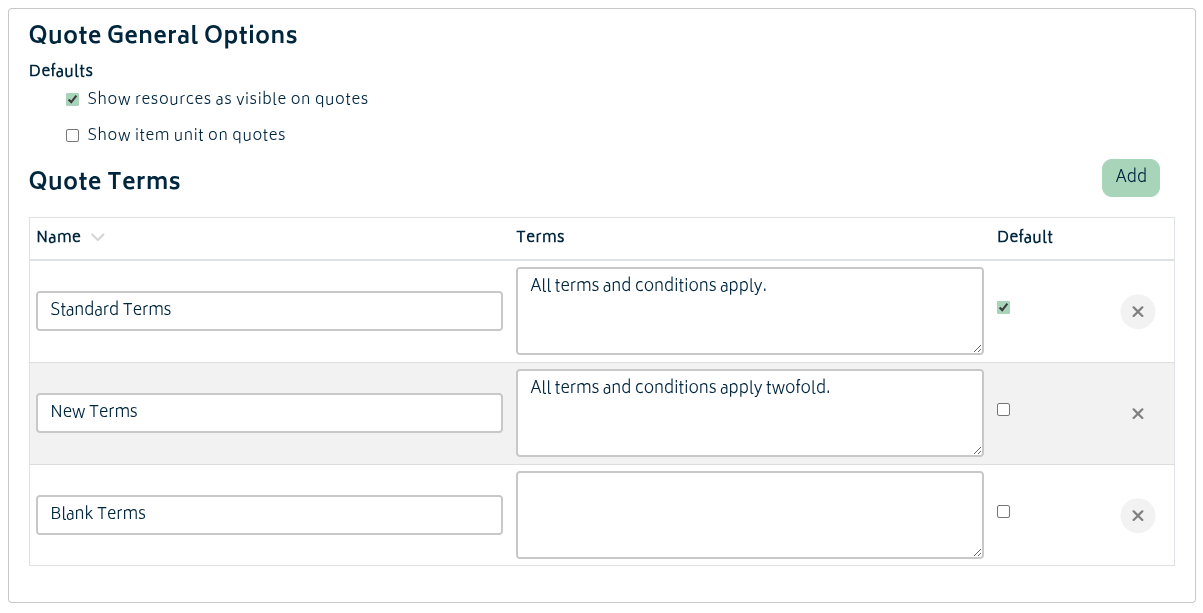
Quote General Options:
-
Show Resources as Visible on Quotes will make any assets, professions and inventory added to the bill of material pages for jobs show on quotes by default.
- Inventory visibility defaults can be set on a per-item basis in the inventory edit page or in batch via CSV update - that will override this setting.
- When creating a quote you can choose to change individual line items to be visible or not, regardless of the option chosen here.
-
Show Item Unit on Quotes will automatically append the unit (eg. (each)) to the name of items when the quote creation starts.
- This may be useful if your items are set up with multiple units of measure and provide clarity to the customer.
- If these are not needed for specific items, you will be able to erase them from the name on a per-item basis.
Quote Terms:
- You can create new terms and conditions to use on quotes here.
- Terms sections can be created, deleted, and marked as default (auto-populate when creating a new quote).
- These can be freely selected between at time of quote creation.
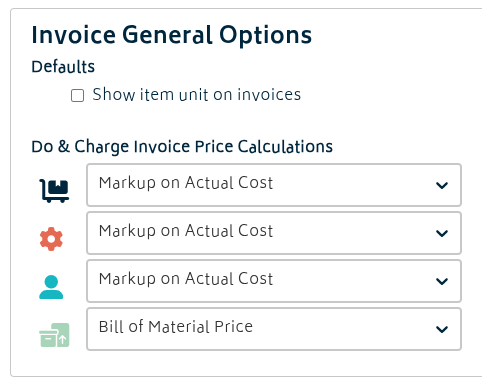
Invoice General Options:
-
Show Item Unit on Invoices will, much the same as quotes, automatically append the unit (eg. (each)) to the name of items when the invoice creation is initiated.
- If these are not needed for specific items, you will be able to erase them from the name on a per-item basis.
-
Show Serial Numbers on Invoices will import the list of consumed serial numbers from the job into the name fields of the relevant line items.
- In the case multiple invoices are being sent out, either the full list may be maintained or items
-
Do & Charge Invoice Price Calculations set what jobs will default to when calculating invoice prices.
-
These are set separately for inventory, profession, asset, and single-use items.
-
The modes are:
- Latest Catalogue Price: Whatever price the item is in the item catalogue
- Bill of Material Price: The price set on the bill of materials in that job
- Markup on Actual Cost: If items are received in at a different cost than what is estimated on the BOM or what the item's expected cost is in the catalogue, this will apply the markup from the BOM (or if not available on the BOM, the catalogue markup) to how much the items actually cost.
-
Delivery Docket:
- Show Serial Numbers on Delivery Dockets will change the default setting of the "Show serial numbers on Tracked Per Instance items" checkbox for new delivery dockets. This can still be toggled manually when creating a delivery docket.
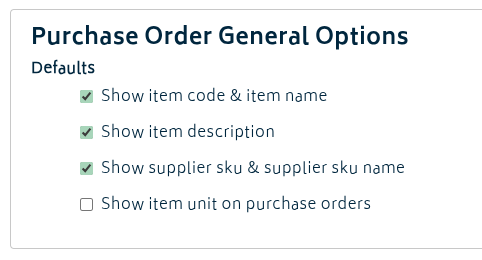
Purchase Order General Options:
This section allows you to customise what will be shown on the purchase order PDFs you create from Gojee to send to your suppliers. The fields referred to are numbered in the images below from the Inventory Edit Page:
-
Show Item Code & Item Name: These fields are taken directly from the item and are guaranteed to always have data.
- If your item codes are confusing for suppliers, you may opt to turn this off and rely on the item description or the supplier-specific fields.
-
Show Item Description: This will show the item's description.
- This field is taken from the item's internal description. As an item's description can be blank, this field may not always appear.
-
Show Supplier SKU & Supplier SKU Name: These can be set up when assigning a supplier to an item or modifying supplier information.
- These should be the internal stock names and codes the supplier uses and provides with their catalogue.
- They are not necessary when setting up a supplier for an item, but they are suggested.
-
Show Item Unit on Purchase Orders will append the unit (eg. (each)) to each item when the Purchase Order PDF is generated.
- As the item name cannot be directly modified for items on purchase orders and may not even appear based on the above settings, the unit will be appended at time of PDF generation.
- If the name is present, it will appear after the item name
Goods Receipt:
This section provides and option to automatically consume items onto the job when receiving goods.
- Generally, it's recommended that this option is turned on in most cases. In this case, you would not need to go into the job and consume the stock manually, it will be done for you as part of the receiving process.
- If you choose to turn this option off, it means that when good are ordered for a job, the goods will be received into stock with a reservation for the job against them so other jobs cannot use the goods. When you're ready to consume the items on the job, you would need to go to the Record Consumables page and manually consume the goods from the reserved instances option.
Xero Tracking Categories:
If a project-linked tracking category is selected, Gojee automatically creates a new Xero tracking option for each new customer job using the job reference and locks the field when editing the job. If the job reference is renamed, the linked Xero tracking option is renamed to match. This keeps job-related Xero transactions easier to report on without requiring users to manually create a tracking option for every job.
You can also archive tracking options for completed jobs from this section when they are no longer needed for active work.
Other Settings
This page allows you to upload your company logo, and set your job sequence number.
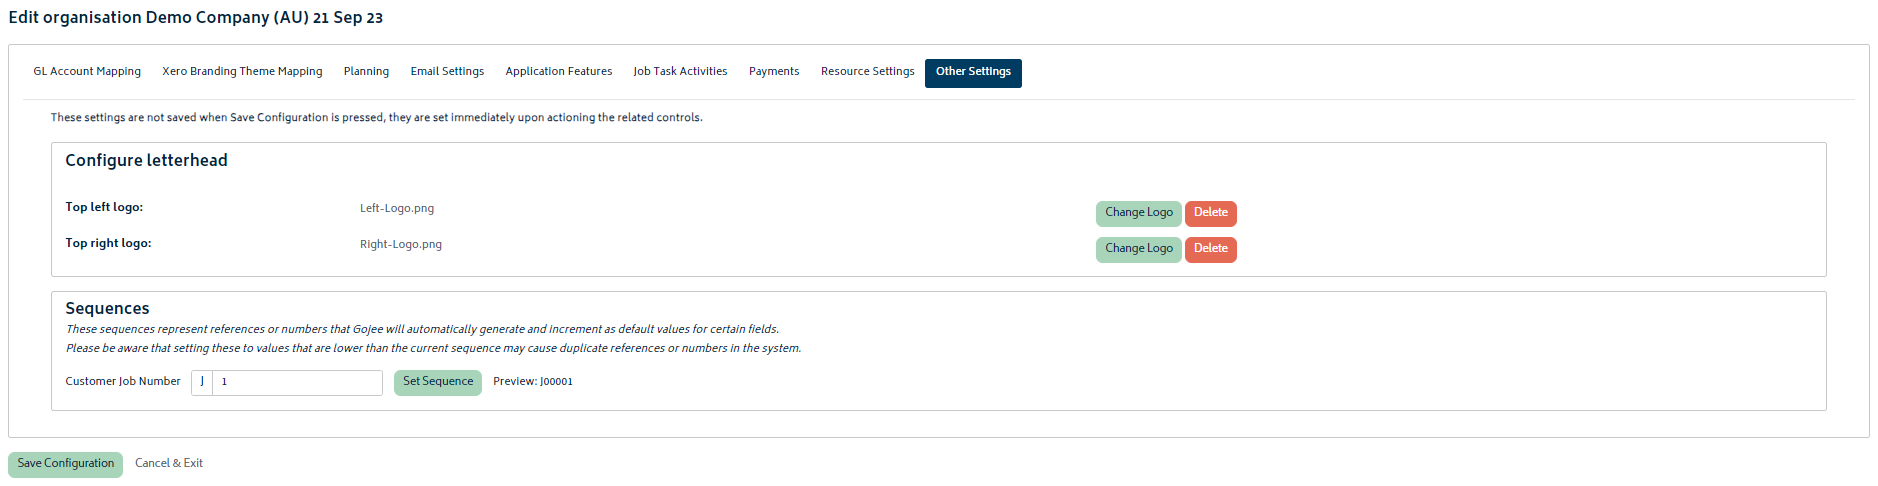
Logo:
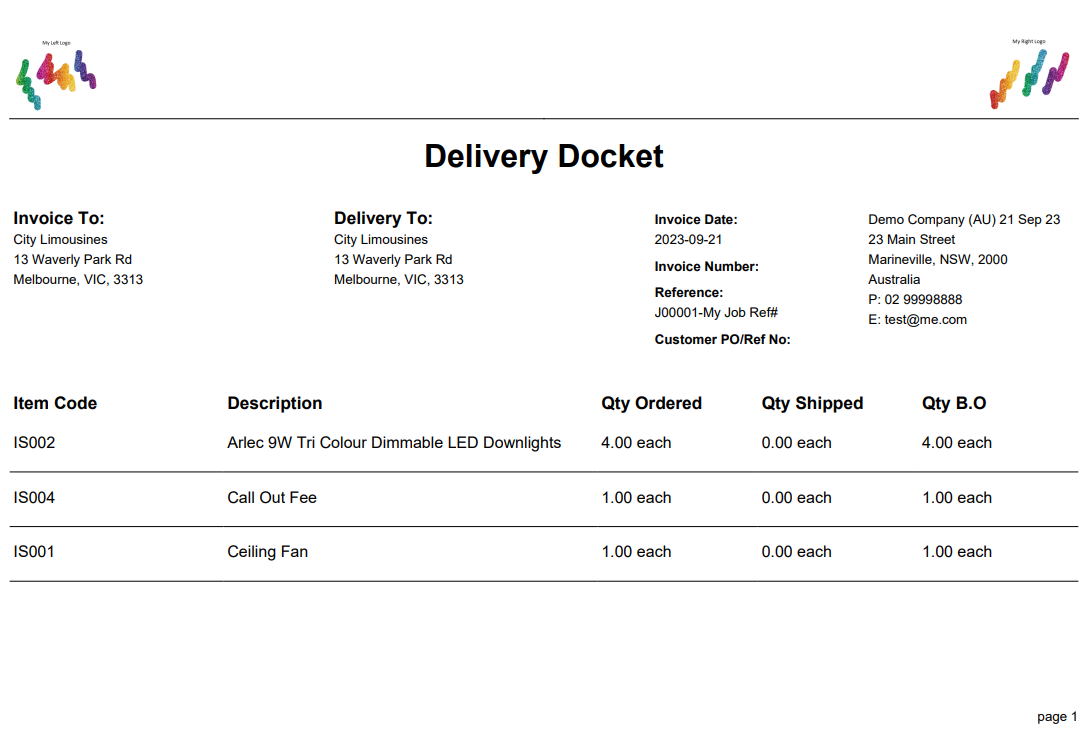
Gojee allows you to upload a logo to be displayed on the top left and top right. These logos are for use on documents created by Gojee, and not by the Xero branding themes. This applies to any documents that have the Gojee branding theme applied - as well as Delivery Dockets, as those don't have an equivalent to pull branding themes in for from Xero. An example of how these logos are displayed is provided below:
Job sequence number:
This setting allows you to change the Job ID number generated for the next jobs created in Gojee. This is useful to continue on with your current job numbering system. At present, the prefix is unable to be changed for newly generated jobs.
- Simply change the number in the field and click set sequence.
- An example of the next job number that will be created is provided for reference.
Organisation Forms
This section allows administrators to configure the custom forms used across jobs in the organisation. Forms can be used for checklists, QA records, inspections, sign-offs, and other structured job paperwork.
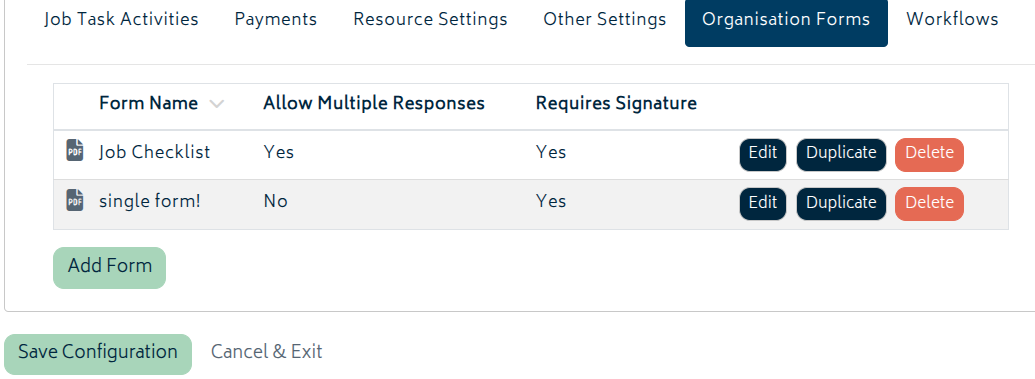
From the forms configuration area, you can create and maintain form definitions, choose the fields that appear on each form, and control how the form behaves when staff use it on jobs.
- Allow multiple responses determines whether each form can be completed once or reused multiple times on the same job.
- Require signature on completion ensures a signature is captured before the response can be marked complete.
- Changes to form definitions should be saved before staff begin using them on jobs.
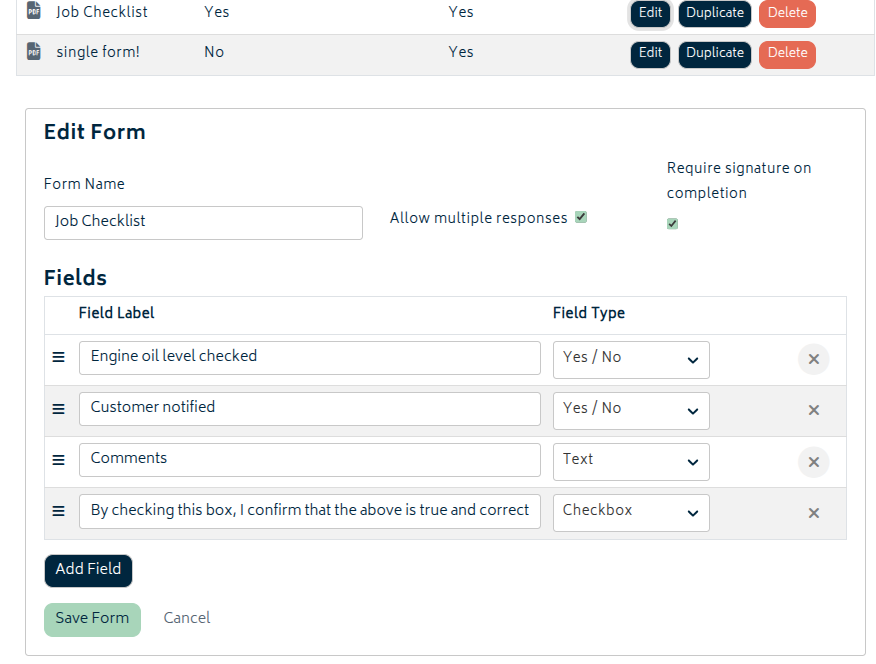
Once configured here, forms can be attached to jobs and completed from the Forms action on the job. Completed responses remain available on the job, and completed forms/responses can be downloaded as PDF when needed.
Workflows
The Workflows tab allows you to manage workflows for the kanban view that control how leads and jobs are organised. You can also control the list of lost reason options for leads.
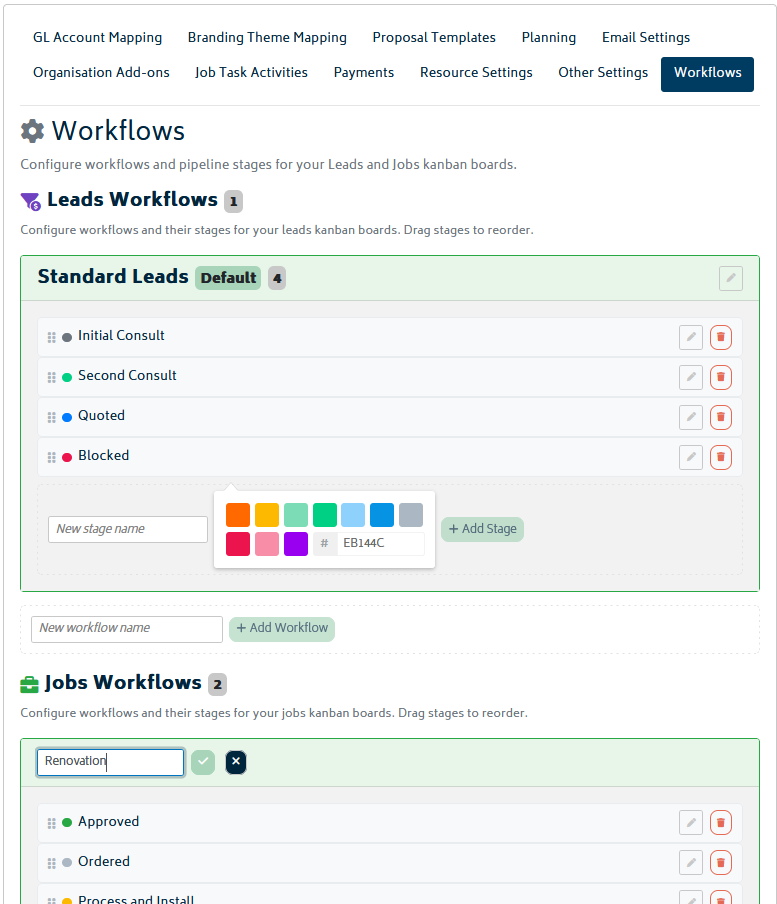
The Workflows sections control the workflows available on the Sales Leads page and Customer Jobs page. You can determine which workflows are available on each type of kanban, which stages appear inside each workflow, the order and colours of those stages, and which workflow is treated as the default.
You can create more than one workflow when needed, rename workflows, set a default workflow, and remove workflows that are no longer required. If a stage is deleted, any leads or jobs in that stage will become unassigned.
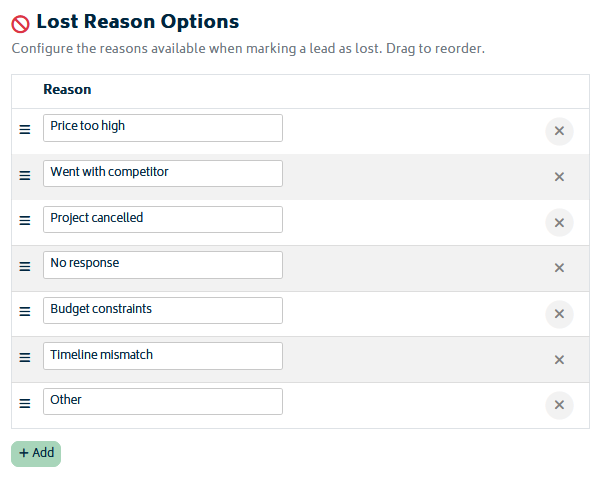
Lost reason options are used when a lead is marked as lost. These reasons, when properly assigned to jobs, provide a better understanding of why your opportunities do not proceed into becoming jobs. This is important for cleaner reporting and more consistent pipeline management.
Next: Email Integration.