
View and Edit Inventory Items
Viewing your Items
Click on Inventory & Assets from the Dashboard, then select View/Edit Inventory Items. This is the inventory list page, which allows you to see all inventory items at a glance.
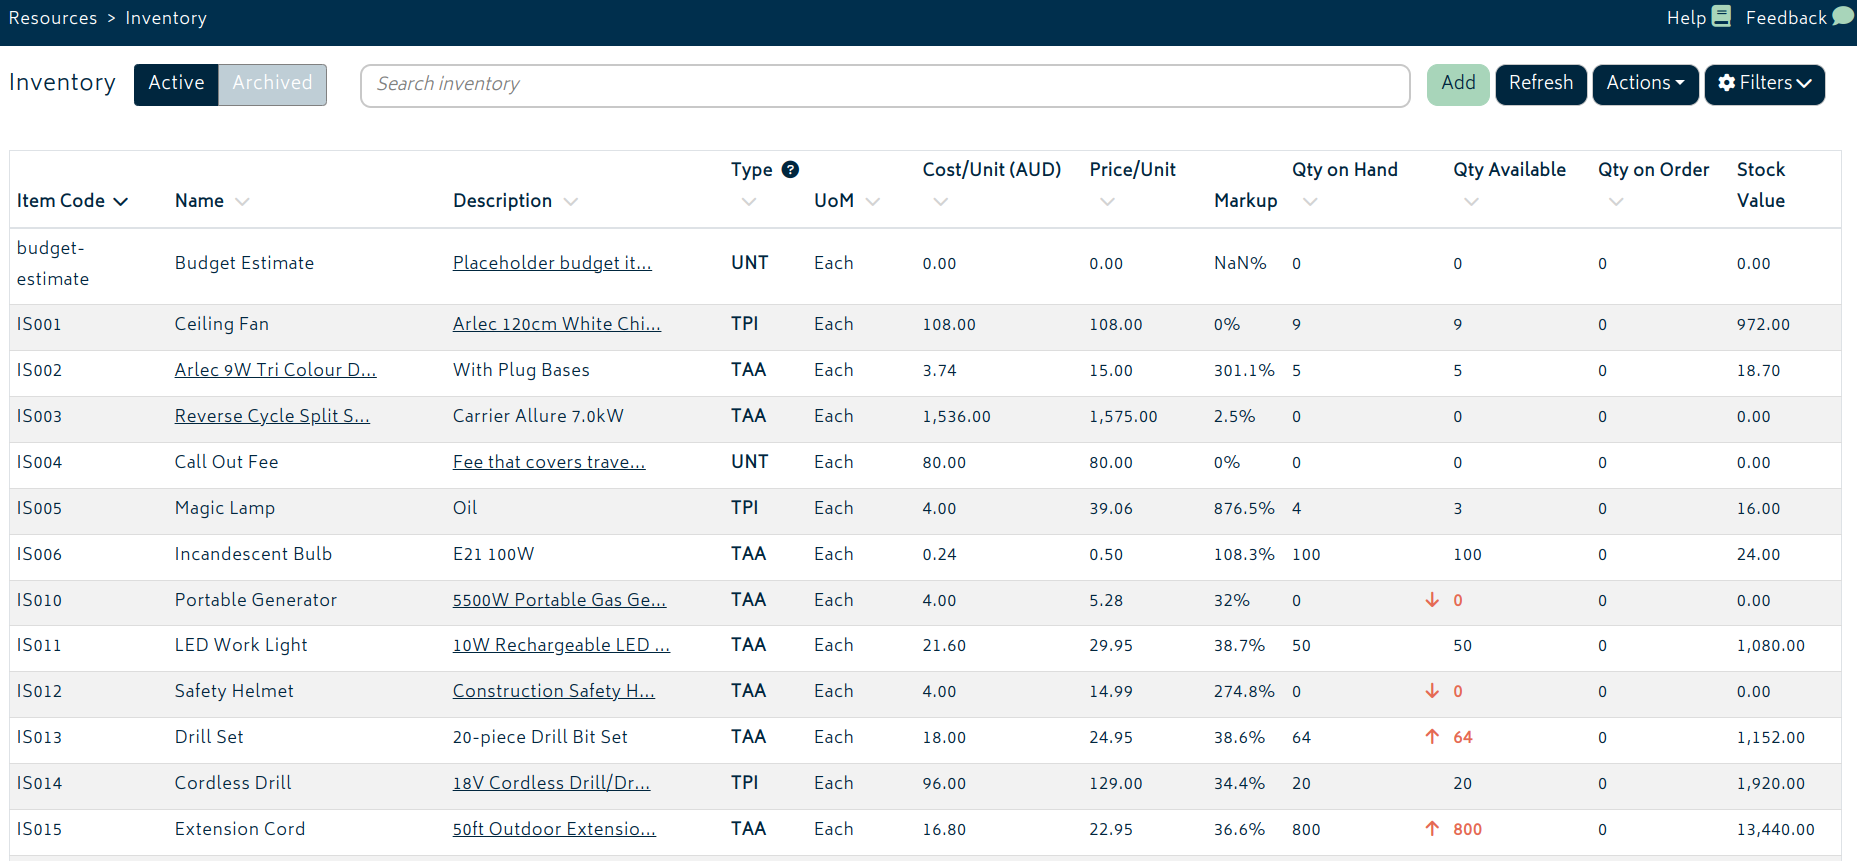
Note: This page has several filters on it, so if the item you’re searching for isn’t shown, you may need to change the filters as detailed below.
The filters and actions available on the option toolbar are detailed below:
-
- Add: This button allows users to add a new item directly from this page. Refer to the Create a New Inventory Item section for instructions on adding a new item.
- Refresh: This button refreshes the list, but without resetting the page filters. You may want to use this button if another user has made an inventory transaction and you want to get the latest quantity on hand information from the database without losing your filters for example.
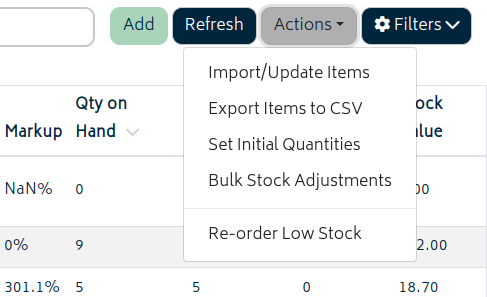
- Actions: This button allows you to choose data import and export options. Refer to Importing and Exporting Data for details on performing these actions. You will also be able to re-order items for stock here.
- Active/Archived Filter: This changes the list view from active items to allow you to view archived items. You can archive or reactivate an item from its edit page.
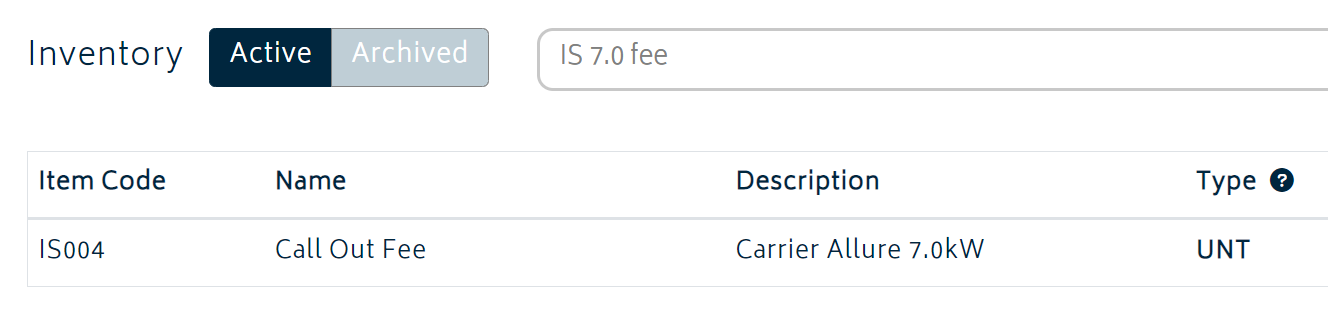
- Search: Filters the list to show items you're looking for. You can search for full or partial matches from a range of fields on the list, including a combination of terms from different fields. The example below uses partial terms from the item code, the name and the description. Search terms are separated with space.
- Filters: This button provides options to filter the items shown in the list.
You can select a location to filter for only items stored at that location:
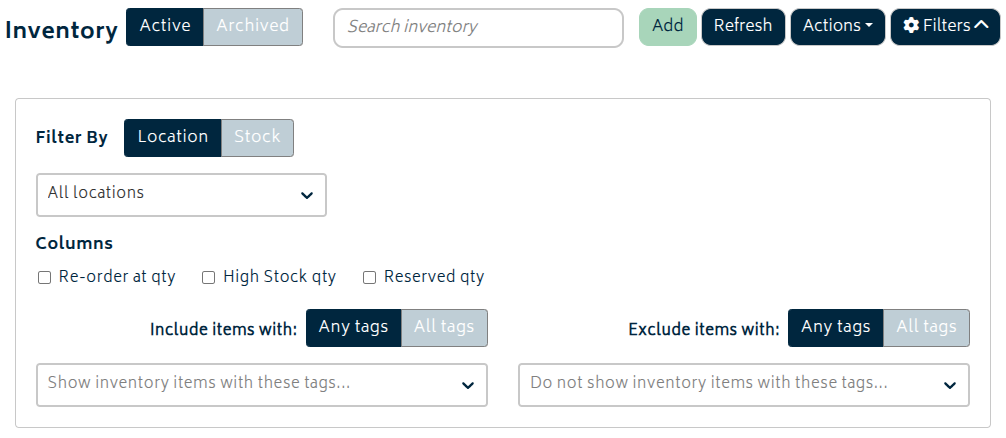
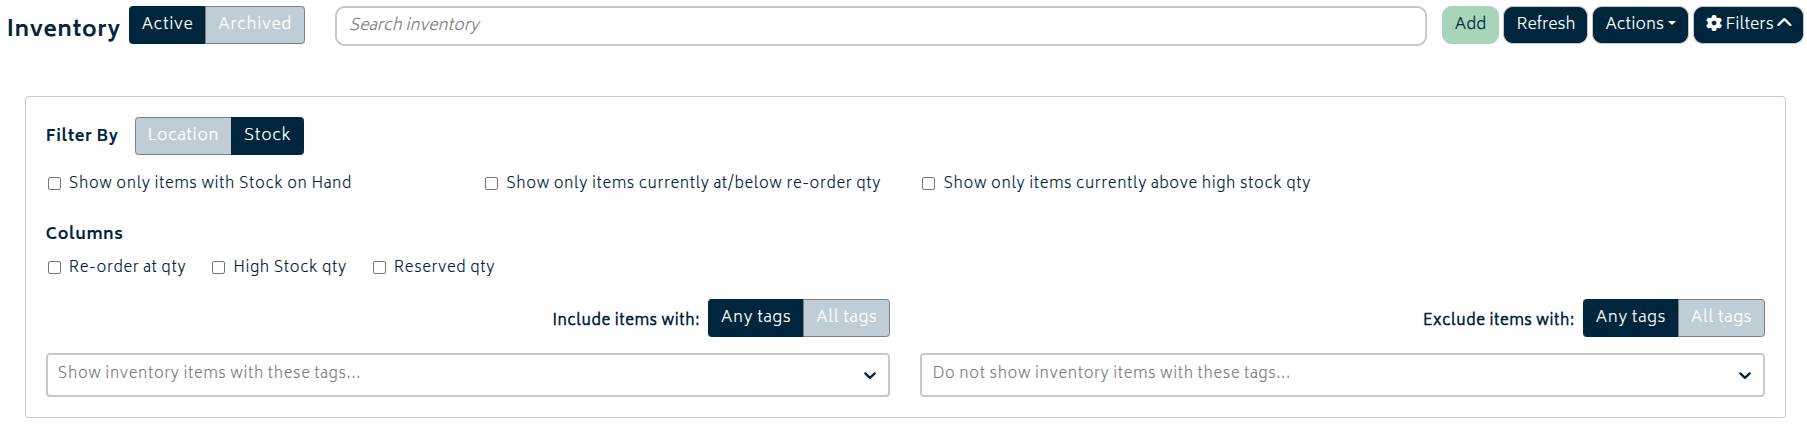
You can also filter by whether inventory items currently have stock, and this is also where you can choose to view additional columns. Tag filters work the same way as they do for the job list - you can use "Any" and "All" modes to match items that contain any of the tags or a specific combination of tags.
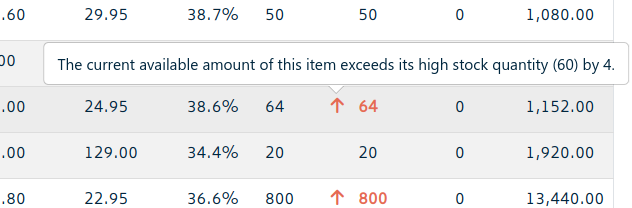
Tracked items may have a re-order at qty and a high stock qty set. If the items are below or above these amounts, arrows will appear next to the stock amount to let you know that the item exceeds a threshold.
Editing your items
To edit or view more details about an item, simply click on the row of that item from the list. This will bring up the inventory edit page.
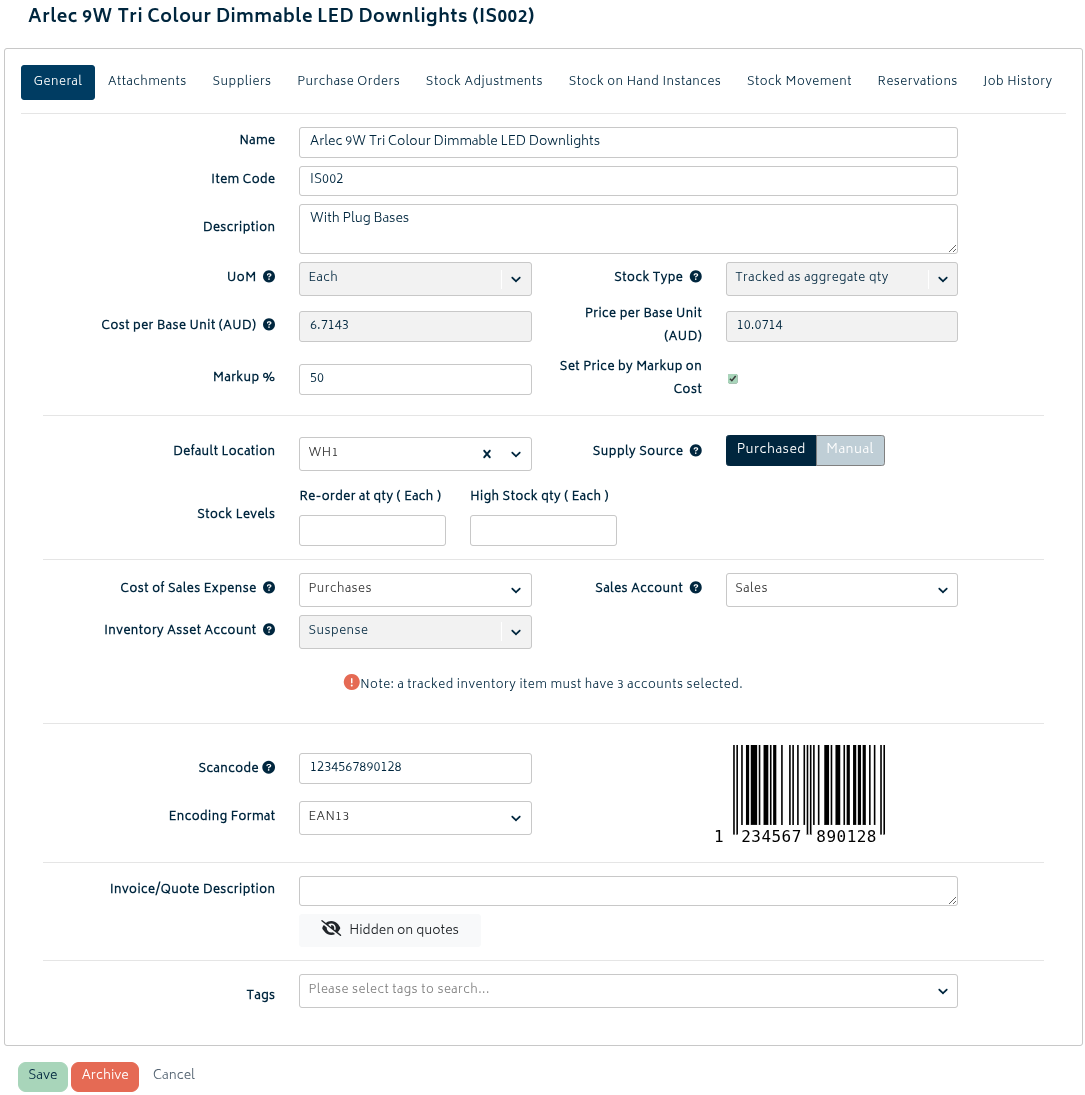
Refer to the following sections for details on each tab of the inventory edit page. Note that for untracked items, tabs related to inventory management will not be visible.
General Tab
On this tab you can edit the general settings of the inventory item. For details on the basic fields shown on this tab please refer to the Create a new inventory item section.
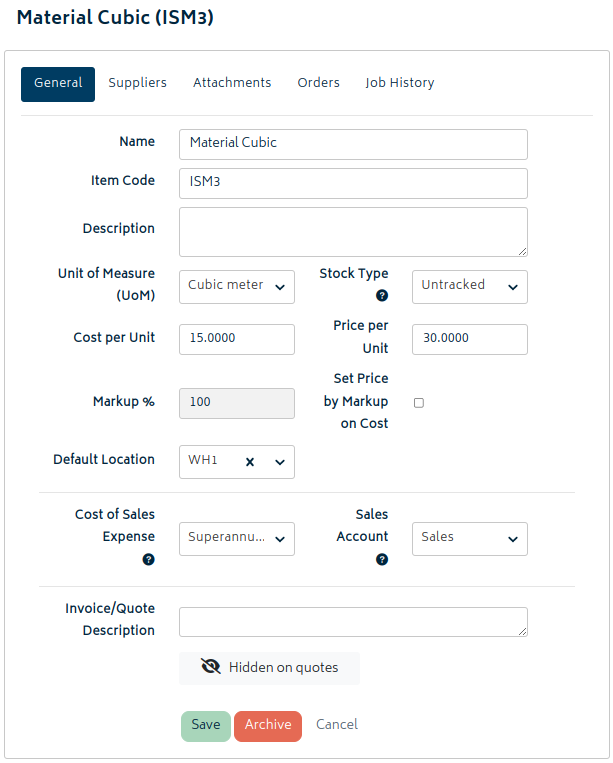
Advanced fields include the following:
Supply Source: Whether the item is sourced from suppliers via Gojee (Purchased), from manual entry (Non-Purchased), or manufactured in-house from other items (Manufactured).

- Items default to "Purchased", but if you want to ensure items from jobs don't show up when creating purchase orders when you can set them to be non-purchased with "Manual".
- Manufacturing is only available for tracked items and requires use of the manufacturing management add-on.
Scancodes: You can set a shortcut code for accessing the item.

- This can be scanned onto the BOM if you have a scanner on hand, eg. scanning items for POS transactions or setting shortcuts to items that are used frequently and having a printout of various codes at hand.
- Supported formats include QR code, CODE128, EAN13, EAN8, UPC, CODE39, ITF, MSI, pharmacode, and codabar.
- QR codes can be generated with different error correction levels. Higher levels make the code more resistant to damage and obscuring before becoming unreadable.
Tags: You can set tags for each item for easier searching and filtering.

- At present, organisation-created tags are shared between jobs and inventory items, but this may change in the future.
Note: Some of the fields on this page may be disabled. This can include the following:
- UoM/Base UoM: Changing unit is disallowed if there are transactions for this item (i.e. the item has been purchased, stock added, item has been consumed onto a job etc.). Please ensure that the item is the correct unit before performing any such actions with the item.
- Stock type: Changing stock type is only permissible for tracked items if the quantity on hand is zero. You can use the Stock Adjustment function detailed below in this article to temporarily remove items on hand to allow a stock type change. You will need to reverse the stock adjustment to bring the stock back on.
- Cost Per Unit: Once any purchasing has occurred for tracked items, this field becomes disabled and is calculated by the system based off an average cost of stock on hand. If you’d like to adjust this cost, you can use the Stock Adjustment function detailed below in this article.
- Price per Unit: This field will be disabled if the option to set price by markup on cost is enabled. To enable this field simply toggle that option. You can also update the price by changing the Markup % field.
- Markup %: This field will be disabled if the option to set price by markup on cost is disabled. To enable this field simply toggle that option. You can also update this field by changing the Price per Unit field.
Suppliers
On this tab you can add one or more suppliers for the inventory item. This tab provides a manual process for adding suppliers. Note: this process can also be done in bulk. Please refer to this article for details on bulk import of Supplier Catalogues.
To add a supplier manually for the item, simply click on the green Add button:
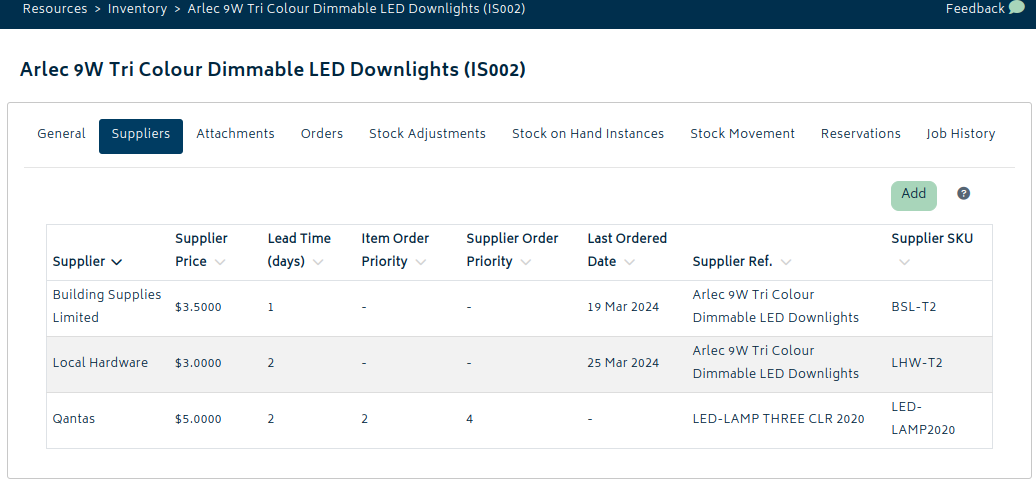
This will present the following modal:
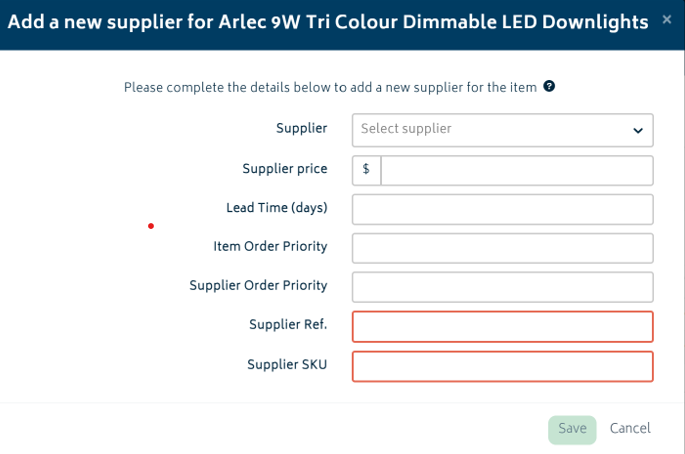
Select or enter the appropriate information for the supplier:
- Supplier Price (required field): Enter the unit price you pay a supplier for an item.
- Lead Time (days): Estimated number of business days that a supplier's product will arrive after being ordered.
- Item Order Priority: Specific order of preference that a supplier is chosen to fulfill a purchase order for this item. Example: for the same stock item, if Amazon has an item priority of 2, and The Iconic has an item priority of 1, the system will default to The Iconic when creating a purchase order for the item.
- Supplier Order Priority: General order of preference that a supplier is chosen to fulfill a purchase order if Item Order Priority is not set. Example: for the same stock item, if Amazon has a Supplier Order Priority of 1, and The Iconic has a Supplier Order Priority of 2, the system will default to Amazon when creating an order for the item.
- Supplier Ref. (required field): Name used by the supplier for this item (i.e. what the supplier names the item in their own catalogue)
- Supplier SKU (required field): Stock keeping unit (SKU) used by the supplier for this item (i.e. what the supplier item code is for the item in their own catalogue)
To edit the information for a supplier, simply click on the row in the list and a modal for editing the information will appear.
To delete this supplier from the list, please refer to the Contacts section of the Knowledge Base. You will need to navigate to the supplier page and delete the item from the supplier's catalogue.
Attachments
This tab allows you to upload attachments for this inventory item, such as spec sheets, manuals, photographs, et cetera for safe keeping. Attachments can be any file type. However, there is a limit of 100Mb per attachment.
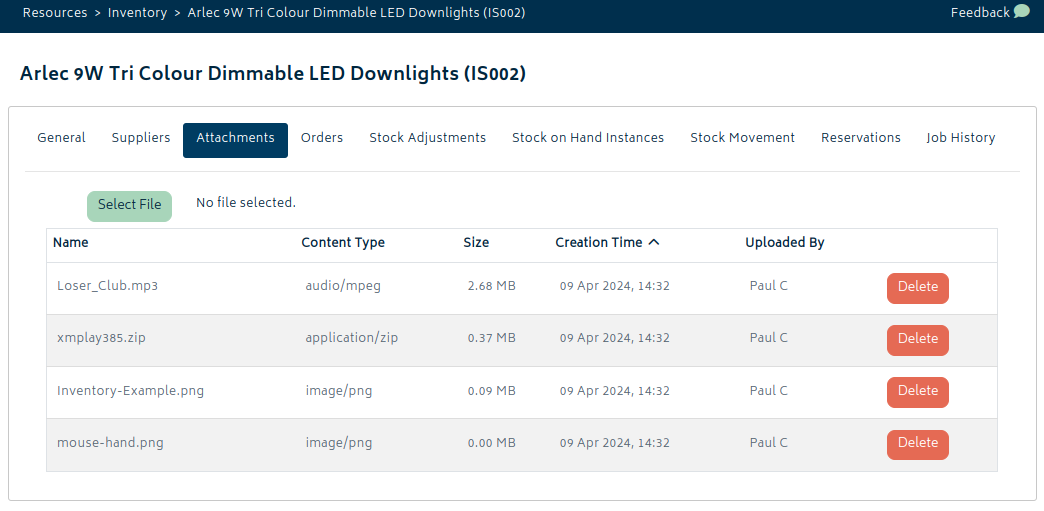
To upload a file, follow these steps:
- Click on the Attachments Tab.
- Click the green Select File button.
- Choose the file you’d like to upload from the explorer.
- Click the green Upload File button.
- Your attachment will be uploaded, and viewable from the list.
Orders
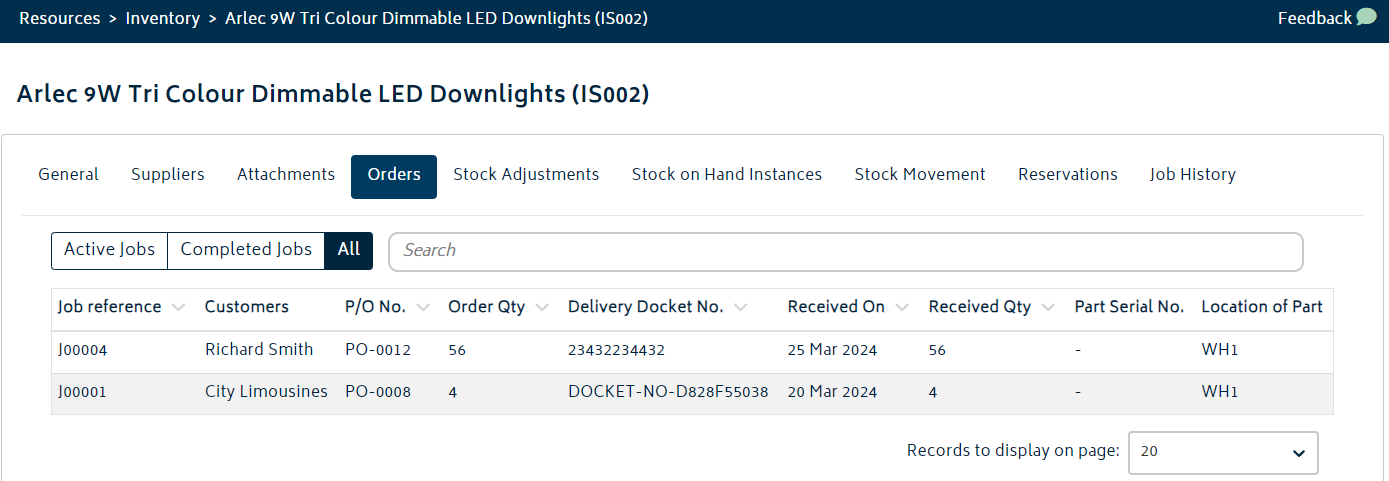
This tab shows you details regarding purchase orders made for the inventory item. It shows what job the items were purchased for, when they were received, and their serial numbers. You can also filter based on orders for active or completed jobs, or search for text in any field.
Stock Adjustments (Tracked only)
This tab allows you to adjust the quantity, and cost of the item.
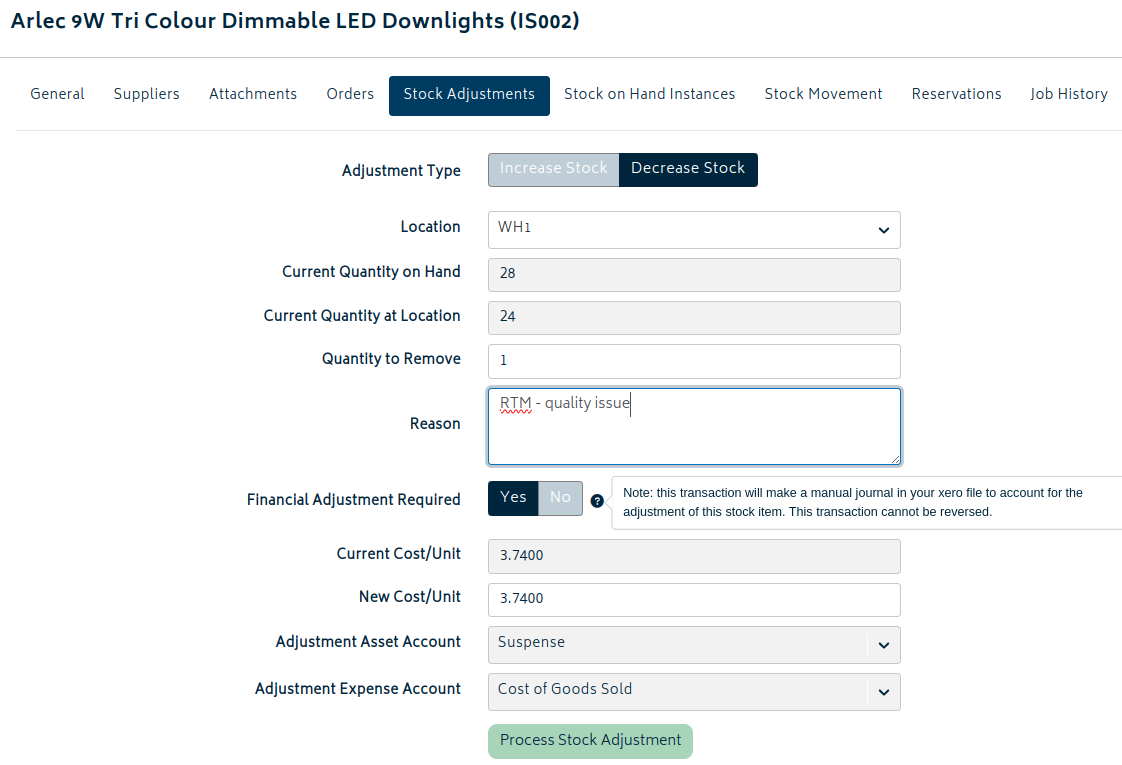
To make a stock adjustment, follow these steps:
- Adjustment Type (Required Field): Choose whether you’d like to increase or decrease the stock.
- Location (Required Field): Select the location you would like to make the adjustment to. Note, if you have stock in multiple locations, you’ll need to adjust each location one at a time.
- Current Quantity on Hand: This is a read only field which shows you the quantity on hand in all locations (not just the one you have selected above).
- Current Quantity at Location: This is a read only field which shows you the quantity on hand specifically in the location you have selected.
- Quantity to Add/Remove (Required Field): This is the quantity you want to make the adjustment for.
- Reason (Required Field): Enter a reason for the adjustment. This will be stored for future reference.
- Financial Adjustment Required (Required Field): If this option is selected, then the adjustment transaction will make a manual journal in your xero file to account for the adjustment of this stock item. This transaction cannot be reversed. If this field is selected, the following additional options are shown:
Note: This is and advanced option and we recommend you obtain advice from your accountant or bookkeeper before choosing this option. Typically, we would suggest that you leave this on for most cases so that the value of the stock on your xero file is maintained correctly at all times, however there are instances where you may not want to make this adjustment (i.e., when recognising opening stock, and other examples) so the option is provided.
-
- Current Cost/Unit: Read only field showing the current cost per unit.
- New Cost/Unit: Editable field which allows you to set the new cost/unit of the item once the adjustment is processed. If you aren’t intending to adjust the cost of the item, only the quantity, then leave this field as per the default.
- Adjustment Asset Account: Read only field showing the asset account side of the manual journal which will be created for this transaction in Xero. This field is taken from the general tab of the inventory item edit page.
- Adjustment Expense Account: Read only field showing the expense account side of the manual journal which will be created for this transaction in Xero. This field is taken from the general tab of the inventory item edit page.
Stock on hand instances (Tracked only)
This tab shows you a list of all the stock on hand, where they are located and what their serial number is (for tracked per instance items only).
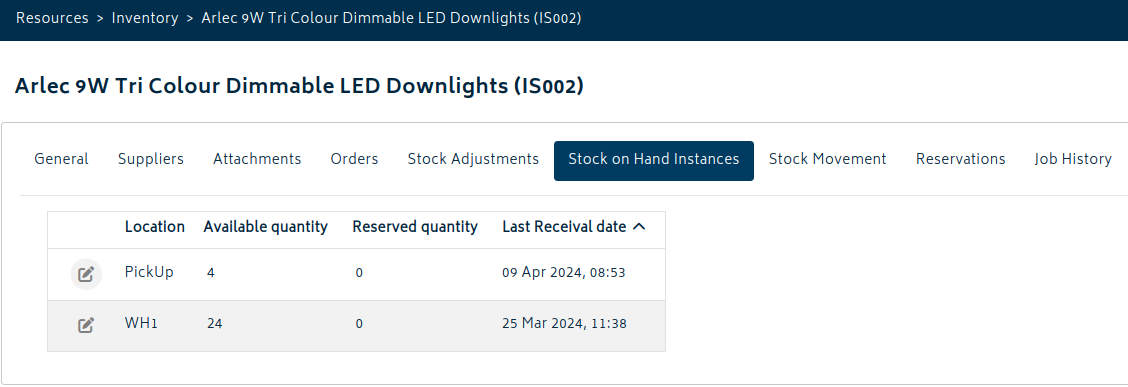
This page allows you to edit the location and the serial number of the stock on hand. To do this simply click on the edit icon as highlighted in the image above.
Stock Movements (Tracked only)
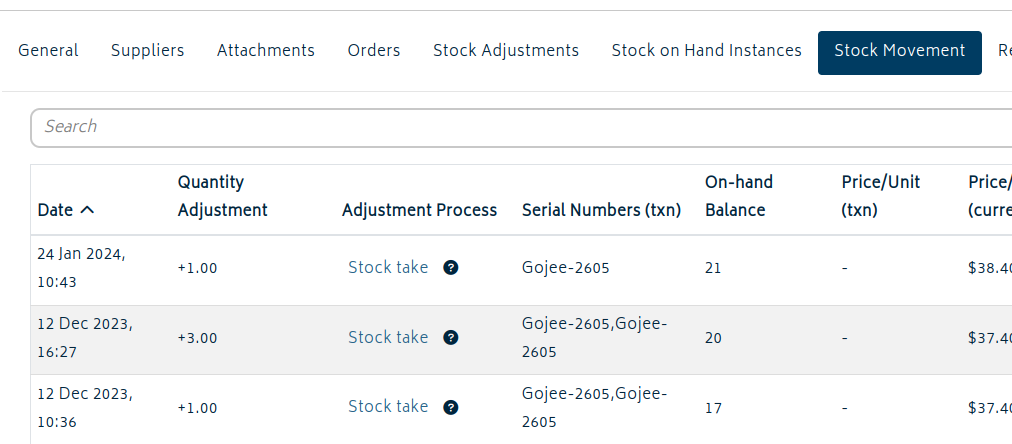
This tab shows a report of all the movements that have occurred for this item.
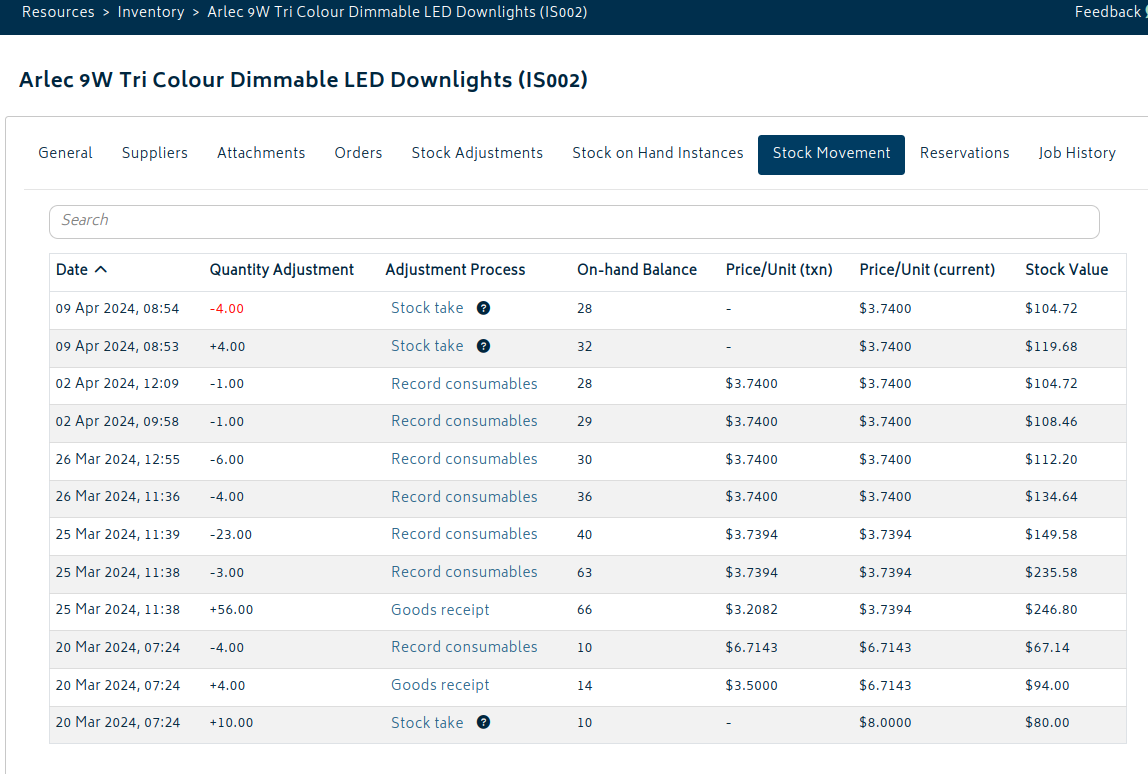
You can click on the blue text in the Adjustment Process column to show you more information on each individual movement.
Note: The price/unit (txn) is the price that the movement occurred at. The price/unit (current) is the average cost of the items on hand after the movement occurred.
For items tracked individually, serial numbers will also be displayed here next to each movement - whether they be part of a batch of the same serial number or individual serial numbers per item.
Reservations (Tracked only)
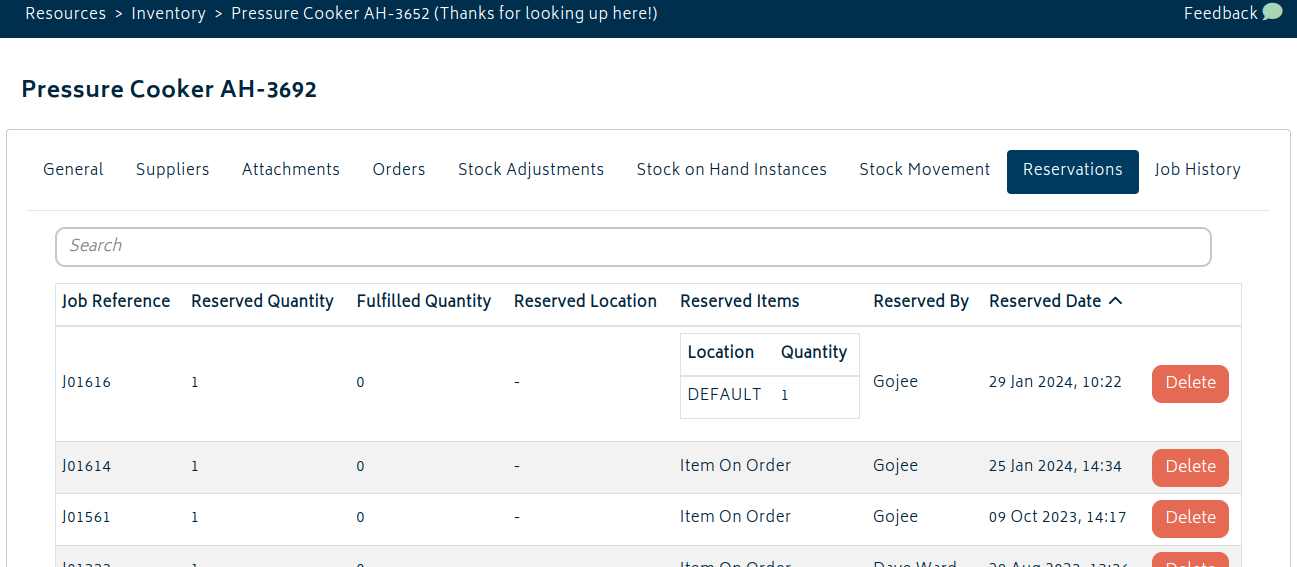
This tab allows you to view instances of this item that are reserved by jobs but have not yet been consumed. It shows you where the item is located (if specified), or whether it is on order.
Job History
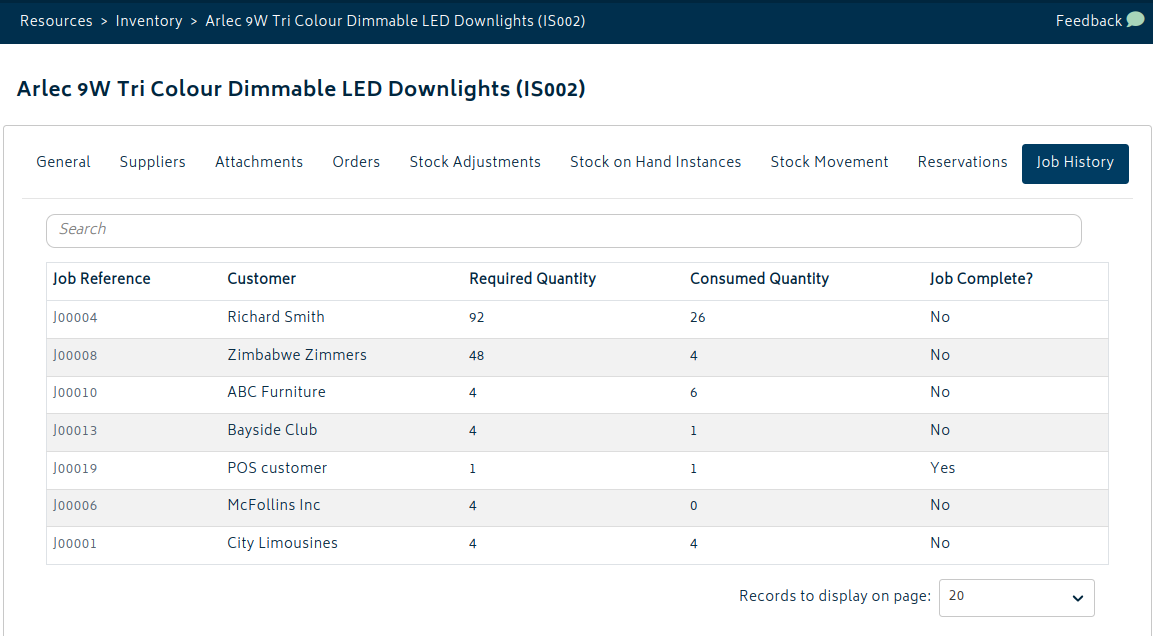
This tab shows a history of all jobs that the inventory item has been used in. It shows how many of this item have been consumed for each job, and how many of the item are required by it.