

Create Purchase Orders
Create a new Purchase Order
Prerequisite: Before you can create a purchase order for inventory you will need to have created at least one inventory item in Gojee (refer to Create a New Inventory Item for more information). It is recommended you also set up the supplier pricing for inventory items (or import supplier catalogues) prior to creating purchase orders. You can allocate supplier as part of the process of creating a purchase order, but it will save you time if the pricing is already set up, and it may be less confusing on your first attempt.
There are four main ways to create a new purchase order:
- Job-specific PO from the Job Actions list on a job
- Reorder stock PO from the inventory list
- All PO types from the Reports > Purchase Orders list
- All PO types from the Navigation Dashboard
For POs created from the job/PO lists, just click the green Add or New Order button on the top right of the list.
From the navigation screen, click the Purchasing & Receiving section and select "Create a New Purchase Order":

For both this method and the Purchase Orders list, you will be presented with the following options:
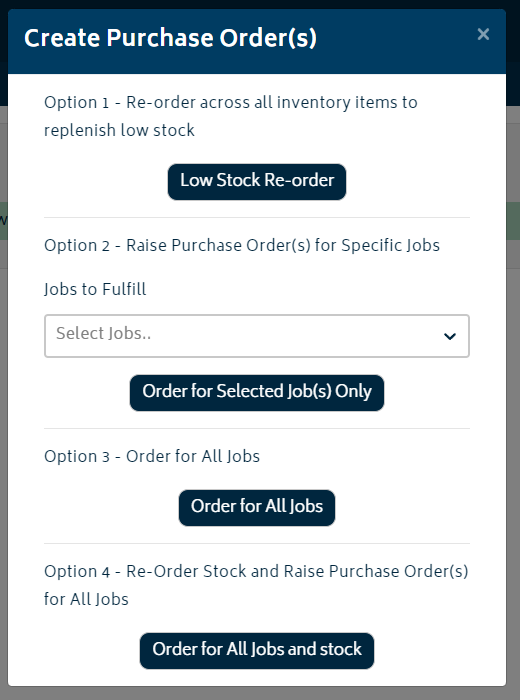
You can choose how you would like to proceed the four options in the modal above - a low stock reorder, ordering for specific jobs, ordering for all jobs, and ordering everything at once. Refer to the sections below for details on each option.
The Purchase Order Creation Page
When any method to create purchase orders is chosen, you will go to the Create Purchase Order page. On this page, one or more purchase orders will be generated. Each will be presented in a card view with the supplier name at the top, all the items being ordered for the supplier in the middle, and delivery details at the bottom. The delivery details can be collapsed so they aren't in the way, and the items can be re-ordered by grabbing the bars on the left side. You can also click the Item Code or the Name column headers to sort the items in the PO automatically. The total order will be combined at the top of the page as per the image below:
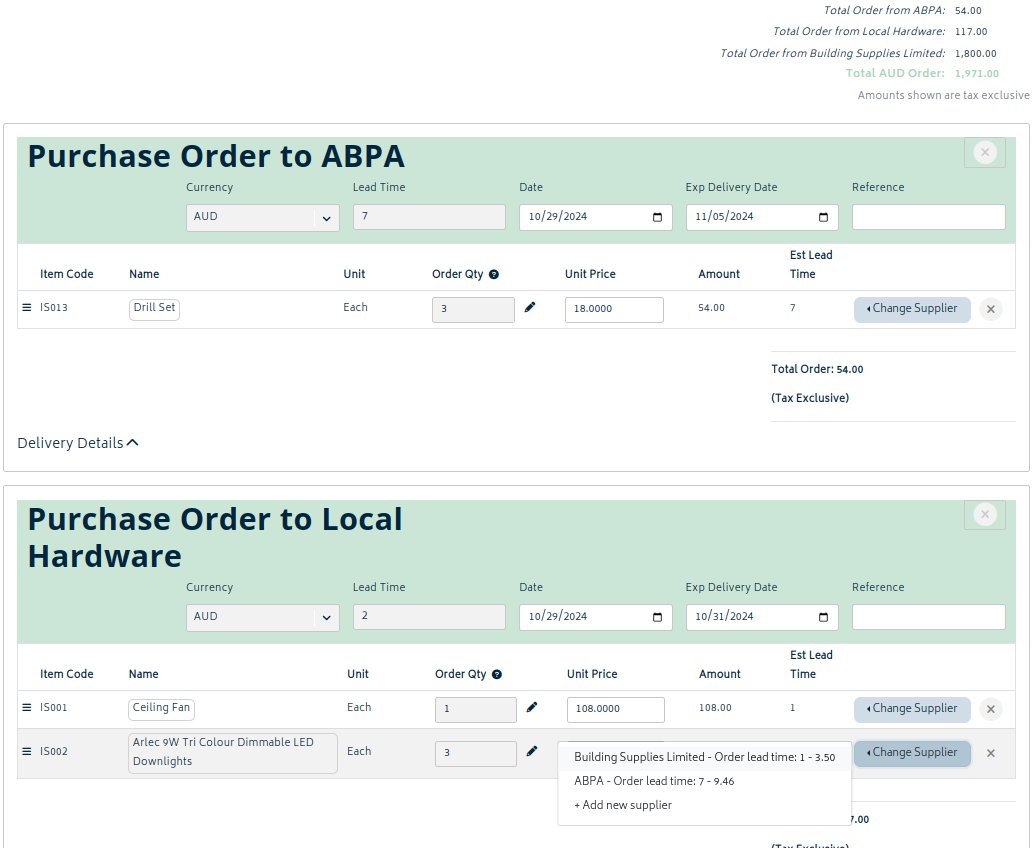
You have the option to change a supplier to another existing supplier, or add a new supplier for the item on the fly. Simply click on the "change supplier" button on the line item and select an option. The existing suppliers will be shown in the list, in this case there are 2 other suppliers that also supply the LED Downlights. Each alternate supplier's price and lead time is also shown for convenience.
If the system loads an item onto the create purchase order page without any existing supplier information, the "Items Without Supplier Information" card will be displayed:
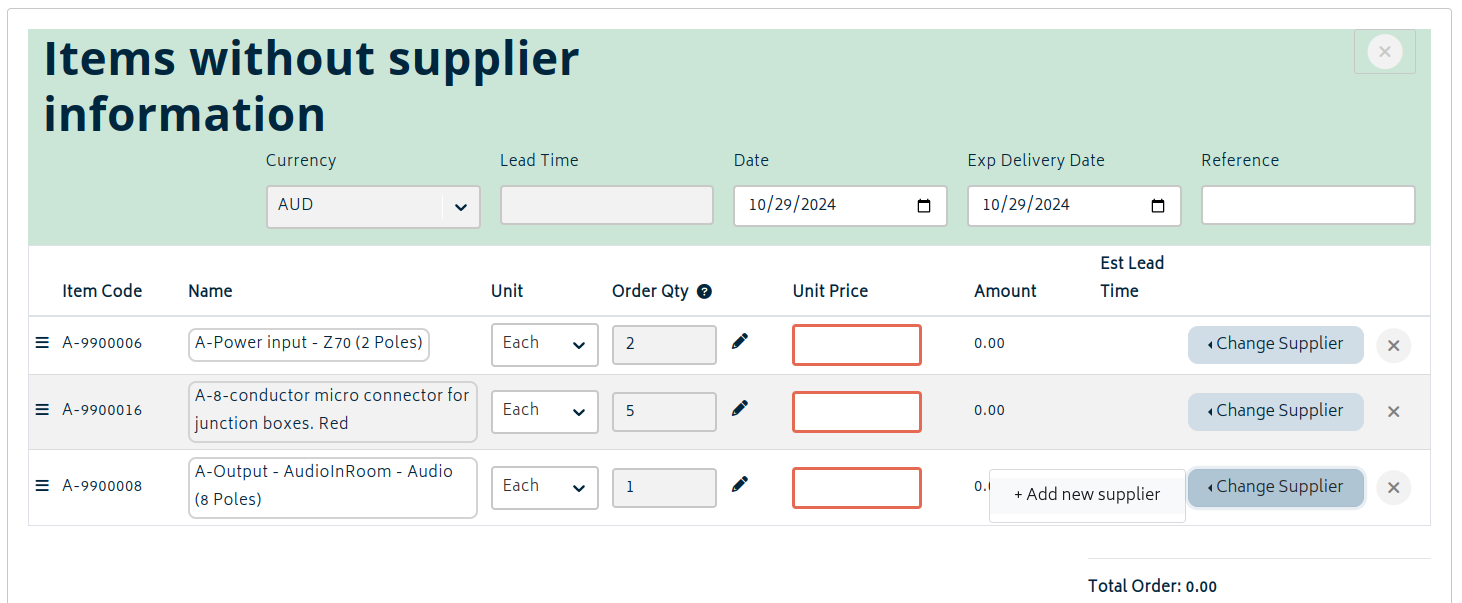
Note: For each item without a supplier, you will need to click on the "change supplier" button for each line item and allocate a new supplier for this item to be eligible for ordering. If you are ordering job items, suppliers can also be set and linked to items via the Suppliers section on the BOM.
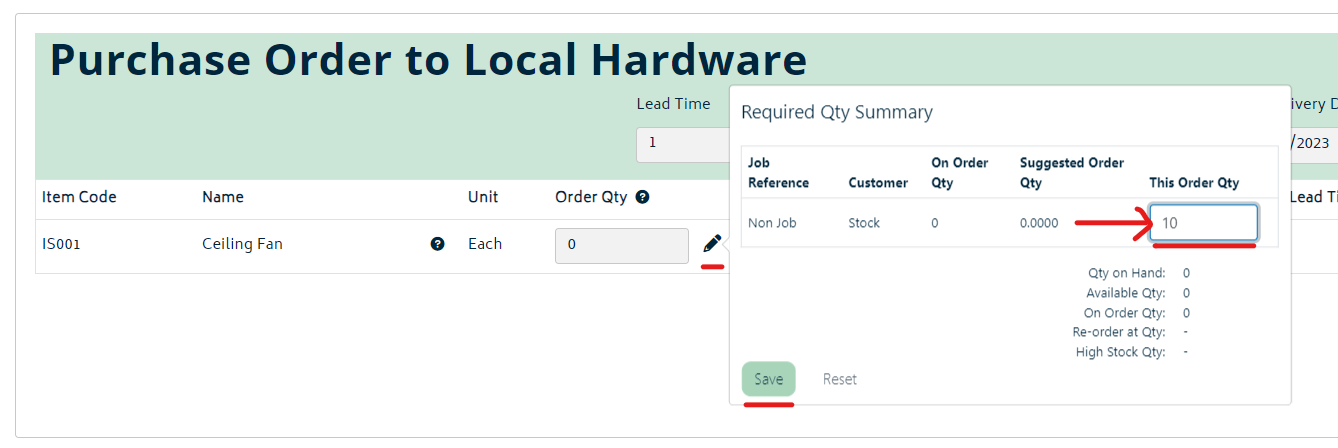
To edit the quantity of each item being ordered, click the pencil icon and you will be able to check the details of what is being ordered.
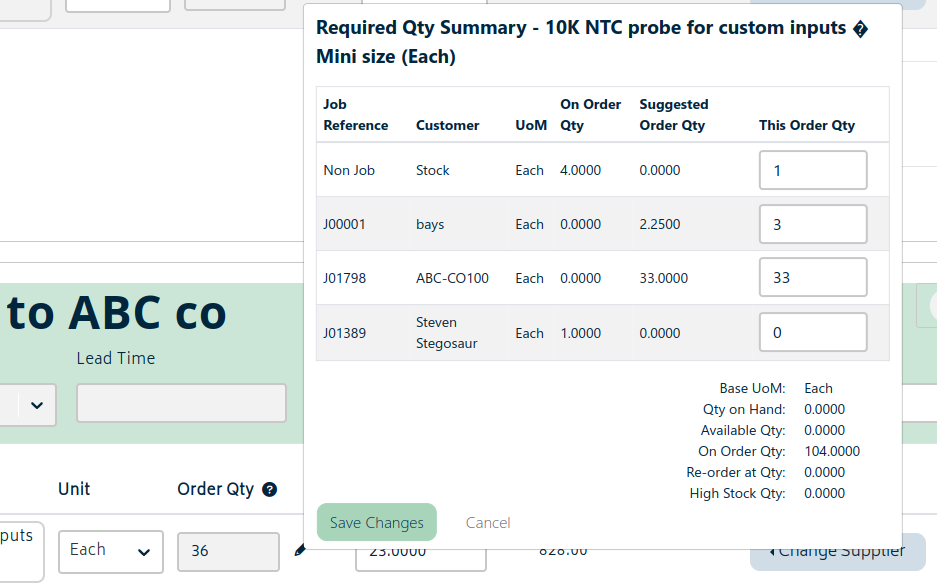
Change the quantity in the "This order qty" column and then hit the "save changes" button to update how many will be ordered and for which job they are being ordered for. In this case, the system will suggest an order of 33 + 2.25 for required stock for jobs, but we want to order one for stock.
The quantity columns shown in the table above are detailed as follows:
- On Order Qty: The amount already on order, awaiting receipt for this item.
- Suggested Order Qty: This is the default amount the system has calculated that should be ordered on this order.
- This Order Qty: This will default to the "Suggested Order Qty" but can be edited as required. This will be the quantity that will show on the purchase order sent to the supplier.
In addition to changing the quantity of items added to the order by default (i.e. items which met the criteria of re-order), you can also add additional items onto the order that don't meet the re-order requirements.
- You may wish to do this because you know the particular supplier you're making an order with stocks other items that are close to the low re-order level and you'd like to include them in the order to save on shipping costs. To do this, simply click on the "+ Add a new line" button at the bottom of the page, and you'll be presented with a modal to choose the item you'd like to add:
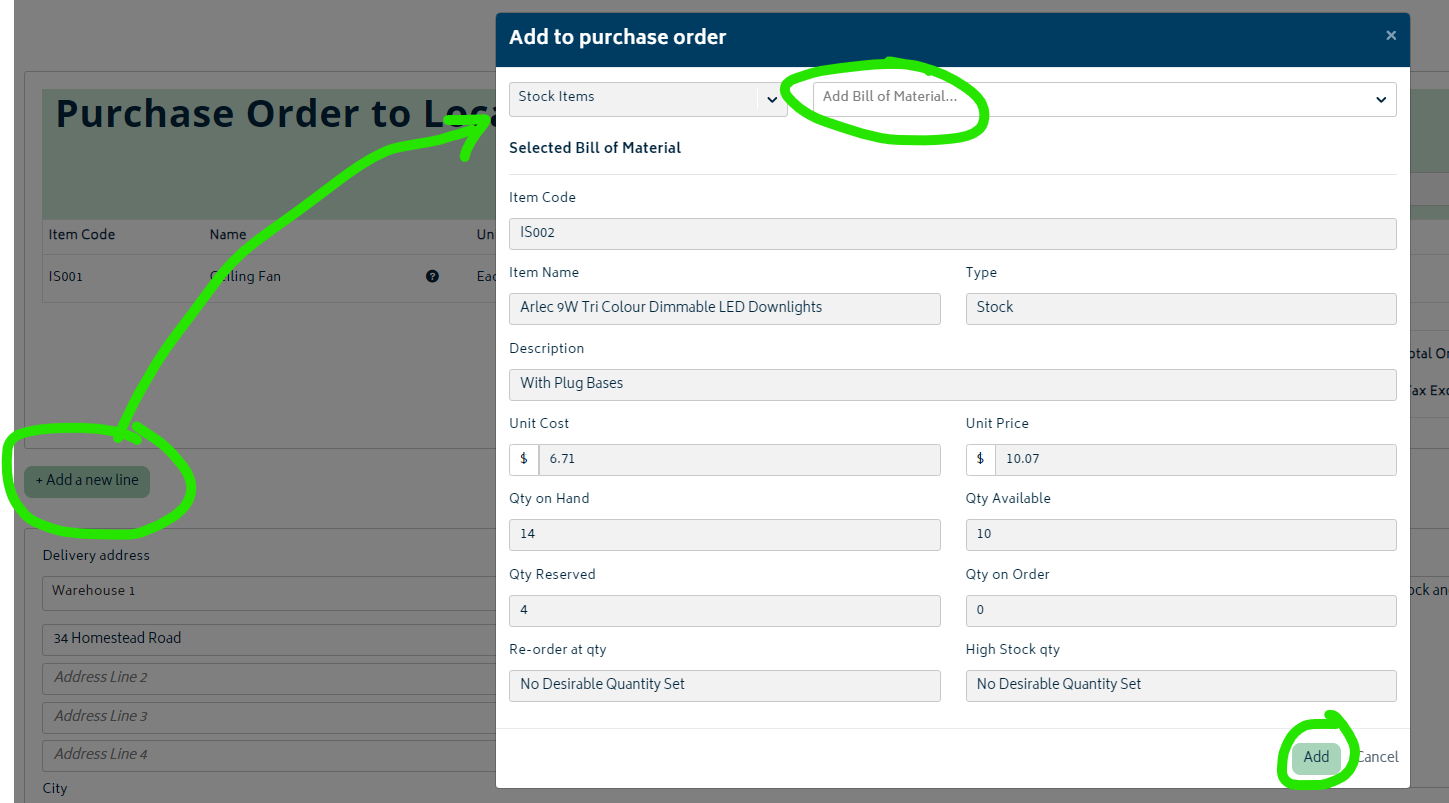
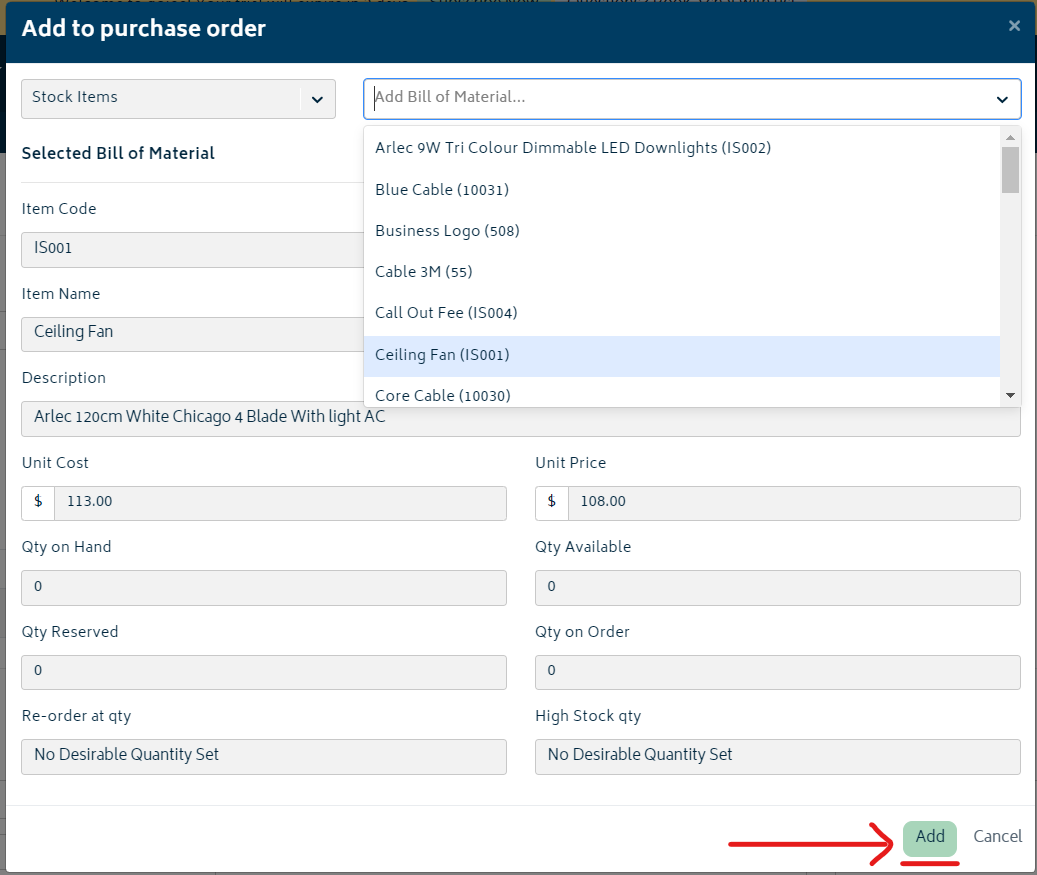
Once you've selected the item as per the above image, click add at the bottom of the modal and the item will be added to the order list and placed into a supplier card (based off the supplier priorities chosen at the top of the page). The item will be loaded with a suggested qty of 0 items. Simply repeat the process above to change the quantity:
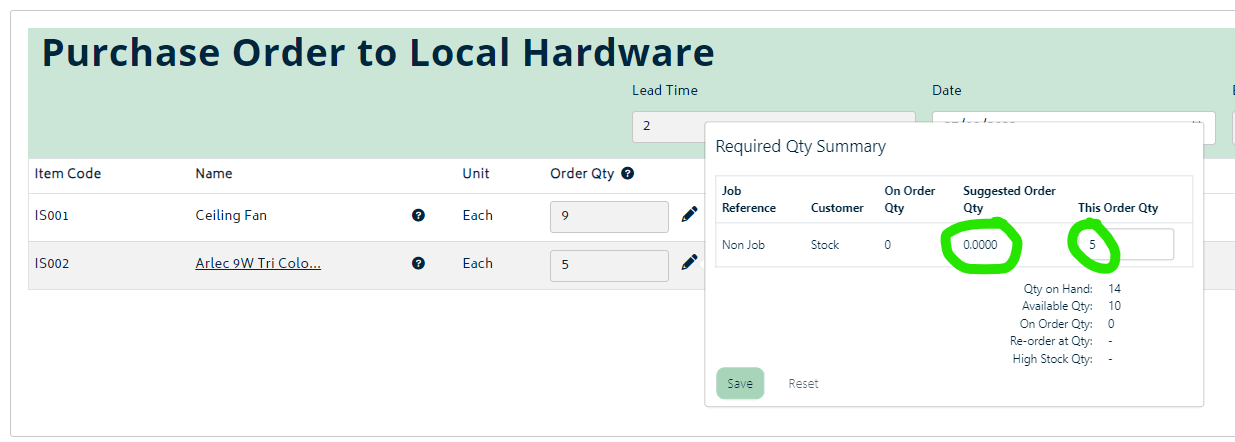
Note the Date and Delivery Date for the order. The Date is when you anticipate to send the order (as it may need to be approved internally first), and the Delivery Date will be automatically generated based on the highest lead time among the items in the order.
- This will not take national holidays, weekends, etc. into account as every supplier and delivery method varies, so if you have a preferred delivery date you can also set this freely.
At the bottom of each card, you can complete the standard order details including the delivery address, the person to address the items to, and the delivery instructions. The delivery address is the first field. You can simply select an existing delivery address, or add your own custom address into this field.
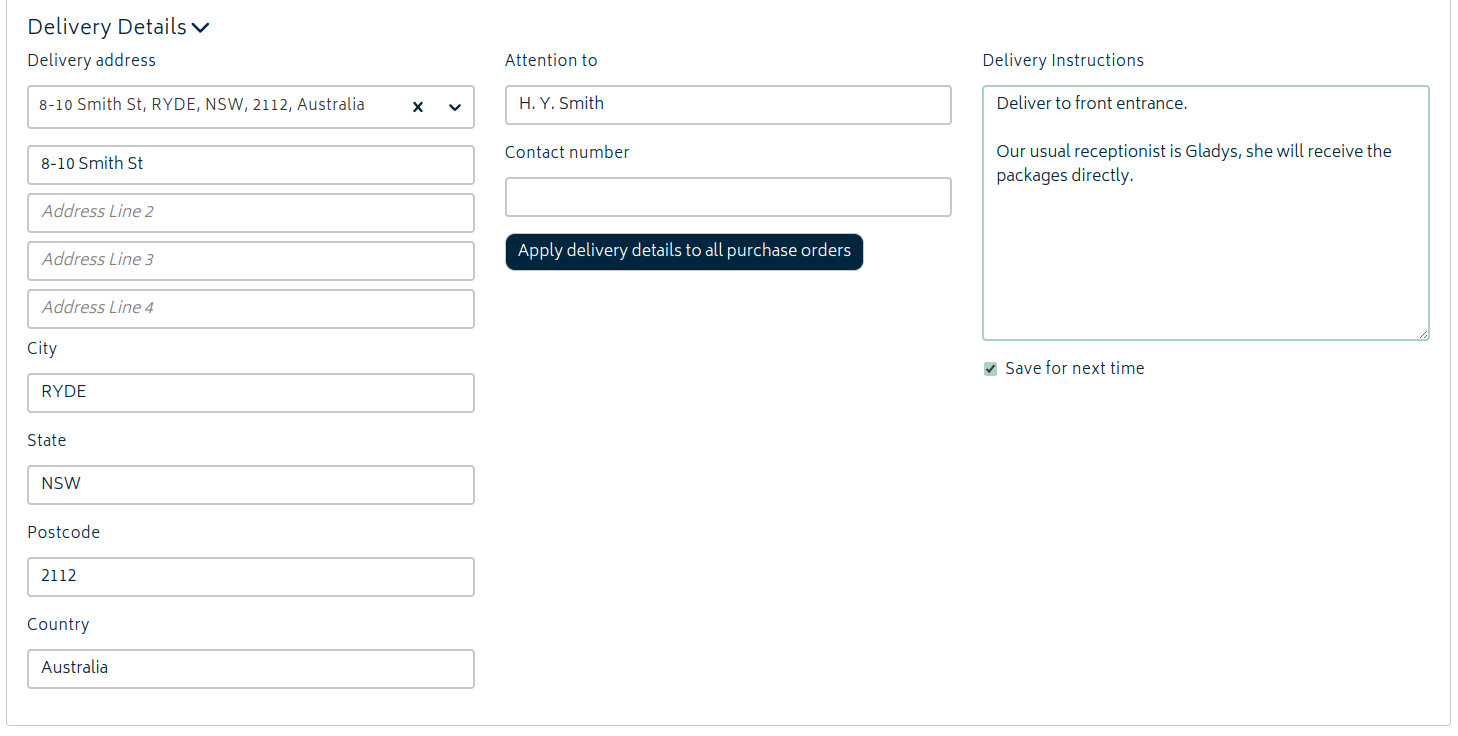
- Delivery instructions can be saved for each supplier so that they will auto-populate the next time an order is placed with that supplier.
- The delivery details can be copied as a whole to every other purchase order. Note that this will copy the instructions as well, overwriting any custom instructions that may be set for a specific supplier.
- The "Attention To:" and "Contact Number" fields in the image above will default to the name and contact number attached to the delivery address if one exists. See an example below, as set in the organisation settings page.

Tip: Take a moment to set up all your delivery addresses in the organisation settings in order to speed up the process of creating new orders.
Once you have completed all the information, ensure the "Branding Theme" chosen at the top of the page is correct (this will default to the theme chosen for purchase orders in organisation settings) and then hit the "Create Purchase Order" button at the bottom of the page.
Your order(s) will be generated and you'll be navigated to the Purchase Order list page, where you'll see the order(s) in the "Awaiting Shipment" list:

Refer to the view, edit and email section for more information on actions relating to purchase orders.
Low Stock Re-order
The low stock re-order function uses the settings on each individual stock item to determine whether or not an order is required for each stock item. This process will raise one or more purchase orders (i.e. orders for one or more suppliers) in the one convenient action.
Prerequisite:
For your items to be included in this type of order, you will need to have set up both high and low stock levels for each inventory item. Refer to Create a New Inventory Item for more information on these levels.
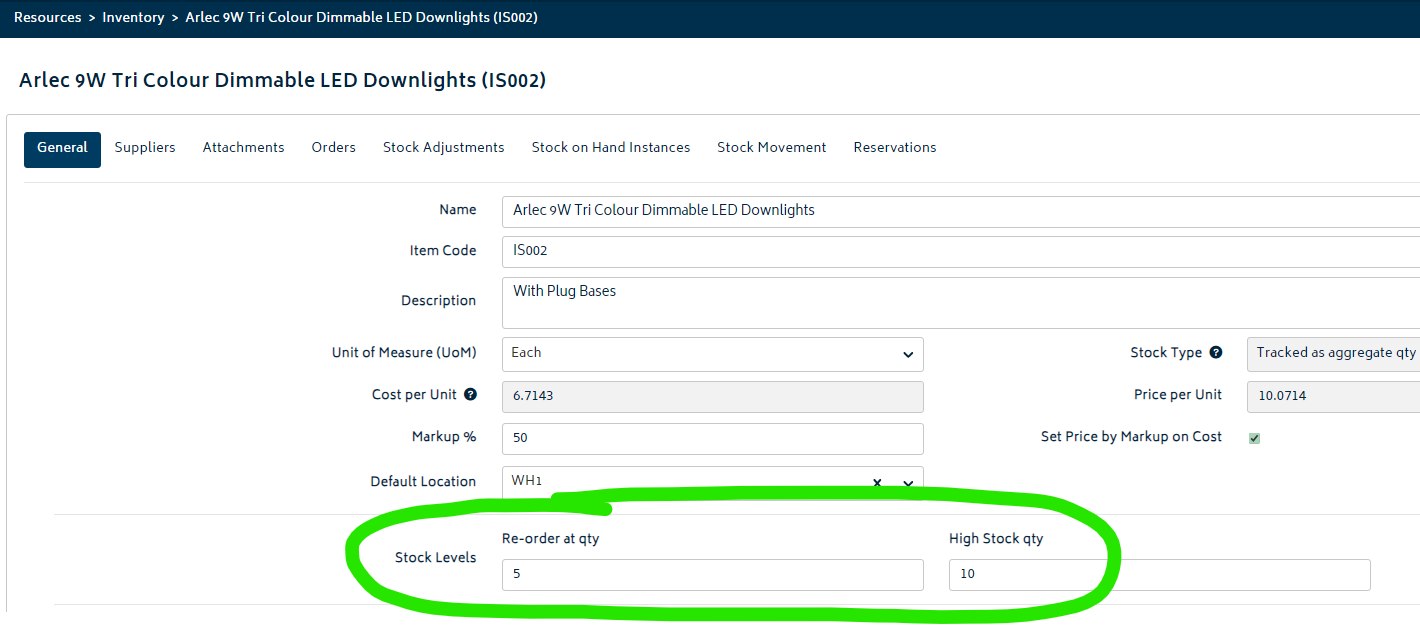
This function will only work for tracked items, it will not order untracked items, as there is no stock count for these items by design.
To create a low stock order, either choose the first option from the modal:
Or choose the "Re-order Low Stock" option on the inventory list page:
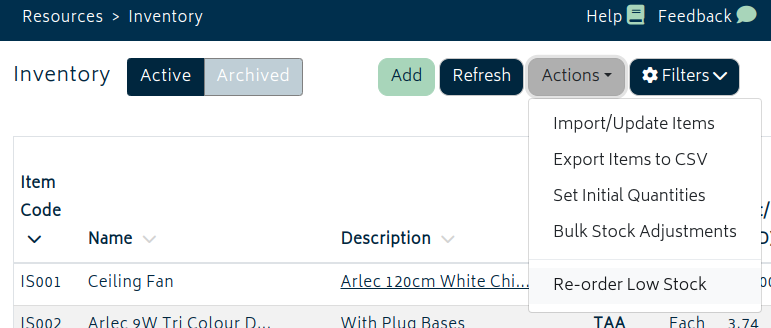
You'll be navigated to the create purchase order page:
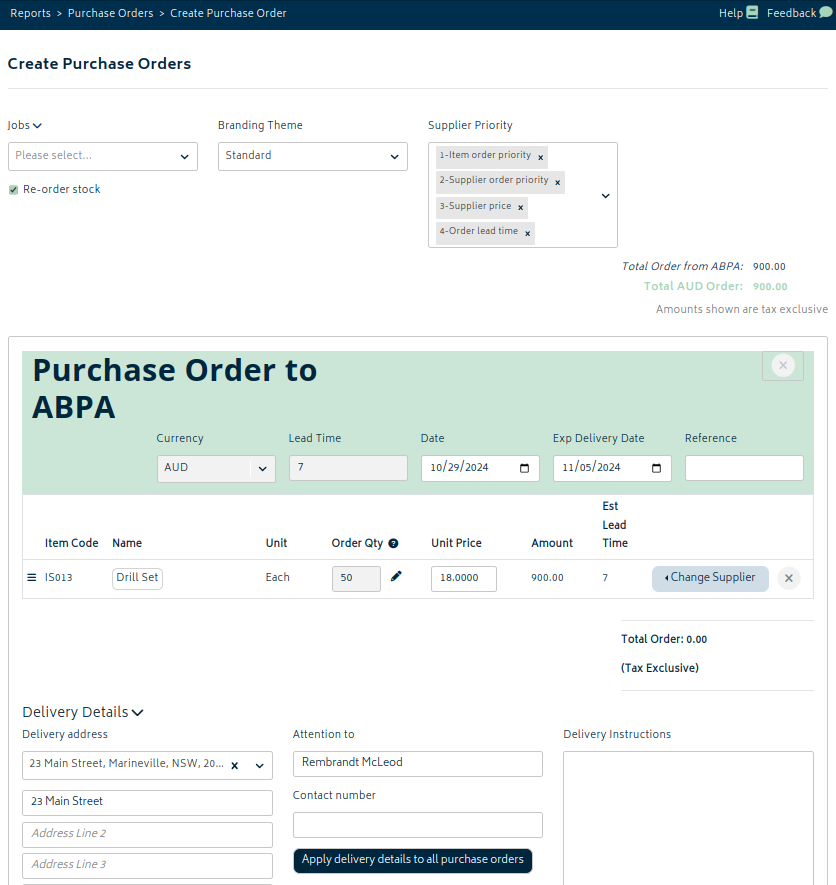
This page will show a list of all the items where:
- The item has a stock on hand quantity that is less than the item's "Re-order at" quantity
- No open purchase order exists for stock for these items which would put the stock level above the "Re-order at" quantity when received.
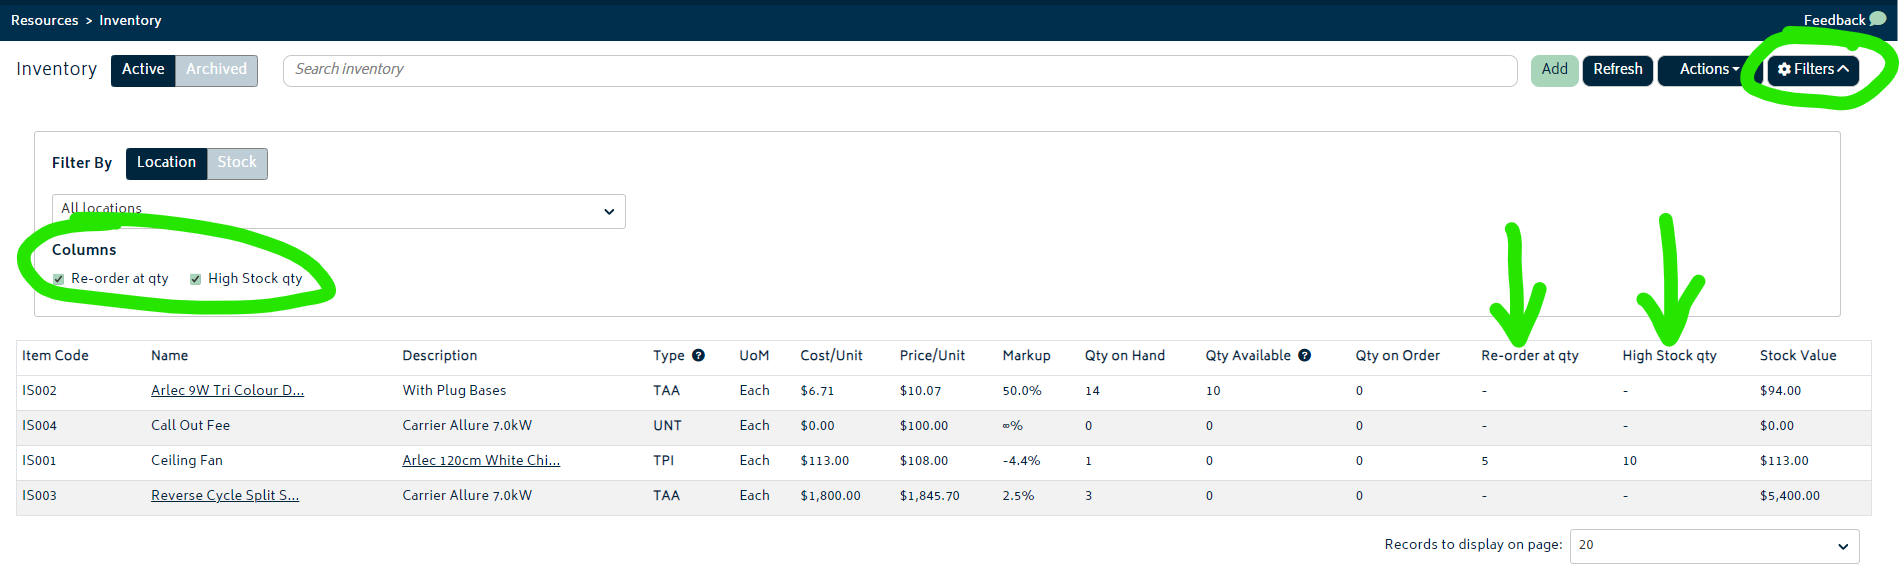
Tip: from the inventory list page, you get a view to see the status of your items. Use the filters as indicated in the image below to show the stock order levels, stock on hand, and on order levels. Low stock re-orders will use this information when deciding which items require ordering.
Ordering any Stock Item
To order any item from your inventory list, you can simply use any method to generate a purchase order and remove unwanted items from the order by clicking on one of the (x) icons shown in the image below:
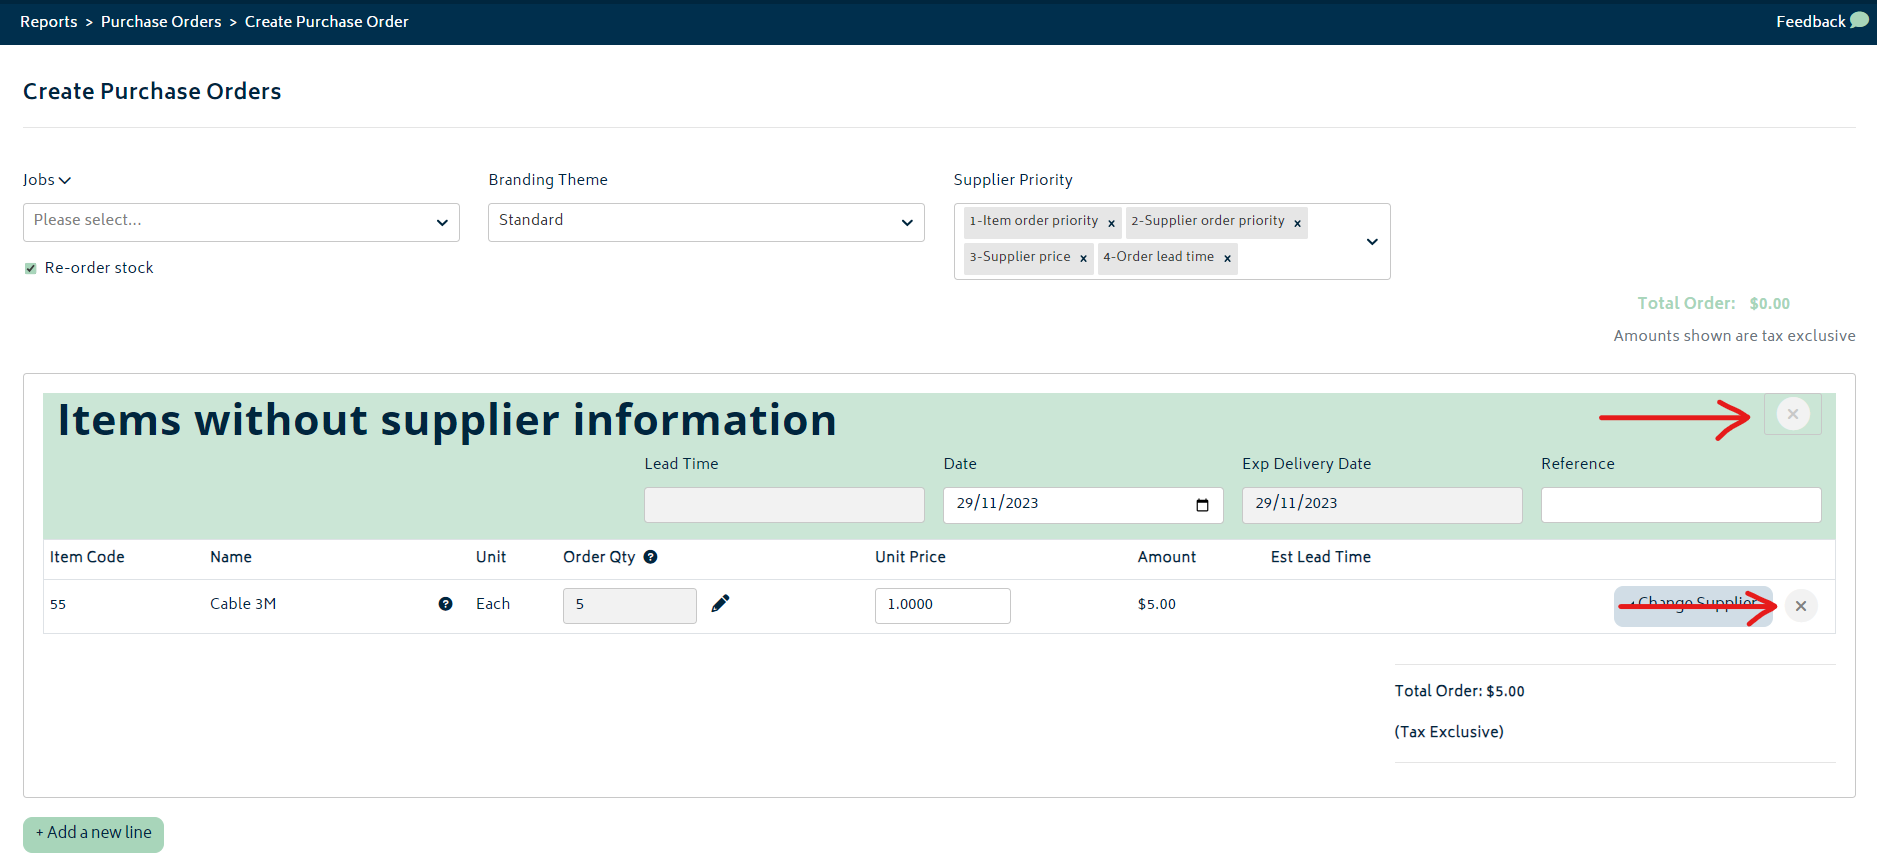
To add a new item that isn't shown by default on the purchase order, simply click on the "+ add new line" button as indicated in the image below:
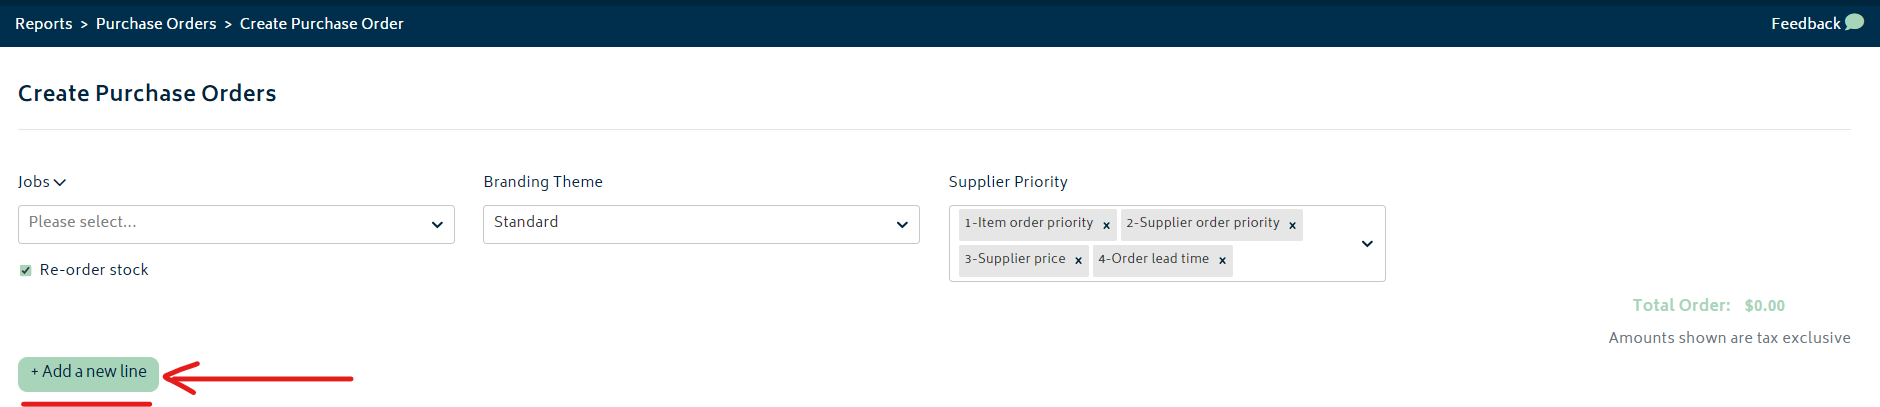
After clicking the add new line button, you will be presented with a modal to choose the inventory item you'd like to order. Use the search bar at the top right of the modal and choose the item you'd like to add. Then hit the "Add" button at the bottom right of the modal.
- Once you have added the item, you can now enter the qty you would like to order. Simply click on the pencil icon next to the "Order Qty" field, and add the order quantity into the field as shown below. Be sure to hit "Save" before moving your mouse away from the modal.
- Note that once you click the field, you can use the Tab key on your keyboard to cycle through the fields and hit Save with enter for efficiency.
-
- You can repeat this process to add more items as required. Once you're ready to raise the order, simply complete the delivery details and any other necessary fields (as explained in the section above), then click on the Create Purchase order button at the bottom left of the page to create the purchase order(s).
Job Stock Orders
Prerequisite: Before you can create a purchase order for a job, you will need to have added an inventory item or single-use item onto the job BOM page. Refer to the BOM section for more information.
This function will add items to the purchase order that are required for the job(s).
Note: when the items are loaded for this order type, the system will firstly check if existing stock items have been reserved for the job. The system will order the difference between the quantity required for the job(s) and the stock that's already reserved for the job(s).
The suggested workflow for ordering for jobs is as follows:
- Add the required quantities onto the job BOM page(s).
- Reserve the stock available for the jobs.
- Run the job stock function to order the remaining requirements for the job.
To get started, click on the dropdown from option 2 and select one or more jobs from the list (refer to the section at the top of this page for how to navigate to this modal):
- You will be presented with the create purchase order screen. This is the same page as detailed in the sections above, and has exactly the same functionality. The main difference with a job order is that there will be a list of jobs in the jobs section at the top left of the page:
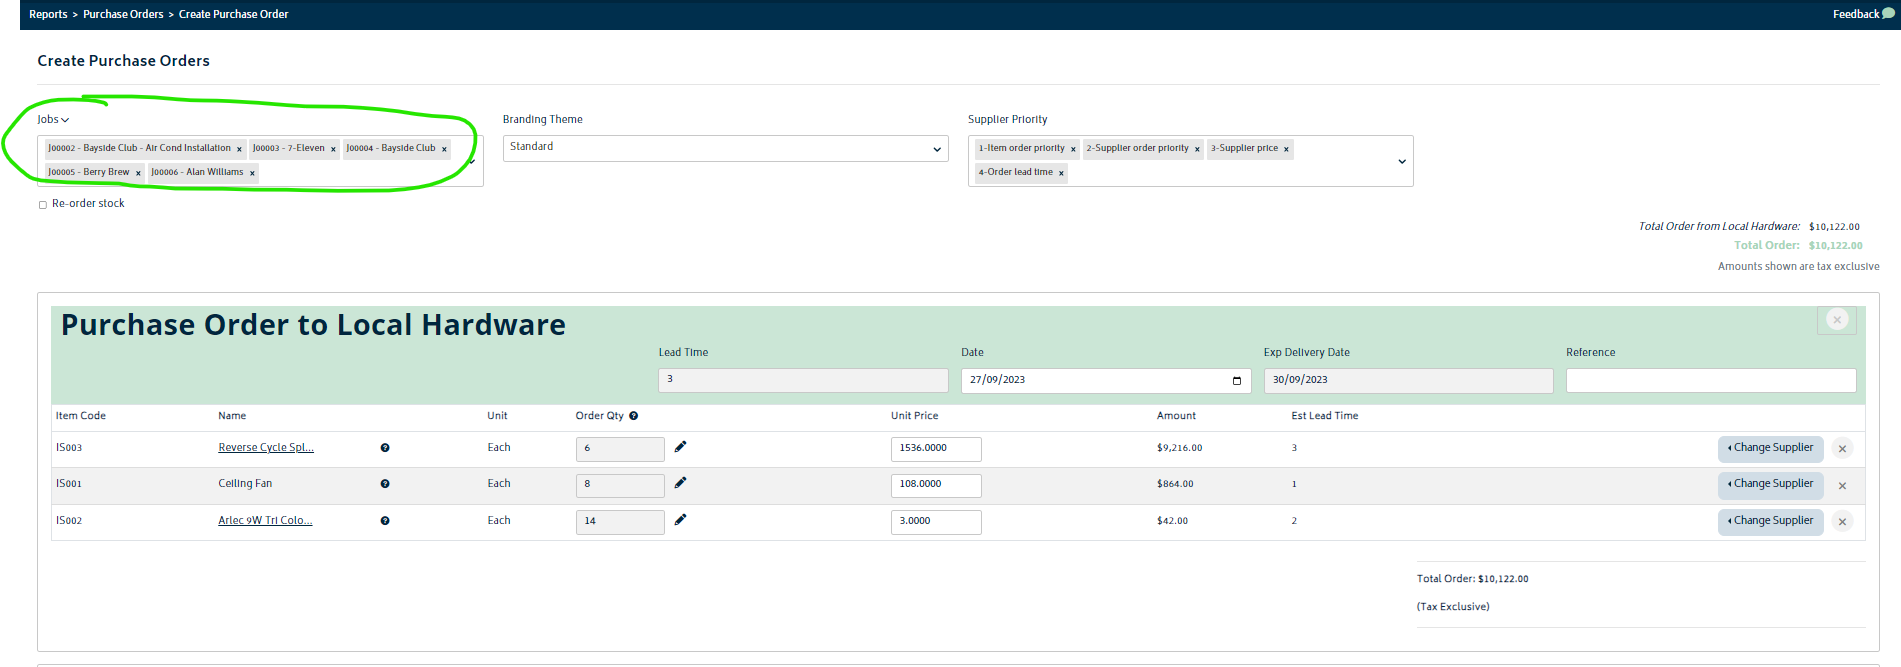
Note: from the job field at the top of the page, you can make changes to the requirements for the order by adding or removing jobs from the list and the order will be updated as you go.
- With the exception of the job list field itself, the main difference between a job order and a stock order is simply what goes into the "Order Qty" field on each line of the order. An example is provided below, which is presented when hovering over the pencil icon next to the Order Qty field:
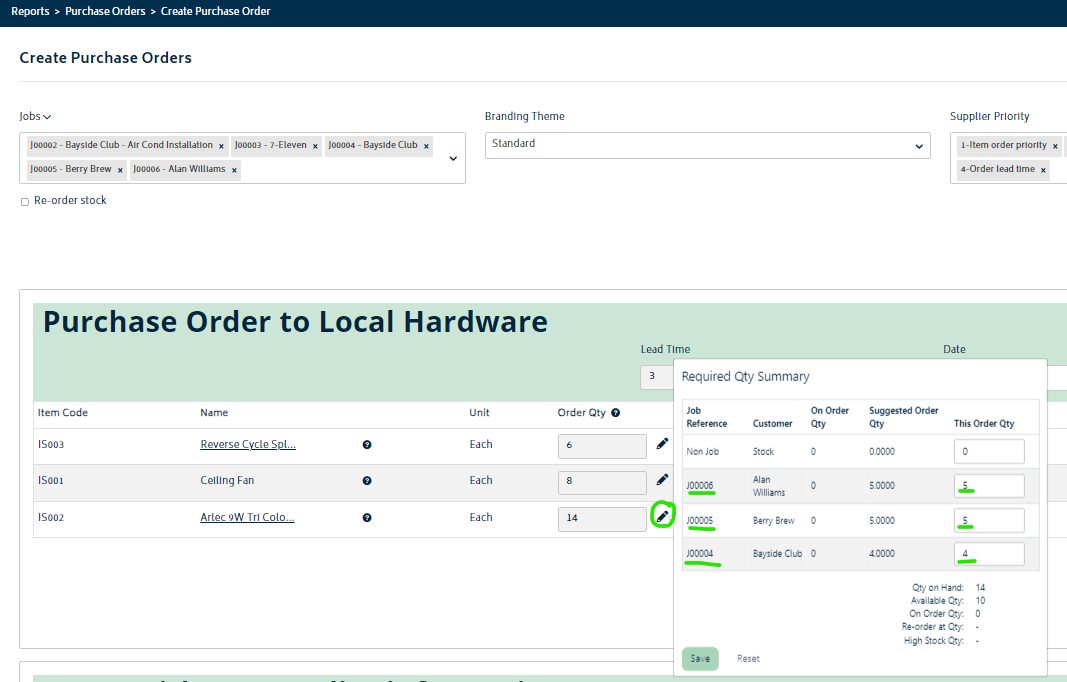
- As can be seen in the order above, the item "IS002, Arlec 9W ... ", is being ordered to meet the requirements of three different jobs. You can see the quantity being ordered for each job in the list, and you can modify each of those lines to change the order.
You can then follow the same instructions as listed above to complete the order.
Combined Stock and Job Order
If you'd like to create purchase orders which fulfil the requirements of low stock re-order, and job requirements, all in one, this is also possible in Gojee.
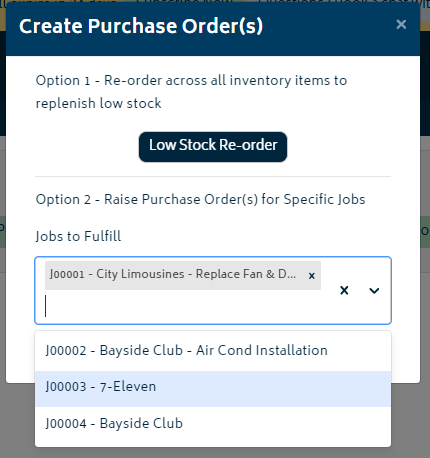
- To get started, select the job option 2, and select one or more jobs from the list:
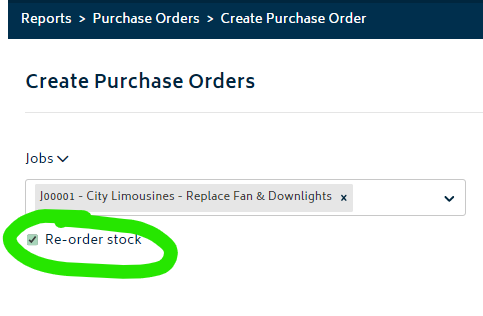
- You'll be navigated to the create purchase order page. Select the option at the top left of the page to "Re-order Stock"
- The create purchase order screen is now the same page as detailed in the low stock re-order section above, and has exactly the same functionality. The difference in this use case is that the requirements for the purchase order will now combine the requirements for stock and the jobs selected:
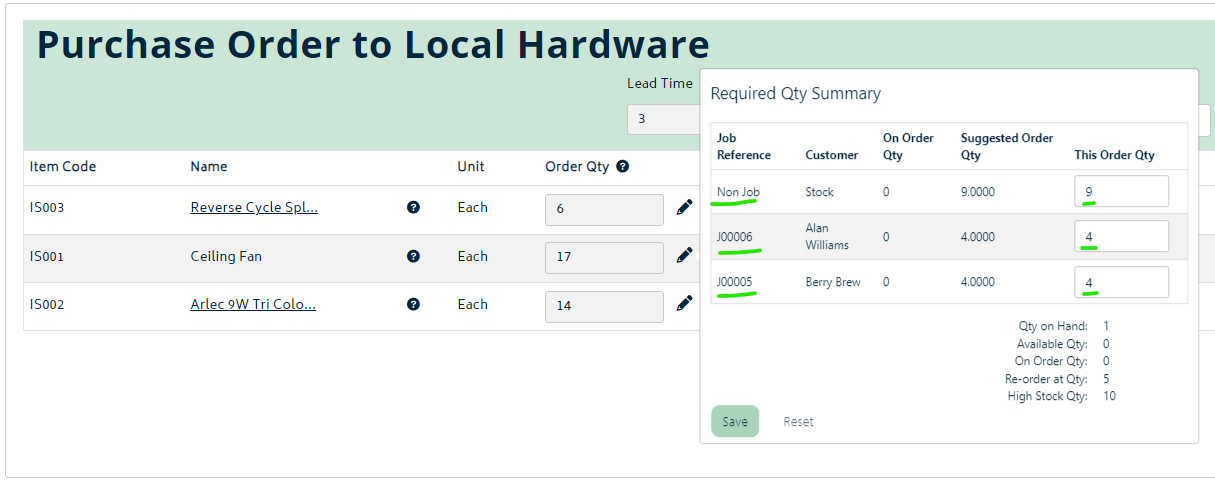
As can be seen in the image above, this order is going to combine the requirements for stock and two jobs all in the one for the item ceiling fan. You can then follow the same instructions as listed above in the sections above for Low Stock Re-order and Job Stock Orders and complete the order.