

View, Edit and Email Purchase Orders
View All Purchase Orders
To view all your purchase orders in the one spot, simply navigate to the Reports > Purchase Orders page:
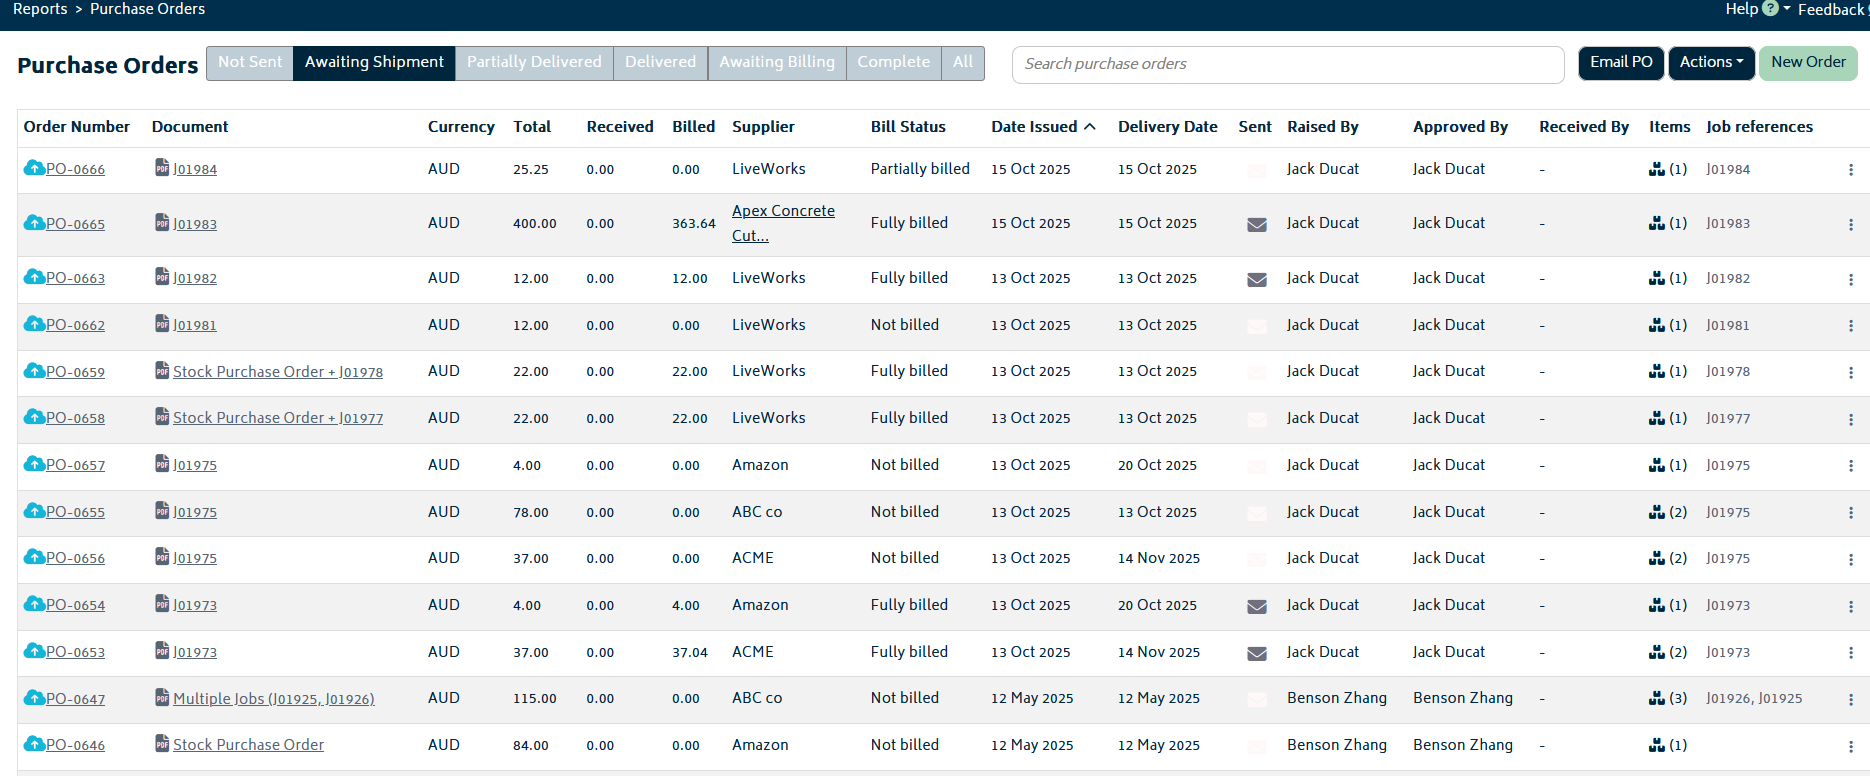
The items in the image above are described below:

Status filter: select any of these buttons to filter the purchase order list to orders with this status. i.e. if you'd like to see all the purchase orders that are yet to be emailed, click on the "Not Sent" filter.

Search: Searches for partial matches from the Xero PO, document/job reference number, supplier, and item code list.
Email PO: Click on this to email the order. See the section below for more information.
Actions: Further actions that can be taken:
- Export All POs to CSV: This will export a complete list of all your purchase orders. Note that it will not filter the list to what's shown on the screen.
- Batch Email POs: This will allow you to select multiple POs that have not yet been sent and send them all at once.
New Order: This will enable you to raise a new order. Refer to Create Purchase Orders for more information.
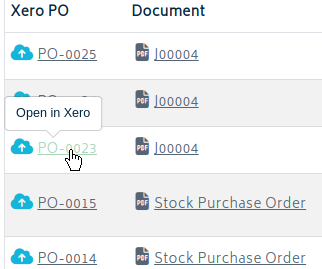
Xero PO deep link: Takes you into Xero to show you the purchase order as it is in Xero.
PO PDF link: Retrieves the PDF copy of the purchase order..
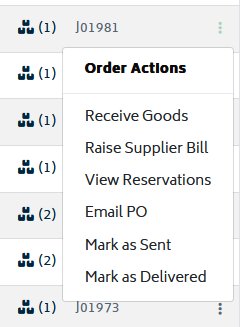
Order Actions: This button enables you to receive goods, raise supplier bills, view reservations that are linked to this PO, and send it as an email. Each of these actions are explained in the following sections. Orders can also be manually marked as sent/unsent for record-keeping purposes, or marked as delivered, clearing any outstanding reservations.
View Job Purchase Orders
You can also access purchase orders that are directly related to one job from that job's Purchasing page.
Refer to the Job Actions section on how to navigate to the job purchasing page:
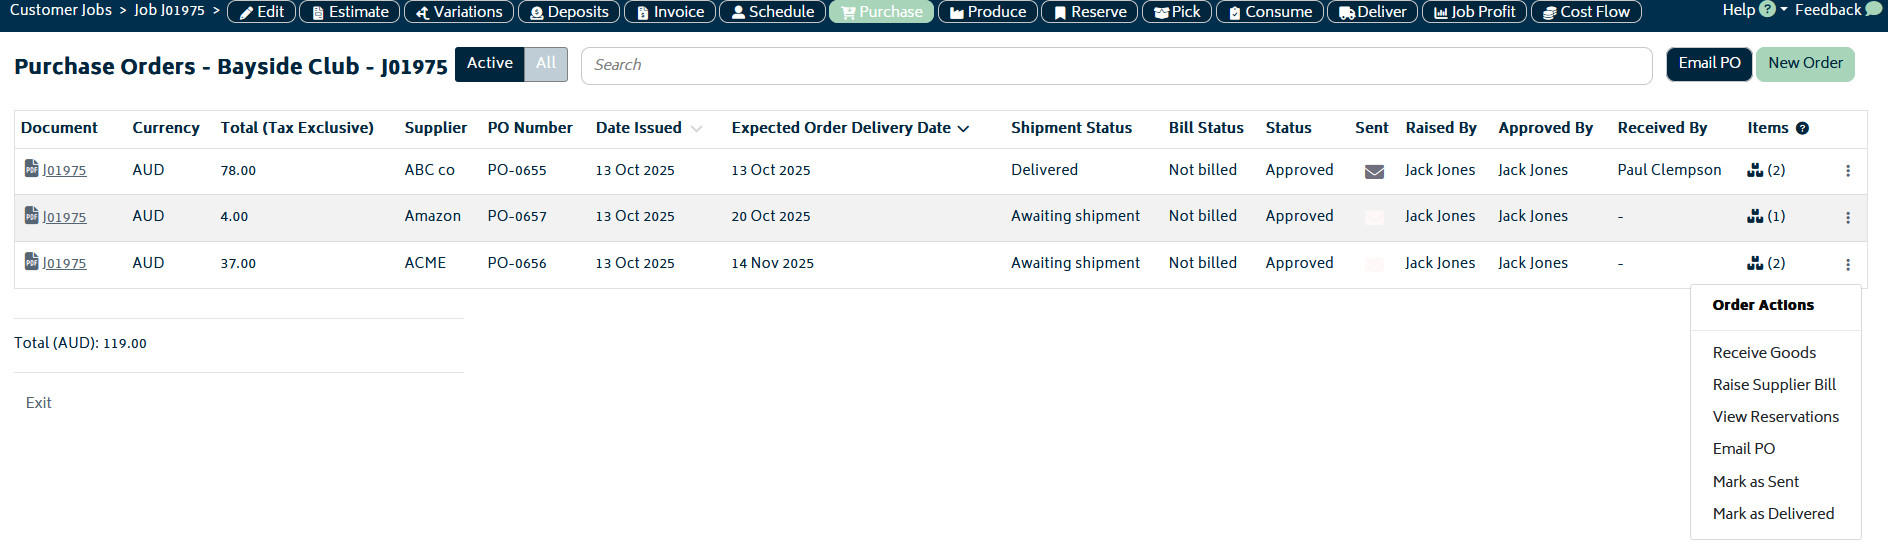
Some actions can be executed directly from this page:
- Email PO: Email a specific purchase order.
- New Order: This will load up a purchase order with the job and its required items pre-selected.
- Any of the Order Actions also available from the reports page.
Edit Purchase Orders
To edit a purchase order, simply click on the row in the list ( Reports > Purchase Orders) and it will open the order edit page.
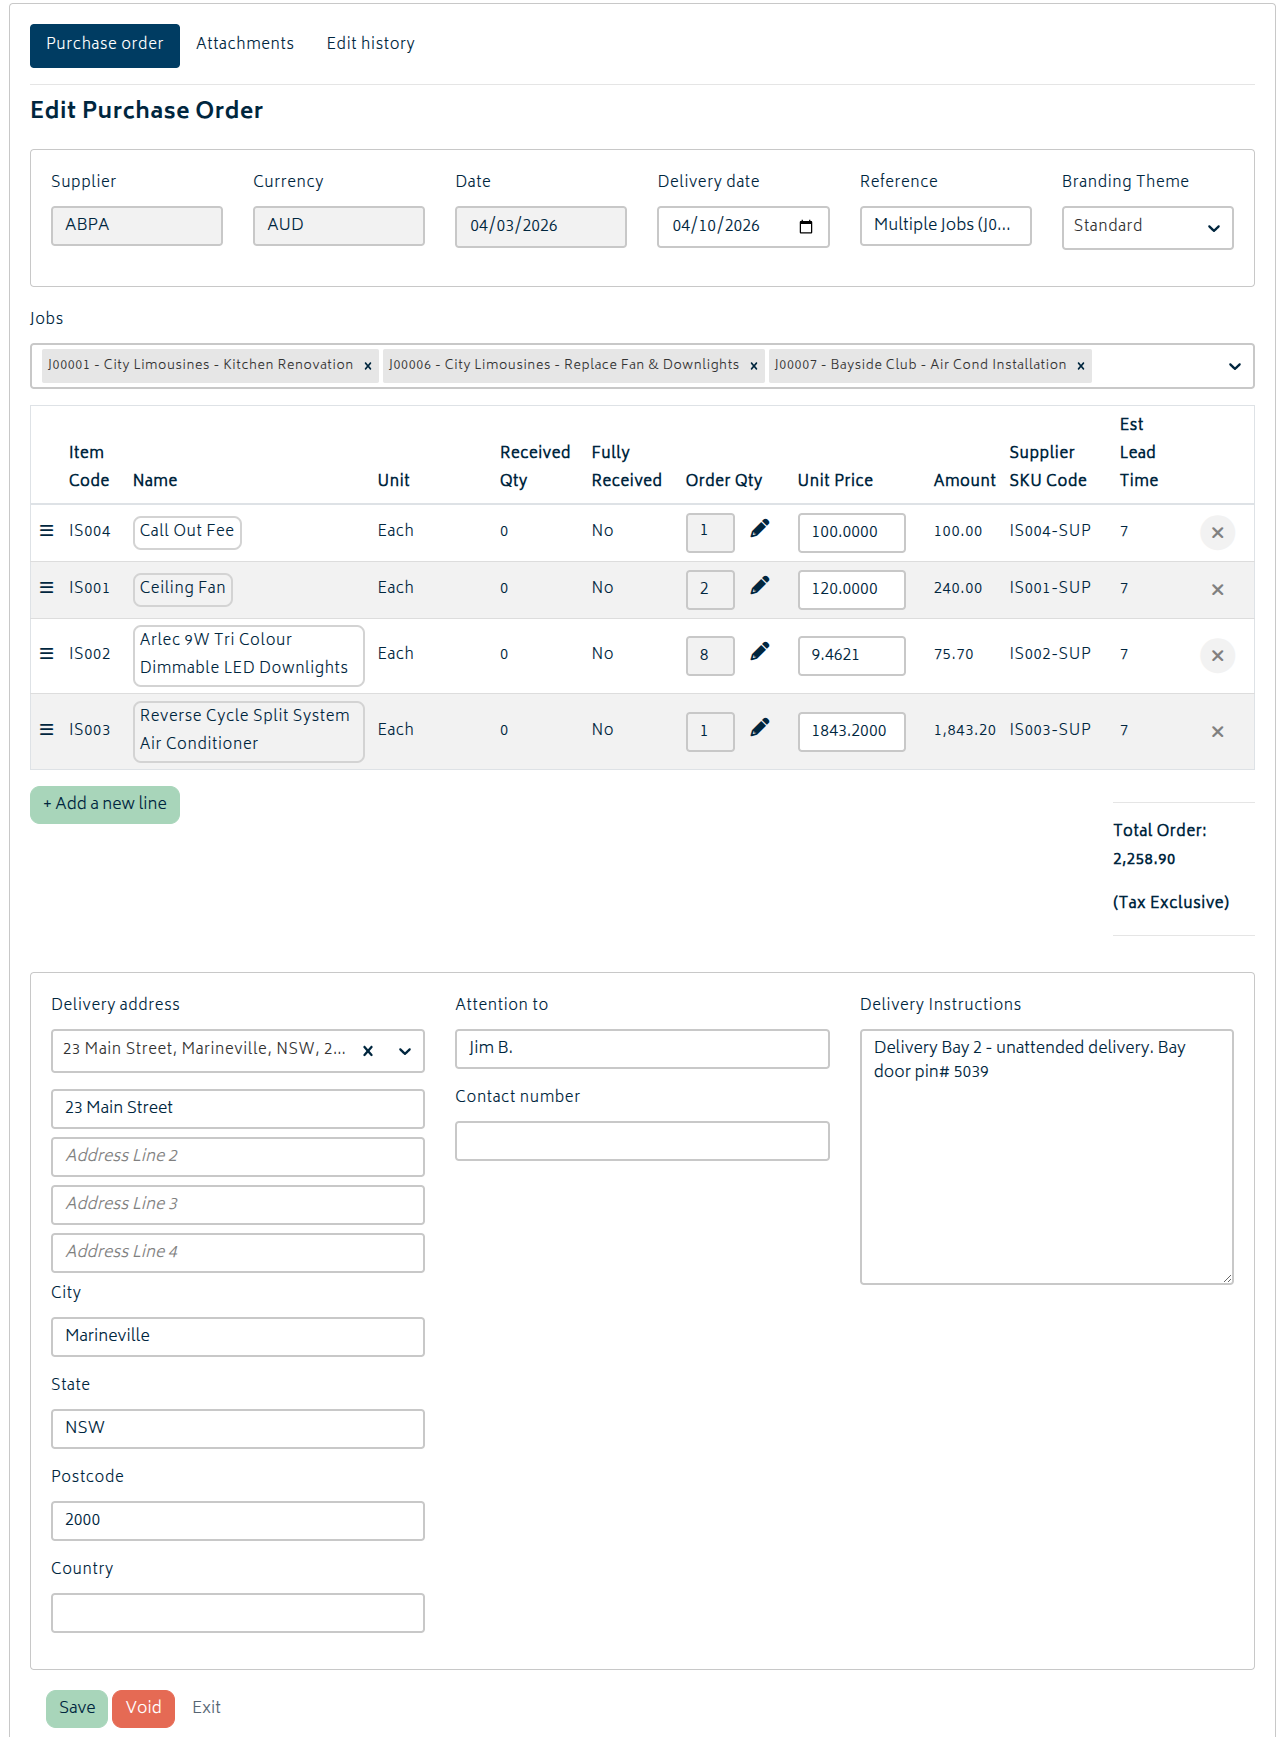
You can make the necessary changes, save and exit. The PDF for the purchase order will be regenerated with the new information and Xero will be updated. Lines can be rearranged, item descriptions edited, quantities can be updated and new reservations/jobs added to the PO, the Xero branding theme can be changed, and the delivery date/reference can be modified to suit. However, the date field, supplier, and currency are fixed upon creation of the PO and cannot be changed.
Note: if the order has already been sent, you will need to send it again if you wish to ensure the supplier has the most up to date copy of the PDF.
You can view any changes already made to the PO by opening the edit page again and clicking on the Edit History button at the top of the page. This will display the audit trail for the PO:
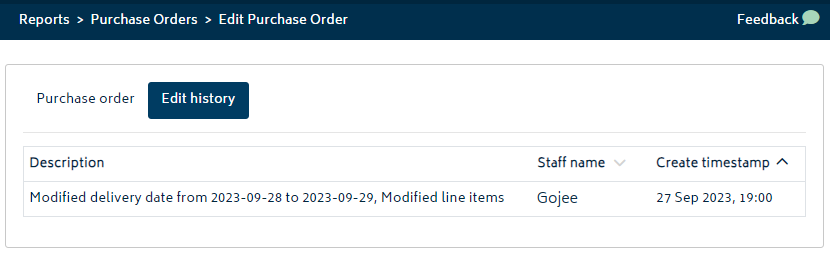
Changes made to the PO itself - edits to delivery dates, line item modifications, emailing the PO, and voiding the PO - will appear here as the audit trail. You will be able to see what changed, who enacted the change, and when it was made. However, receipt of goods and creation of supplier bills/reconciliation of supplier bills will not show here, as those are separate processes.
Note: not all fields are editable in the PO. If you need to change fields that aren't editable you have the option to void the order and start again.

By voiding an order, all the reservations against stock or jobs will be reversed. This will mean you can run and of the new order functions again and it will know that the order has been voided.
Important: For orders which have already had stock received through the Goods Receipt process, the purchase order is locked for editing and cannot be voided. If you've mistakenly received the stock, you can void the Goods Receipt first which will pull inventory out of stock to undo the transaction. Note that if the items are already consumed onto a job, they will need to be returned to stock prior to voiding the GR.
Once all GRs associated with the PO have been voided and thus the transactions reversed, the PO will be able to be edited or voided.
Email Purchase Orders
To email purchase orders to your supplier, you have several options. All can be done from the Purchase Order list.
For sending a single PO: Navigate to the Reports > Purchase Orders page and simply click on the "Email PO" button at the top of the page. Choose the PO number from the prompt and you'll be presented with the following modal:
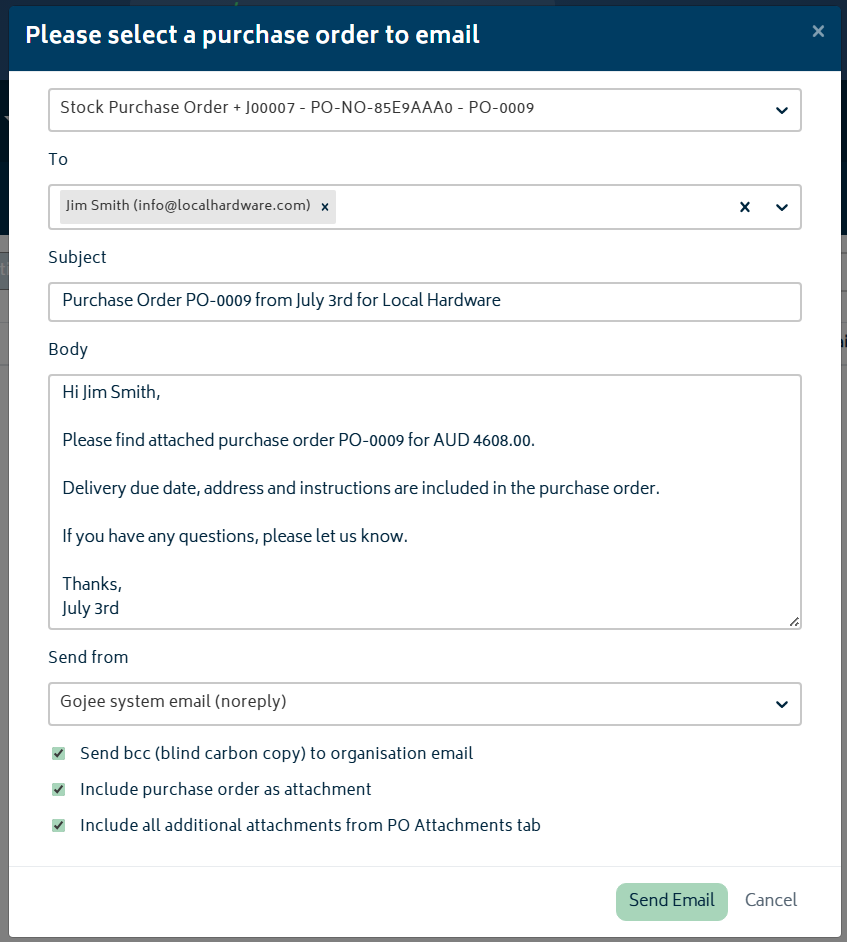
The default email for the supplier will show along with some default editable text, a subject line and options to bcc your organisation, attach the generated PDF of the order, and to include additional attachments (if any) for this PO. If organisation email settings have also been set up correctly, the "Send From" can also be chosen, dependant on the accounts that have been linked. Click Send Email and the email will be sent to the supplier.
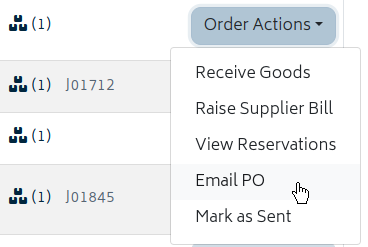
You can also use the "Email PO" action for any PO in the list, and this will provide the same modal with the chosen purchase order preselected.
Once you have emailed the Purchase Order, it will no longer show in the "Not Sent" filter, and the status of the purchase order in Xero will also be updated to be "Sent". Note that there is also the option to manually mark a PO as sent, or if sent by mistake, to mark as unsent. This is useful if you plan to send the PO PDF via your company's email and update the Gojee status to match.
For greater efficiency, you can also send multiple POs at once. The batch emailer can be accessed via the Actions button (see above) or via the "Send Purchase Orders to Suppliers" option in the Purchasing & Receiving area of the Navigation Dashboard.
When the modal is opened, you will be able to select any number of POs from a list of POs that have not been sent. These will be combined into single emails for each supplier.
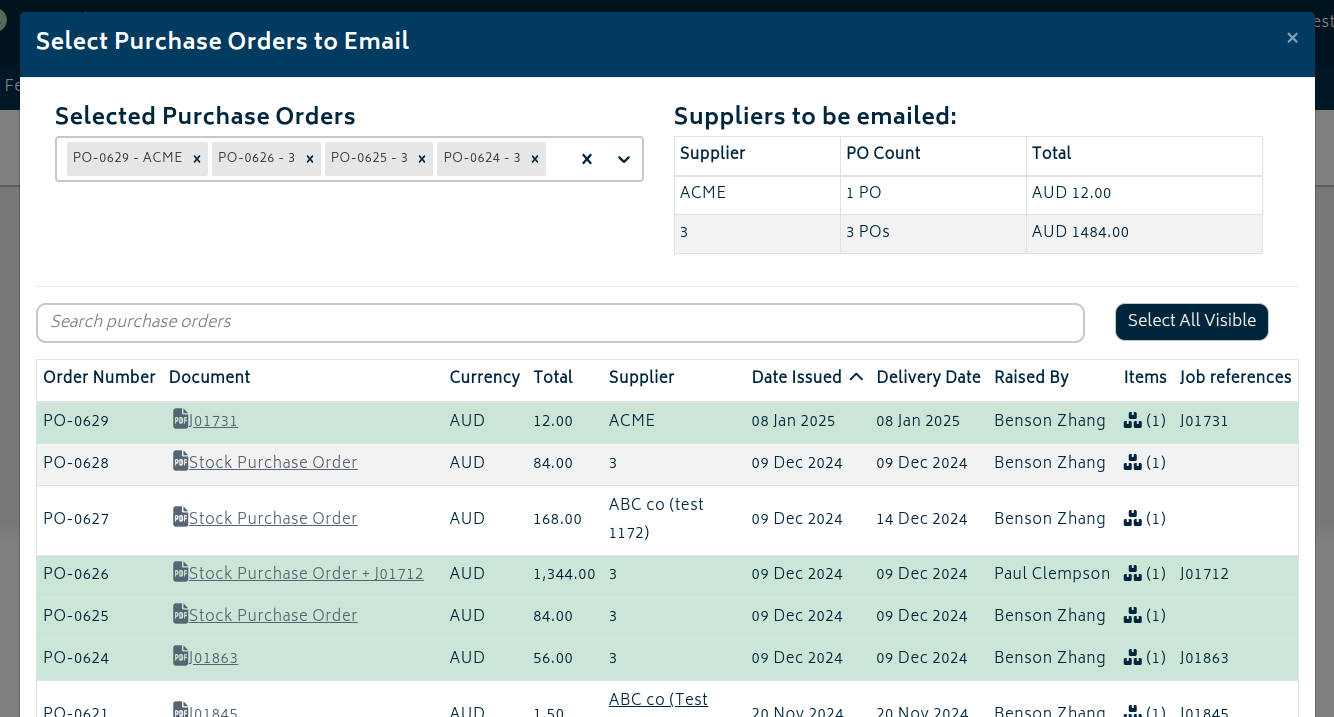
Purchase Orders can be selected by clicking them in the list, by picking them from the dropdown above, or in bulk by using the "Select All Visible" button. Choosing this option will automatically select every PO that is currently visible in the list.
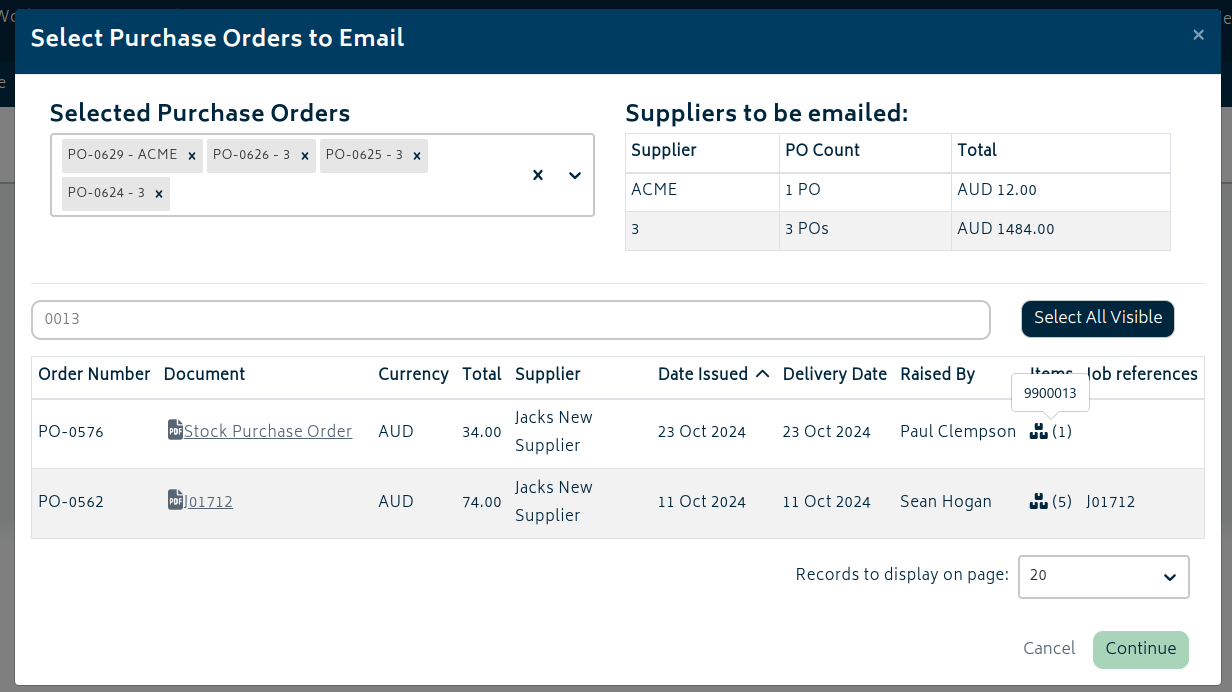
Filtering can work in tandem with this, allowing you to select all visible POs that share the search criteria - whether it be PO numbers, supplier names, or item codes - and select them all at once.
When you're done with selecting the POs you want, you can check over the contents before sending. You will have two options - send individually customised emails to suppliers, or send an identical email template to all suppliers.
Individual Emails:
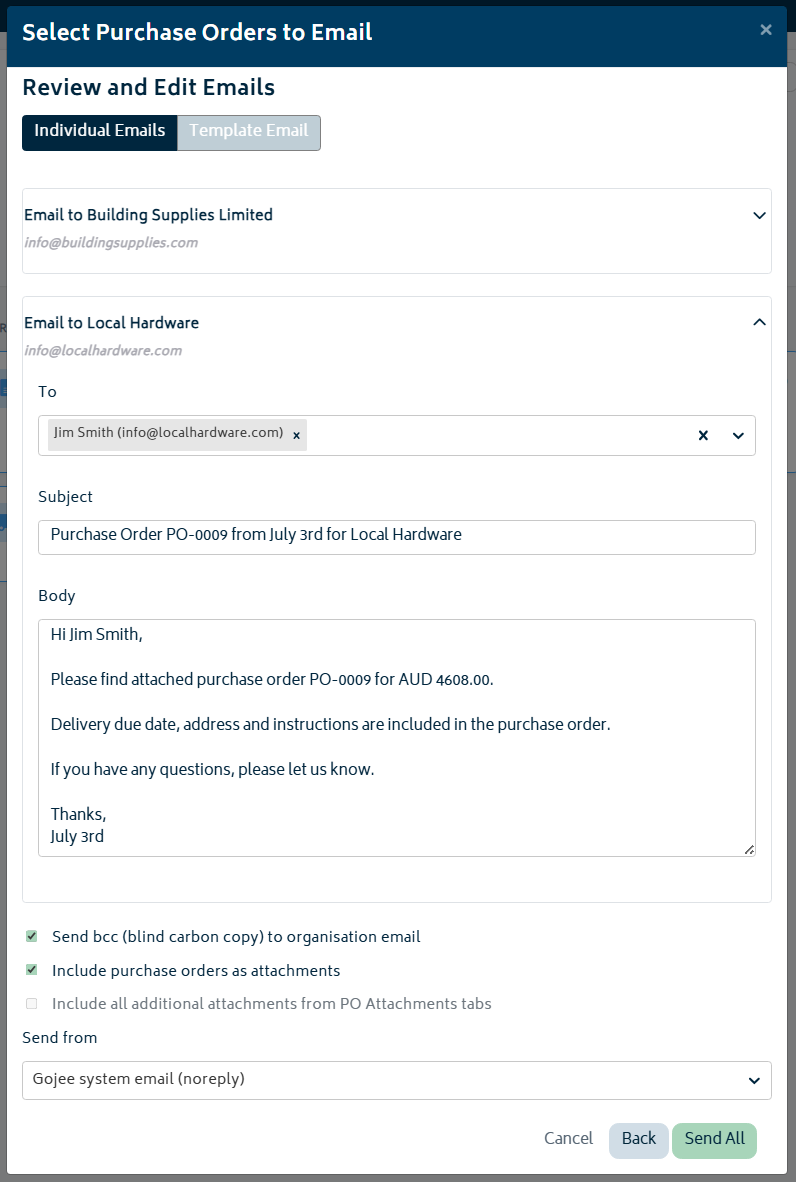
When on the Individual Emails screen, you will have options to check over and modify each email individually. For suppliers that have multiple POs, the text will be slightly different than those who only have a single PO. Note that these emails will only be sent in this state if you click "Send All" while on the "Individual Emails" tab.
Template Emails:
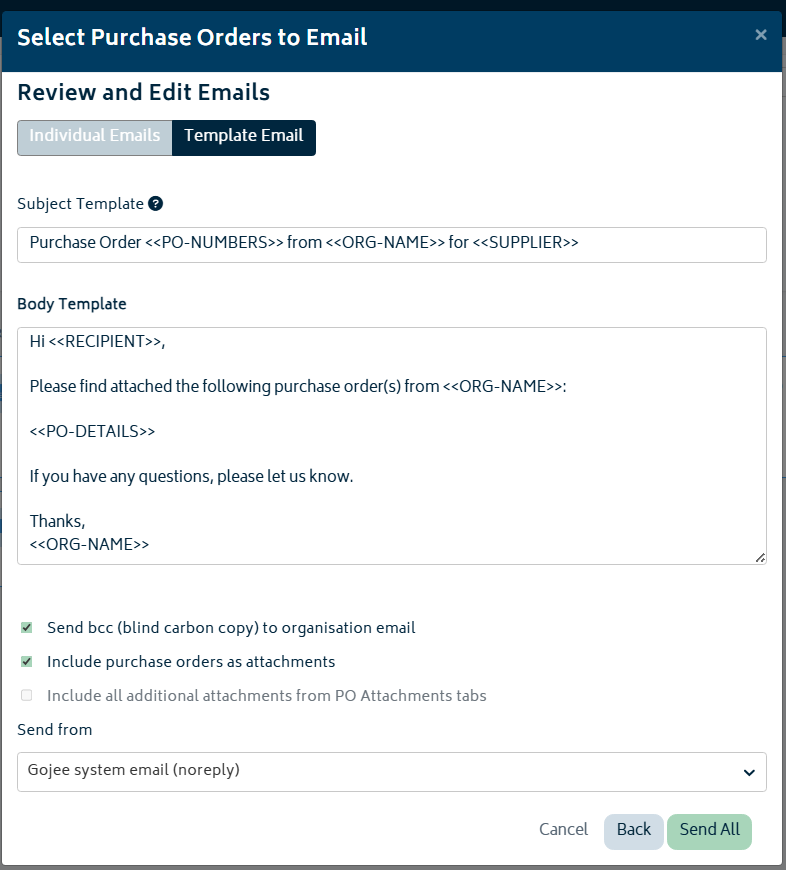
When sending template emails, specific keywords will be replaced with the relevant information for the email. The following information is also available when hovering over the (?) next to the Subject Template heading:
Available Template Variables:
- <<SUPPLIER>> - Supplier name
- <<PO-DETAILS>> - List of all purchase orders with their totals
- <<PO-NUMBERS>> - All PO numbers combined (e.g. "PO-001, PO-002, PO-003")
- <<ALL-TOTAL>> - Combined total of all POs with currency
- <<RECIPIENT>> - Primary contact person's name
- <<ORG-NAME>> - Your organization name
If you want to specify the placement of these individually in the email, you can use:
- <<PO-NUMBER>> - Purchase order number of first PO only
- <<TOTAL>> - Total amount (first PO if multiple)
- <<CURRENCY>> - Currency code
Note that the PO-Number and Total keywords will only pull information from the first PO in the list for that supplier. If you are sending multiple POs to any of your suppliers, it would be best to use the other variables instead.
When you are done modifying your template or your individual emails, click "Send All" and all POs will be sent to your suppliers.
Note that for batch emails, additional attachments are disabled. Please send and review emails with additional attachments individually.
Next: Receive Goods.